Quantcast
Channel: normalian blog
Viewing all 237 articles
Browse latest View live

Setup tips for SQL DB auto export PowerShell scripts

$
0
0

SQL Database offered to backup SQL Database instances with their build-in features, but it was expired now. You can choose below options.

In this post, I will introduce setup tips for the scripts. Please read README of "Automate export PowerShell script with Azure Automation" to setup this script at first.

Add SQL DB instances into single script

You can add other databases to add them into “$databaseServerPairs” in below code.

And please use other credentials if you use other SQL Database servers.

Export error when SQL DB instances so large

Please read this section when you get below error.
f:id:waritohutsu:20180218102309p:plain

The error message is caused by below line.
- https://github.com/Microsoft/sql-server-samples/blob/master/samples/manage/azure-automation-automated-export/AutoExport.ps1#L115

The error is caused by below, so it seems to take too long time to copy DB data.

  if((-not $? -and $global:retryLimit -ile $dbObj.RetryCount) -or ($currentTime - $dbObj.OperationStartTime).TotalMinutes -gt $global:waitInMinutes)

Please change variable “$waitInMinutes = 30;” from 30 minutes to long time.

In order to execute the runbook do I need to have the automation account to have the ability to “Run As account”?

“Azure Run As account” is needed, because we can't execute Runbook scripts without this. It needs to enable Azure Active Directory to register applications.
https://docs.microsoft.com/en-us/azure/automation/automation-create-aduser-account#create-an-automation-account-in-the-azure-portal

" 429 Too many requests" error in Runbook Job log when exporting large SQL Database instances

You will get below error when you execute long jobs.

Get-AzureSqlDatabaseImportExportStatus : A task was canceled.
At line:181 char:11
+ ...    $check = Get-AzureSqlDatabaseImportExportStatus -Request $dbObj.Ex ...
+                 ~~~~~~~~~~~~~~~~~~~~~~~~~~~~~~~~~~~~~~~~~~~~~~~~~~~~~~~~~
    + CategoryInfo          : NotSpecified: (:) [Get-AzureSqlDatabaseImportExportStatus], TaskCanceledException
    + FullyQualifiedErrorId : 
Microsoft.WindowsAzure.Commands.SqlDatabase.Database.Cmdlet.GetAzureSqlDatabaseImportExportStatus

The error is caused by frequent requests using “Get-AzureSqlDatabaseImportExportStatus”, so it need to insert “Start-Sleep” in the script to reduce Azure Management API calls internally.


How to revert new deployment to old one in Service Fabric

$
0
0

As you know, Service Fabric is one of services to achieve Microservice architecture. There are two options when you got bad deployments using Service Fabric.

  • manual deployment: "Start-ServiceFabricApplicationUpgrade"PowerShell command
  • VSTS deployment: create new Release using existing build packages

Revert with "Start-ServiceFabricApplicationUpgrade"

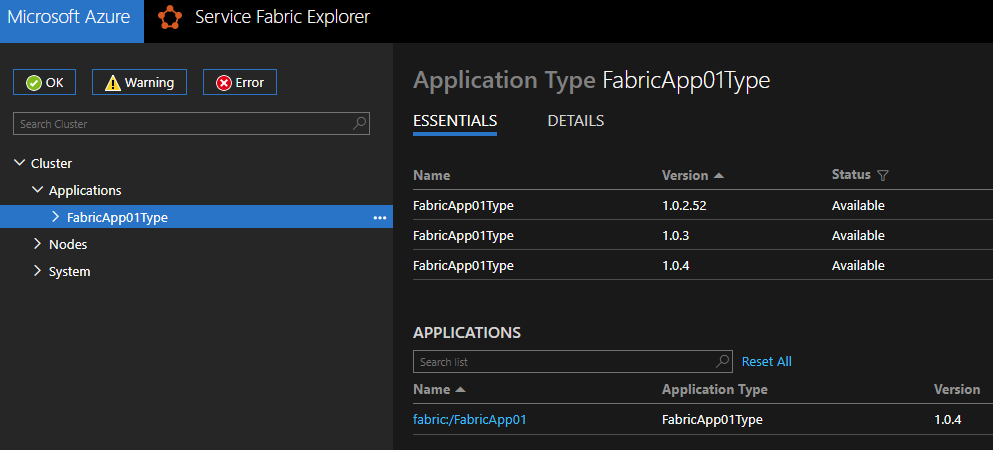
Service Fabric retains old application packages for a while like below. As far as I confirmed, it should retain at least a few hours.
f:id:waritohutsu:20180220080334p:plain

Meanwhile the retainment, you can revert from new deployment to old one with below PowerShell commands.

Login-AzureRmAccount

$applicationName = 'fabric:/FabricApp01'

$connectArgs = @{  ConnectionEndpoint = "'<your cluster name'".westus.cloudapp.azure.com:19000';  
                   X509Credential = $True;  
                   StoreLocation = "CurrentUser";  
                   StoreName = "My";  
                   ServerCommonName = "'your cluster name'.westus.cloudapp.azure.com";  
                   FindType = 'FindByThumbprint';  
                   # "Client certificates" thumbprint. Pick up this value from "security" item in your cluster on Azure Portal
                   FindValue = "YYYYYYYYYY7e3372bc1ed5cf62b435XXXXXXXXXX"; 
                   # "Cluster certificates" thumbprint.  Pick up this value from "security" item in your cluster on Azure Portal
                   ServerCertThumbprint = "YYYYYYYYYY2E67D7E54647A12B7787XXXXXXXXXX" } 
Connect-ServiceFabricCluster @connectArgs

$app = Get-ServiceFabricApplication -ApplicationName $applicationName
$app 
$table = @{}
$app.ApplicationParameters | ForEach-Object { $table.Add( $_.Name, $_.Value)}
Start-ServiceFabricApplicationUpgrade -ApplicationName $applicationName -ApplicationTypeVersion "1.0.2.52" -ApplicationParameter $table -UnmonitoredAuto

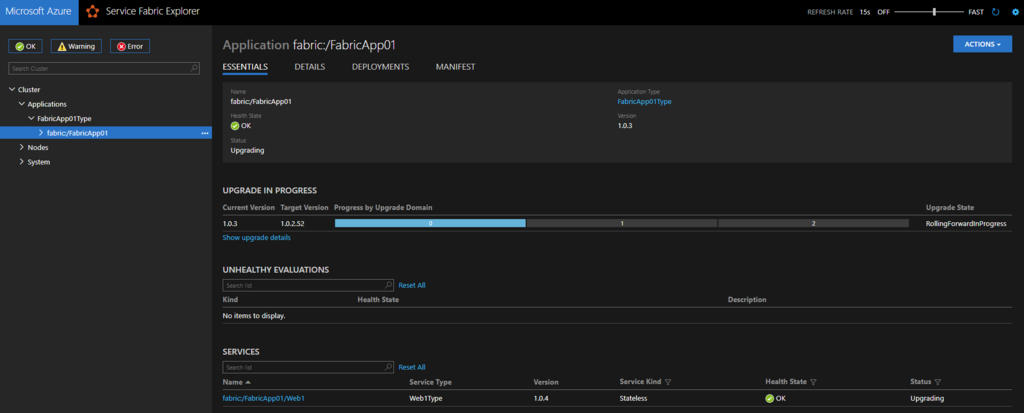
You can watch it progress in Service Fabric Explorer like below.
f:id:waritohutsu:20180220081752p:plain

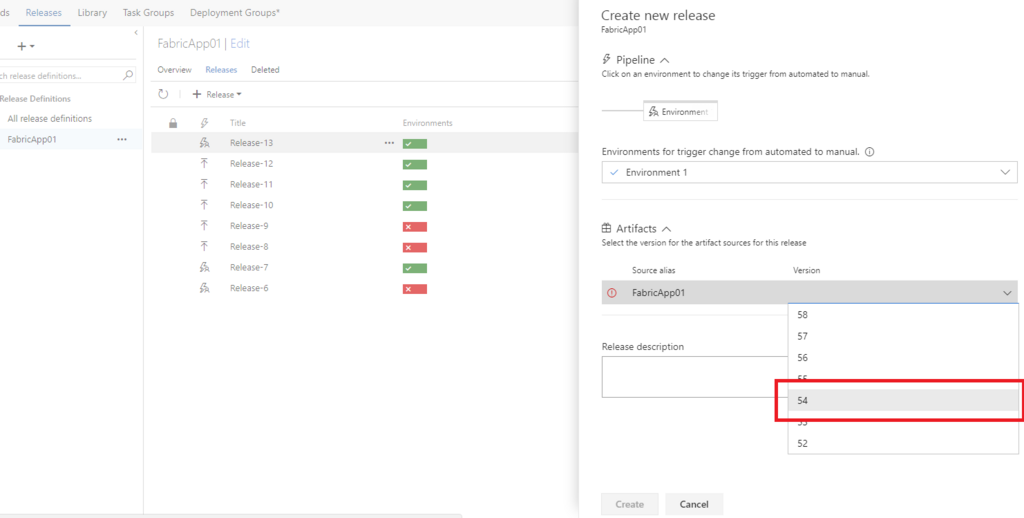
Revert with new Release using existing build packages

I believe you have already made some build packages for deployment into Service Fabric. You can create new Release in your VSTS using the packages like below.
f:id:waritohutsu:20180220081246p:plain

How to execute Microsoft Azure PowerShell commands on Azure Automation

$
0
0

As you know, Azure Automation is really great feature to automate your schedulable tasks both public cloud an on-premise. There are massive documents to describe how to do that including abstraction. I will introduce how to do that simply with screenshots.

Create your Azure Automation Account

At first, note when you create Azure Automation account. And you must create "Azure Run As account" like below, because it's mandatory to execute your Azure Automation scripts called as "Runbook". This probably need your Azure Active Directory privilege of App Registration.
f:id:waritohutsu:20180310093220p:plain

Create your Runbook

Create a Runbook used to execute your scripts. Choose "Runbook" from left side of you Azure Automation account and click "Add a runbook" like below.
f:id:waritohutsu:20180310093511p:plain
And input your Runbook name and choose "PowerShell" as your Runbook type.
f:id:waritohutsu:20180310093619p:plain

Create your scripts into your Runbook

Open your Runbook and click "Edit" to create your script. Update your script like below.

$Conn = Get-AutomationConnection -Name AzureRunAsConnection
Add-AzureRMAccount -ServicePrincipal -Tenant $Conn.TenantID -ApplicationId $Conn.ApplicationID -CertificateThumbprint $Conn.CertificateThumbprint
 
get-azurermresourcegroup | ForEach-Object { $_.ResourceGroupName }

The name of "AzureRunAsConnection" should be created in "'your Azure Automation account name'- Connections". Once again, this is mandatory to execute your script. Confirm it like below if you need.
f:id:waritohutsu:20180310095341p:plain

After updating the script, click "Test pane" to test your script. You can execute your script by clicking "Start" button, so you can take result like below.
f:id:waritohutsu:20180310095541p:plain

Now you can publish your script by clicking "Publish" button to schedule and collaborate with other Runbooks. After publishing that, confirm the status like below.
f:id:waritohutsu:20180310095747p:plain

Schedule your Runbook

Go back to top of your Azure Automation account and choose "Schedule" and click "Add a schedule" like below.
f:id:waritohutsu:20180310095922p:plain

In this example, I setup my schedule as weekly like below.
f:id:waritohutsu:20180310100022p:plain

Finally, you have to associate with your Runbook and Schedule. Go back to your Runbook, choose "Schedule" and click "Add a schedule". Associate your schedule like below.
f:id:waritohutsu:20180310100223p:plain

Now, you can execute your script based on your schedule.

How to setup simple Workflow with Azure Automation

$
0
0

You should read below article before following this article, because this article make a Azure Automation workflow collaborating Runbooks.
normalian.hatenablog.com
Azure Automation offers to collaborate with each Runbooks as Workflok, and you can setup your simple workflow with following this article!

Create your new Runbook as "PowerShell"

Create your new "PowrShell" Runbook under your Azure Automation account and edit it like below. This Runbook output your Azure resources in a location specified by a parameter.

Param
(
    [Parameter (Mandatory = $true)]
    [String] $Location = 'Japan East'
)

# Setup Authentication
$Conn = Get-AutomationConnection -Name AzureRunAsConnection
Add-AzureRMAccount -ServicePrincipal -Tenant $Conn.TenantID -ApplicationId $Conn.ApplicationID -CertificateThumbprint $Conn.CertificateThumbprint

Get-AzureRmResourceGroup -Location $Location | ForEach-Object { Write-Output $_.ResourceGroupName }

You can specify parameters with "Param" keyword like above. "PowerShell Workflow" created in next section can call "PowerShell" Runbook, so you have to create your Runbooks as "PowerShell".

Create new Runbook as "PowerShell Workflow"

You can find how to pass your parameters and how to get output with your "PowerShell" Runbook.

workflow workflow-sample
{
    Param
    (
        [Parameter (Mandatory = $true)]
        [String] $Location01 = "West US",
        [Parameter (Mandatory = $true)]
        [String] $Location02 = "West Central US"
    )

    # settings
    $automationAccountName = "mytest-automation"
    $resourceGroupName = "mytest-automation-rg"

    # Setup Authentication
    $Conn = Get-AutomationConnection -Name AzureRunAsConnection
    Add-AzureRMAccount -ServicePrincipal -Tenant $Conn.TenantID -ApplicationId $Conn.ApplicationID -CertificateThumbprint $Conn.CertificateThumbprint

    ## backup Runbook
    echo '#1 runbook starts'
    $params = @{ 'Location'=$Location01 }
    $runbookName = 'execute-azure-cmdlet'
    $job = Start-AzureRmAutomationRunbook -AutomationAccountName $automationAccountName -Name $runbookName -ResourceGroupName $resourceGroupName -Parameters $params
    $doLoop = $true
    While ($doLoop) {
        $job = Get-AzureRmAutomationJob –AutomationAccountName $automationAccountName -Id $job.JobId -ResourceGroupName $resourceGroupName
        $status = $job.Status
        if($status -eq "Failed") {
            Write-Error "Error in $runbookName"
            Write-Error $job.Exception
            throw $job.Exception
        }
        $doLoop = (($status -ne "Completed") -and ($status -ne "Suspended") -and ($status -ne "Stopped"))
        Start-Sleep -Seconds 2
    }
    echo '################# output start #################'
    $record = Get-AzureRmAutomationJobOutput –AutomationAccountName $automationAccountName -Id $job.JobId -ResourceGroupName $resourceGroupName –Stream Any | Get-AzureRmAutomationJobOutputRecord
    $record # for example
    echo '                               #################'
    $record | Where-Object { $_.Value.value -NE $null} | ForEach-Object { Write-Output $_.Value.value }
    echo '################# output end #################'
    echo '#1 runbook is ended'

    ## 
    echo '#2 runbook is starts'
    $params = @{ 'Location'=$Location02 }
    $runbookName = 'execute-azure-cmdlet'
    $job = Start-AzureRmAutomationRunbook -AutomationAccountName $automationAccountName -Name $runbookName -ResourceGroupName $resourceGroupName -Parameters $params
    $doLoop = $true
    While ($doLoop) {
        $job = Get-AzureRmAutomationJob –AutomationAccountName $automationAccountName -Id $job.JobId -ResourceGroupName $resourceGroupName
        $status = $job.Status
        if($status -eq "Failed") {
            Write-Error "Error in $runbookName"
            Write-Error $job.Exception
            throw $job.Exception
        }
        $doLoop = (($status -ne "Completed") -and ($status -ne "Suspended") -and ($status -ne "Stopped"))
        Start-Sleep -Seconds 2
    }
    echo '################# output start #################'
    $record = Get-AzureRmAutomationJobOutput –AutomationAccountName $automationAccountName -Id $job.JobId -ResourceGroupName $resourceGroupName –Stream Any | Get-AzureRmAutomationJobOutputRecord
    $record | Where-Object { $_.Value.value -NE $null} | ForEach-Object { Write-Output $_.Value.value }
    echo '################# output end #################'
    echo '#2 runbook is ended'
}

Output logs with Workflow

You can execute your Workflow and find output logs like below.

PSComputerName        : localhost
PSSourceJobInstanceId : 256fbcbd-f339-4ce5-b75b-0dc973dd0f2a
Environments          : {AzureCloud, AzureChinaCloud, AzureUSGovernment}
Context               : Microsoft.Azure.Commands.Profile.Models.PSAzureContext


#1 runbook starts

################# output start #################

PSComputerName        : localhost

PSSourceJobInstanceId : 256fbcbd-f339-4ce5-b75b-0dc973dd0f2a
Value                 : {Environments, Context}
ResourceGroupName     : mytest-automation-rg
AutomationAccountName : mytest-automation
JobId                 : eb19892d-8e2d-4572-862f-9205ca6e89fc
StreamRecordId        : eb19892d-8e2d-4572-862f-9205ca6e89fc:00636563050813081260:00000000000000000001
Time                  : 03/10/2018 18:58:01 +00:00
Summary               : 
Type                  : Output

PSComputerName        : localhost
PSSourceJobInstanceId : 256fbcbd-f339-4ce5-b75b-0dc973dd0f2a
Value                 : {value}
ResourceGroupName     : mytest-automation-rg
AutomationAccountName : mytest-automation
JobId                 : eb19892d-8e2d-4572-862f-9205ca6e89fc
StreamRecordId        : eb19892d-8e2d-4572-862f-9205ca6e89fc:00636563050827143533:00000000000000000002
Time                  : 03/10/2018 18:58:02 +00:00
Summary               : normalian-datacatalog-rg
Type                  : Output

PSComputerName        : localhost
PSSourceJobInstanceId : 256fbcbd-f339-4ce5-b75b-0dc973dd0f2a
Value                 : {value}
ResourceGroupName     : mytest-automation-rg
AutomationAccountName : mytest-automation
JobId                 : eb19892d-8e2d-4572-862f-9205ca6e89fc
StreamRecordId        : eb19892d-8e2d-4572-862f-9205ca6e89fc:00636563050827612512:00000000000000000003
Time                  : 03/10/2018 18:58:02 +00:00
Summary               : sqldb-rg
Type                  : Output

                               #################

normalian-datacatalog-rg

sqldb-rg

################# output end #################

#1 runbook is ended

#2 runbook is starts

################# output start #################

demo-automation-rg

mytest-automation-rg

################# output end #################

#2 runbook is ended

How to pass values generated on VSTS processes into other build/release tasks

$
0
0

When you deploy templates with some linked templates, the linked templates should be stored public or limited access wtih SAS token. But this sometimes makes difficult to setup CI/CD pipeline on Visual Studio Team Service(VSTS). You can understand how to setup this with this article and GitHub - normalian/ARMTemplate-SASToken-InVSTS-Sample.
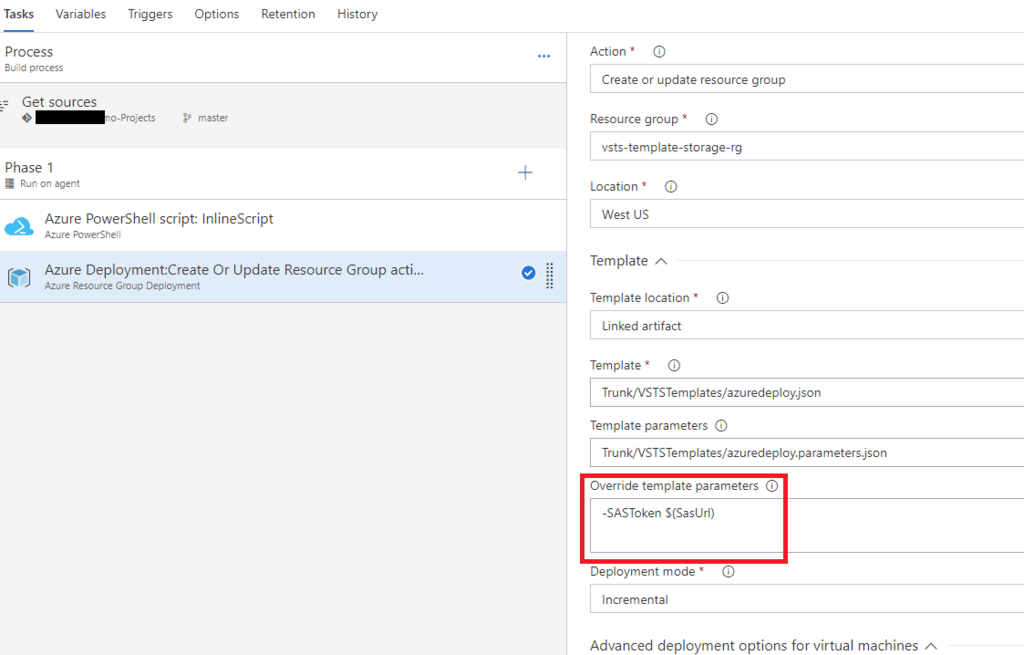
You can generate SAS token with VSTS task in build process and pass the value with VSTS variables, and you can also override ARM template parameters with VSTS tasks. This is key concepts of this article.

In VSTS Build Process

Create "Azure PowerShell script" task and "Azure Deployment: Create Or Update Resource Group Action" like below.
f:id:waritohutsu:20180311085121p:plain

Azure PowerShell script: inline Script – inline script
Edit "Azure PowerShell script" task like below.
f:id:waritohutsu:20180311085327p:plain

$context = New-AzureStorageContext -StorageAccountName 'your storage account name' -StorageAccountKey 'your storage access key'
$sasUrl = New-AzureStorageContainerSASToken -Container templates -Permission rwdl -Context $context 
Write-Output ("##vso[task.setvariable variable=SasUrl;]$sasUrl")

You can store generated values with VSTS variables like above.

Azure Resource Group Deployment - Override template parameters
Edit "Azure Deployment: Create Or Update Resource Group Action" like below.
f:id:waritohutsu:20180311085500p:plain

-SASToken $(SasUrl)

Part of ARM template

Now you can use SAS token to specify your linked templates like below. Refer this sample if you need.

"variables": {"sharedTemplateUrl": "[concat('https://'your storage account name'.blob.core.windows.net/templates/blank-azuredeploy.json', parameters('SASToken') )]",
      "sharedParametersUrl": "[concat('https://'your storage account name'.blob.core.windows.net/templates/blank-azuredeploy.parameters.json', parameters('SASToken'))]"
    },

What is workaround when your got error messages "There was an error during download.Failed" while downloading container images

$
0
0

As you know, Service Fabric is one of implementations to offer Microservice Architecture provided by Microsoft. Of course, it can be deployed Docker Images both Windows and Linux base, but you should note "Operating System" of Service Fabric cluster to match with Docker images when you want to deploy Docker images. There might be some reasons like below when you got error messages "There was an error during download.Failed" like below.
f:id:waritohutsu:20180317111137p:plain

It's caused by some reasons and it should be one of below.

  1. URL of your Docker image is invalid
  2. The authentication info of your Docker repository account is invalid
  3. There is virtualization mechanism mismatch between base OS of Docker images and operating system version of your Service Fabric cluster

No.1 and No.2 are trivial and not so difficult to fix it, but it's not easy to clarify when you got the message caused by No.3. In this article, I will dig into cause of No.3.

Docker container base images need to match the version of the host its running on. Unfortunately Windows made a breaking change where container images are not compatible across hosts like below article.
docs.microsoft.com
You need to specify your Service Fabric cluster "Operating System" based on your Docker image base OS like below image.
f:id:waritohutsu:20180317110812p:plain

  • You must specify "WindowsServer 2016-Datacenter-with-Containers" as Service Fabric cluster Operation System if your base OS is "Windows Server 2016"
  • You must specify "WindowsServerSemiAnnual Datacenter-Core-1709-with-Containers" as Service Fabric cluster Operation System if your base OS is "Windows Server version 1709"

Example to match OS Versions

It's important to match your Service Fabric cluster "Operating System" and base OS version specified in Dockerfile "FROM" keyword. And I put ServiceManifest and ApplicationManifest.xml just in case.

Example - part of Dockerfile

# This base OS for "WindowsServer 2016-Datacenter-with-Containers"
#FROM microsoft/aspnetcore-build:2.0.5-2.1.4-nanoserver-sac2016 AS base
# This base OS for "WindowsServerSemiAnnual Datacenter-Core-1709-with-Containers"
FROM microsoft/aspnetcore:2.0-nanoserver-1709 AS base
WORKDIR /app
EXPOSE 80

# This base OS for "WindowsServer 2016-Datacenter-with-Containers"
#FROM microsoft/aspnetcore-build:2.0.5-2.1.4-nanoserver-sac2016 AS build
# This base OS for "WindowsServerSemiAnnual Datacenter-Core-1709-with-Containers"
FROM microsoft/aspnetcore-build:2.0-nanoserver-1709 AS build
WORKDIR /src
COPY *.sln ./
COPY NetCoreWebApp/NetCoreWebApp.csproj NetCoreWebApp/
RUN dotnet restore
COPY . .
WORKDIR /src/NetCoreWebApp
RUN dotnet build -c Release -o /app

FROM build AS publish
RUN dotnet publish -c Release -o /app

FROM base AS final
WORKDIR /app
COPY --from=publish /app .
ENTRYPOINT ["dotnet", "NetCoreWebApp.dll"]


Example - part of ApplicationManifest.xml

<ServiceManifestImport><ServiceManifestRef ServiceManifestName="GuestContainer1Pkg"ServiceManifestVersion="1.0.0" /><ConfigOverrides /><Policies><ContainerHostPolicies CodePackageRef="Code"><RepositoryCredentials AccountName="Username of your Container registry"Password="password of your Container registry"PasswordEncrypted="false"/><PortBinding ContainerPort="80"EndpointRef="GuestContainer1TypeEndpoint"/></ContainerHostPolicies></Policies></ServiceManifestImport>

Example - part of ServiceManifest.xml

<EntryPoint><!-- Follow this link for more information about deploying Windows containers to Service Fabric: https://aka.ms/sfguestcontainers --><ContainerHost><ImageName>"Username of your Container registry".azurecr.io/sample/helloworldapp:latest</ImageName></ContainerHost></EntryPoint>

How to build ASP.NET Framework Docker images on VSTS build tasks

$
0
0

As you know, Visual Studio Team Services offers to build Docker image tasks and Visual Studio offers Docker support. But there are some tips when you build ASP.NET Framework Docker images with VSTS build tasks. This post shows how to setup that.

What's happened if you build ASP.NET Framework Docker images with default settings

You can choose "Add - Docker Support" like below if you have setup "Visual Studio Tools for Docker" in your machine. The tool is really useful and it will generate below Dockerfile in your ASP.NET Framework application.

FROM microsoft/aspnet:4.7.1-windowsservercore-1709
ARG source
WORKDIR /inetpub/wwwroot
COPY ${source:-obj/Docker/publish} .

Last "COPY" command line is a little bit tricky, because copy sources directory will change with ${source} variable value. The directory will be ${source} variable value if the value is set, but the directory will be obj/Docker/publish if ${source} variable isn't set.

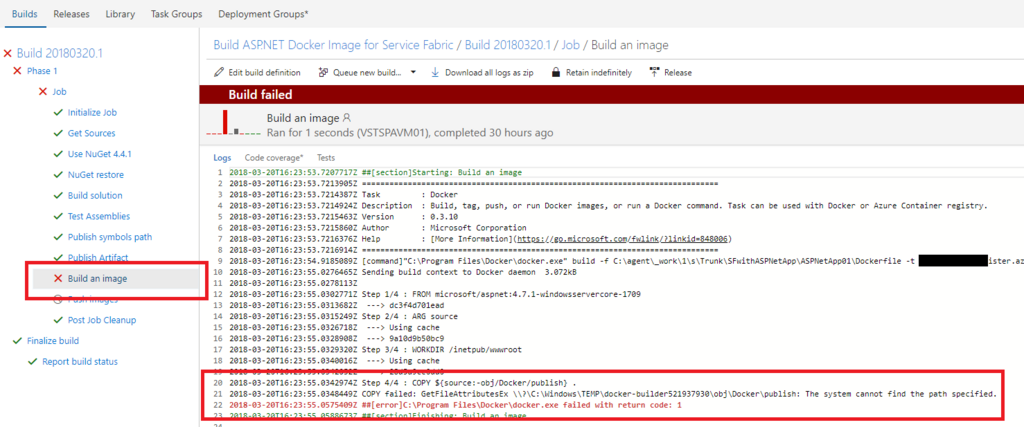
This Dockerfile should work on your machine, but it won't work on VSTS build tasks like below.

2018-03-20T16:23:53.7207717Z ##[section]Starting: Build an image
2018-03-20T16:23:53.7213905Z ==============================================================================
2018-03-20T16:23:53.7214387Z Task         : Docker
2018-03-20T16:23:53.7214924Z Description  : Build, tag, push, or run Docker images, or run a Docker command. Task can be used with Docker or Azure Container registry.
2018-03-20T16:23:53.7215463Z Version      : 0.3.10
2018-03-20T16:23:53.7215860Z Author       : Microsoft Corporation
2018-03-20T16:23:53.7216376Z Help         : [More Information](https://go.microsoft.com/fwlink/?linkid=848006)
2018-03-20T16:23:53.7216914Z ==============================================================================
2018-03-20T16:23:54.9185089Z [command]"C:\Program Files\Docker\docker.exe" build -f C:\agent\_work\1\s\Trunk\SFwithASPNetApp\ASPNetApp01\Dockerfile -t xxxxxxxxxxxxxxxxxxxister.azurecr.io/yyyyyyyyyyy-demo-projects:80 C:\agent\_work\1\s\Trunk\SFwithASPNetApp\ASPNetApp01
2018-03-20T16:23:55.0276465Z Sending build context to Docker daemon  3.072kB
2018-03-20T16:23:55.0278113Z 
2018-03-20T16:23:55.0302771Z Step 1/4 : FROM microsoft/aspnet:4.7.1-windowsservercore-1709
2018-03-20T16:23:55.0313682Z  ---> dc3f4d701ead
2018-03-20T16:23:55.0315249Z Step 2/4 : ARG source
2018-03-20T16:23:55.0326718Z  ---> Using cache
2018-03-20T16:23:55.0328908Z  ---> 9a10d9b50bc9
2018-03-20T16:23:55.0329320Z Step 3/4 : WORKDIR /inetpub/wwwroot
2018-03-20T16:23:55.0340016Z  ---> Using cache
2018-03-20T16:23:55.0342052Z  ---> 28d5a9cc0dd0
2018-03-20T16:23:55.0342974Z Step 4/4 : COPY ${source:-obj/Docker/publish} .
2018-03-20T16:23:55.0348449Z COPY failed: GetFileAttributesEx \\?\C:\Windows\TEMP\docker-builder521937930\obj\Docker\publish: The system cannot find the path specified.
2018-03-20T16:23:55.0575409Z ##[error]C:\Program Files\Docker\docker.exe failed with return code: 1
2018-03-20T16:23:55.0588673Z ##[section]Finishing: Build an image

f:id:waritohutsu:20180322072636p:plain

What is workaround of the issue?

You need to setup both Visual Studio and VSTS in this case. Please follow below steps .

Setup in your ASP.NET Framework project
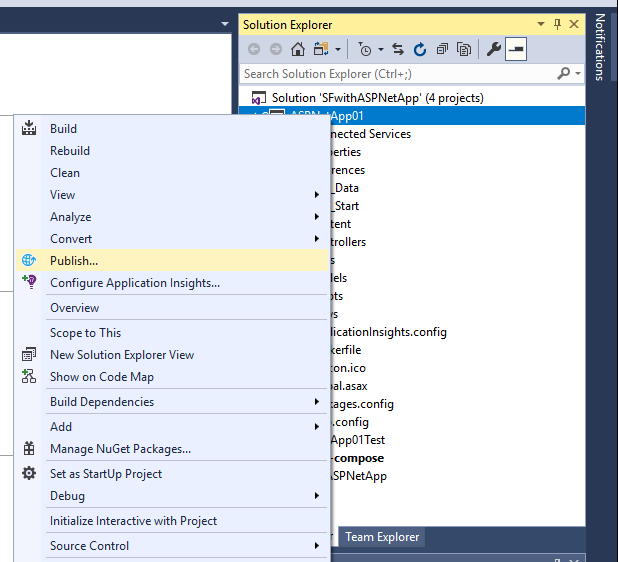
At first you need to setup new pubxml file in your ASP.NET Framework project to ensure output binaries into "obj\Docker\publish" directory, so choose "Publish" from right click menu of your ASP.NET Framework project like below.
f:id:waritohutsu:20180322065235p:plain

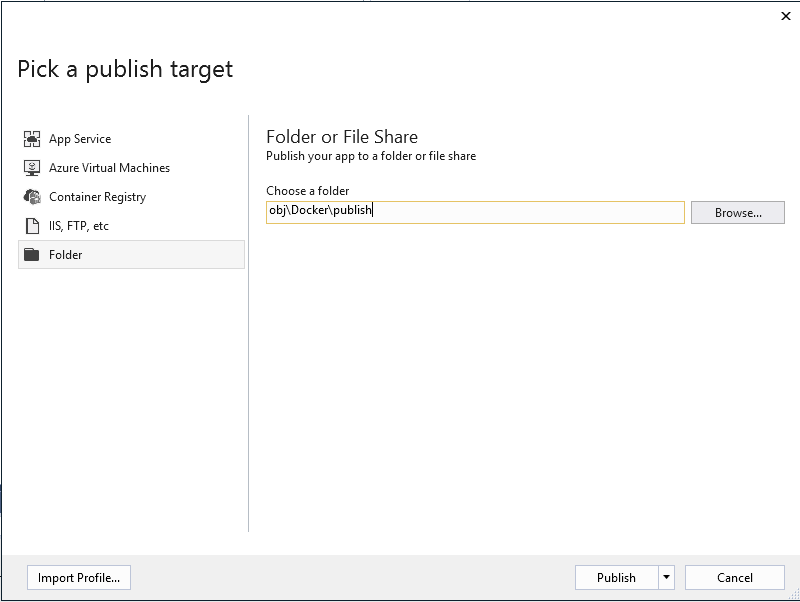
Choose "Folder" as target and edit "Choose a folder" as "obj\Docker\publish" like below.
f:id:waritohutsu:20180322065321p:plain

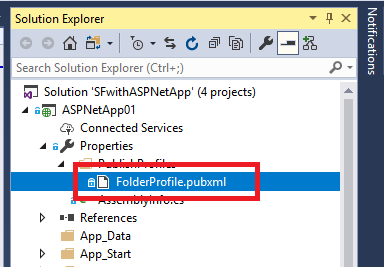
After setup the pubxml file, you can find it in your ASP.NET Framework like below. In this case, the filename is "FolderProfile.pubxml".
f:id:waritohutsu:20180322065556p:plain

Setup in your VSTS tasks
You need to update "Build Solution" tasks at first. Please note to add "/p:PublishProfile=FolderProfile.pubxml" and remove "/p:WebPublishMethod=Package".

  • "MSBuild Arguments" - before change
/p:DeployOnBuild=true /p:WebPublishMethod=Package /p:PackageAsSingleFile=true /p:SkipInvalidConfigurations=true /p:PackageLocation="$(build.artifactstagingdirectory)\\"
/p:DeployOnBuild=true /p:PackageAsSingleFile=true /p:SkipInvalidConfigurations=true /p:PackageLocation="$(build.artifactstagingdirectory)\\" /p:PublishProfile=FolderProfile.pubxml 

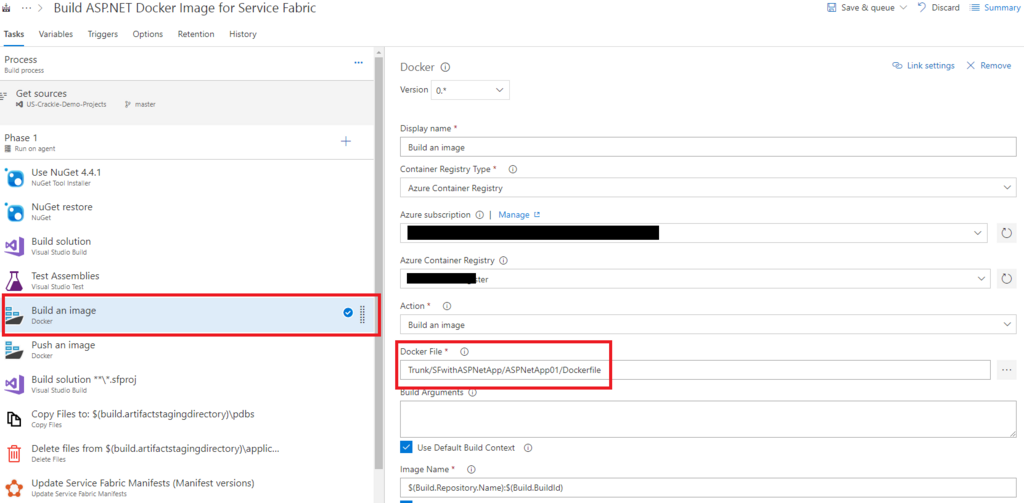
After setup "Build Solution" tasks correctly, you can just add "Build an Image" task and specify "Docker file" correctly like below.
f:id:waritohutsu:20180322071044p:plain

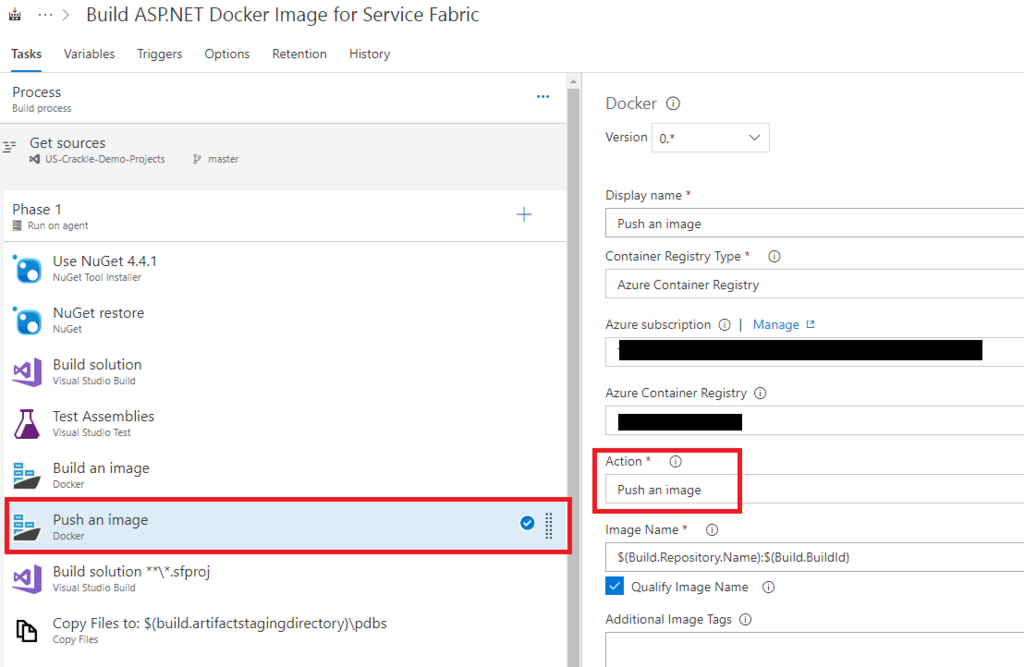
And you also need to add "Push an image" to store your Docker images into some registries. Note to specify as "Push an Image" not "Push images" like below.
f:id:waritohutsu:20180322071438p:plain

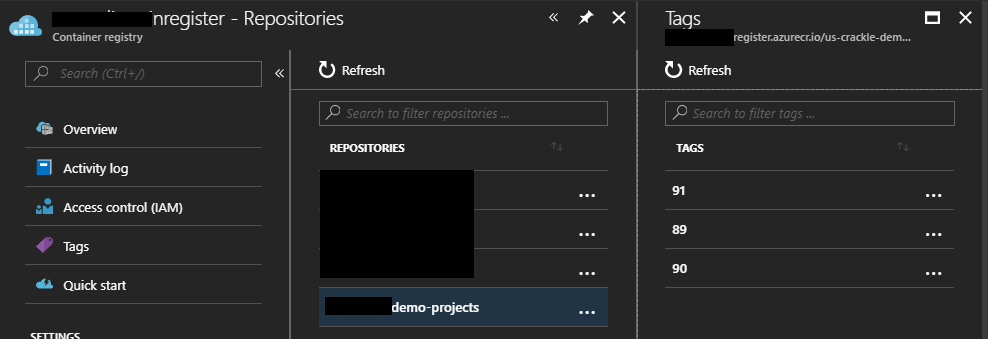
You can find your Docker images in your Container registry if the build process on VSTS work correctly.
f:id:waritohutsu:20180322071616p:plain

How to setup VSTS Private Agent for build Windows Server ver 1709 base Docker images

$
0
0

Do you know Windows had breaking changes for their virtualization technologies and I referred about that in Windows Container Version Compatibility | Microsoft Docs. This change will cause an error when you will build Windows Server ver 1709 base Docker images on VSTS build tasks.
Unfortunately, VSTS probably doesn't offer Hosted which are available to build Windows Server ver 1709 base Docker images. As far as I have checked, there are some "Hosted Agent" in Hosted agents for VSTS | Microsoft Docs like below.

It was failed when I built my Windows Server ver 1709 base Docker images on VSTS build tasks. You need to setup your Private Agent for building Windows Server ver 1709 base Docker images. You can setup the VM following this article!

Step by Step to step Windows Server version 1709 based VM as Private Agent

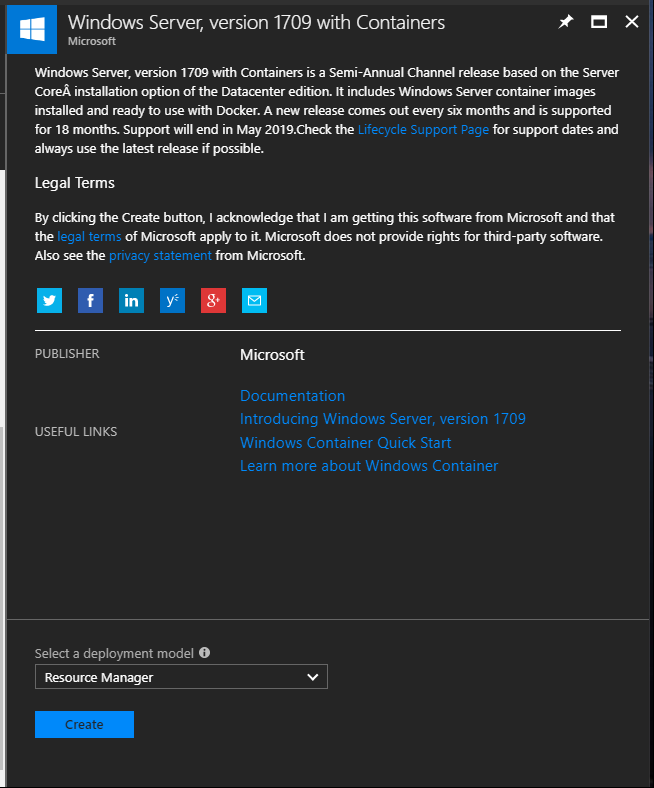
You need to create new Virtual Machine on Azure Portal. Choose "Windows Server, version 1709 with Containers" for base VM, because it contains "docker.exe" command. But keep in mind the image doesn't contain "docker-compose".
f:id:waritohutsu:20180323034702p:plain
You don't need add special setting when you create the VM, but don't setup Network Security Group as completely closed to enable accessible VSTS service.

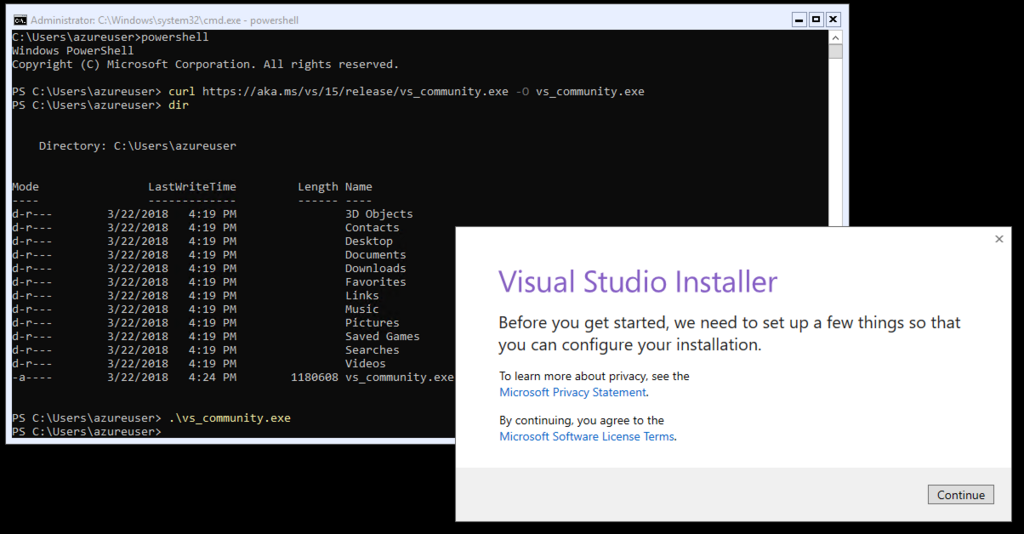
Access the VM using Remote Desktop and install Visual Studio 2017 into the VM, because the VM doesn't contain MSBuild and other commands for VSTS Build/Release processes. Follow below commands.


C:\Users\azureuser>powershell
Windows PowerShell
Copyright (C) Microsoft Corporation. All rights reserved.

PS C:\Users\azureuser> curl https://aka.ms/vs/15/release/vs_community.exe -O vs_community.exe
PS C:\Users\azureuser> dir


    Directory: C:\Users\azureuser


Mode                LastWriteTime         Length Name
----                -------------         ------ ----
d-r---        3/22/2018   4:19 PM                3D Objects
d-r---        3/22/2018   4:19 PM                Contacts
d-r---        3/22/2018   4:19 PM                Desktop
d-r---        3/22/2018   4:19 PM                Documents
d-r---        3/22/2018   4:19 PM                Downloads
d-r---        3/22/2018   4:19 PM                Favorites
d-r---        3/22/2018   4:19 PM                Links
d-r---        3/22/2018   4:19 PM                Music
d-r---        3/22/2018   4:19 PM                Pictures
d-r---        3/22/2018   4:19 PM                Saved Games
d-r---        3/22/2018   4:19 PM                Searches
d-r---        3/22/2018   4:19 PM                Videos
-a----        3/22/2018   4:24 PM        1180608 vs_community.exe

PS C:\Users\azureuser> .\vs_community.exe

f:id:waritohutsu:20180323040104p:plain

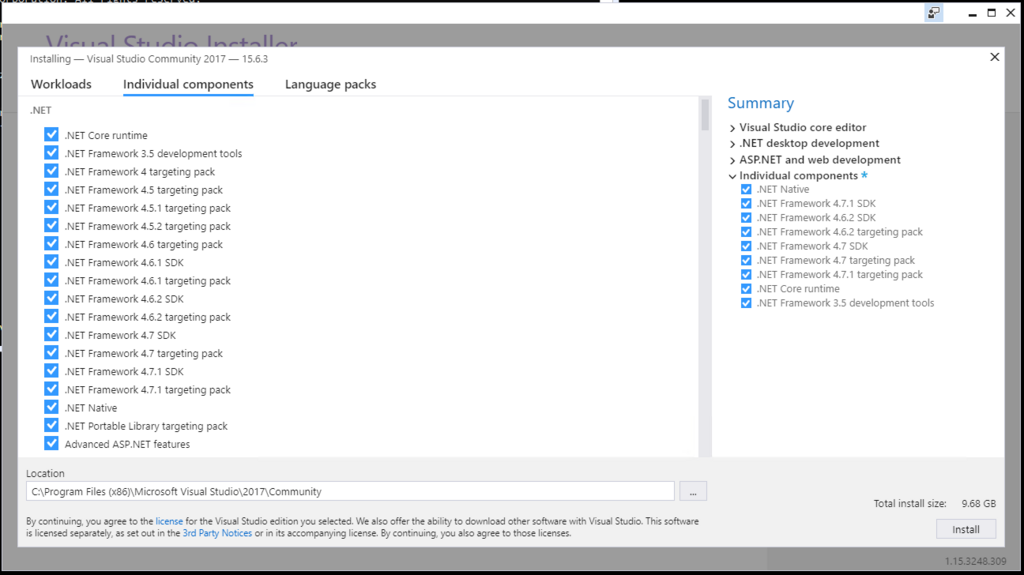
I chose below settings in my case, but change the settings for your environment if you need.
f:id:waritohutsu:20180323040219p:plain
f:id:waritohutsu:20180323040228p:plain

After Visual Studio installation has completed, add MSBuild execution folder path into PATH environment variable like below.

PS C:\Users\azureuser> setx /M PATH "%PATH%;C:\Program Files (x86)\Microsoft Visual Studio\2017\Community\MSBuild\15.0\B
in"

SUCCESS: Specified value was saved.
PS C:\Users\azureuser> 

Next, you also need to add "docker-compose" to build with it, because this base VM contains only just "docker" command. Follow below commands to install it.

PS C:\> [Net.ServicePointManager]::SecurityProtocol = [Net.SecurityProtocolType]::Tls12
PS C:\> Invoke-WebRequest "https://github.com/docker/compose/releases/download/1.20.0/docker-compose-Windows-x86_64.exe" -UseBasicParsing -OutFile $Env:ProgramFiles\docker\docker-compose.exe
PS C:\>

What will be error messages if you haven't complete docker-compose

You will get "##[error]Unhandled: Failed which: Not found docker: null" message from your VSTS build task.

2018-03-17T21:07:37.4182183Z ##[section]Starting: Build an image
2018-03-17T21:07:37.4186946Z ==============================================================================
2018-03-17T21:07:37.4187316Z Task         : Docker
2018-03-17T21:07:37.4187693Z Description  : Build, tag, push, or run Docker images, or run a Docker command. Task can be used with Docker or Azure Container registry.
2018-03-17T21:07:37.4188244Z Version      : 0.3.10
2018-03-17T21:07:37.4188534Z Author       : Microsoft Corporation
2018-03-17T21:07:37.4188879Z Help         : [More Information](https://go.microsoft.com/fwlink/?linkid=848006)
2018-03-17T21:07:37.4189247Z ==============================================================================
2018-03-17T21:07:37.6890544Z ##[error]Unhandled: Failed which: Not found docker: null
2018-03-17T21:07:37.6953107Z ##[section]Finishing: Build an image

What will be error messages if you build Windows Server ver 1709 images with "Hosted VS2017" agent

You will get "The following Docker images are incompatible with the host operating system: [microsoft/aspnet:4.7.1-windowsservercore-1709]. Update the Dockerfile to specify a different base image." message from your VSTS build task.

2018-03-17T21:02:41.2336315Z 
2018-03-17T21:02:41.2336964Z Build FAILED.
2018-03-17T21:02:41.4137038Z 
2018-03-17T21:02:41.4138305Z "D:\a\1\s\Trunk\SFwithASPNetApp\SFwithASPNetApp.sln" (default target) (1) ->
2018-03-17T21:02:41.4139002Z "D:\a\1\s\Trunk\SFwithASPNetApp\docker-compose.dcproj" (default target) (3) ->
2018-03-17T21:02:41.4139575Z (DockerComposeBuild target) -> 
<b>2018-03-17T21:02:41.4141190Z   C:\Program Files (x86)\Microsoft Visual Studio\2017\Enterprise\MSBuild\Sdks\Microsoft.Docker.Sdk\build\Microsoft.Docker.targets(111,5): error : The following Docker images are incompatible with the host operating system: [microsoft/aspnet:4.7.1-windowsservercore-1709]. Update the Dockerfile to specify a different base image. See http://aka.ms/DockerToolsTroubleshooting for more details. [D:\a\1\s\Trunk\SFwithASPNetApp\docker-compose.dcproj]</b>
2018-03-17T21:02:41.4142524Z 
2018-03-17T21:02:41.4142996Z     0 Warning(s)
2018-03-17T21:02:41.4143435Z     1 Error(s)
2018-03-17T21:02:41.4143702Z 
2018-03-17T21:02:41.4144142Z Time Elapsed 00:14:00.47
2018-03-17T21:02:43.2578358Z ##[error]Process 'msbuild.exe' exited with code '1'.
2018-03-17T21:02:44.0944814Z ##[section]Finishing: Build solution
2018-03-17T21:02:44.1143215Z ##[section]Starting: Post Job Cleanup
2018-03-17T21:02:44.1300074Z Cleaning any cached credential from repository: US-Crackle-Demo-Projects (Git)
2018-03-17T21:02:44.1413004Z ##[command]git remote set-url origin https://daisami-online.visualstudio.com/_git/US-Crackle-Demo-Projects
2018-03-17T21:02:44.3340613Z ##[command]git remote set-url --push origin https://daisami-online.visualstudio.com/_git/US-Crackle-Demo-Projects
2018-03-17T21:02:44.3757483Z ##[section]Finishing: Post Job Cleanup
2018-03-17T21:02:44.4763369Z ##[section]Finishing: Job

Finally, you need to setup VSTS Private Agent. Refer to How to setup your CentOS VMs as VSTS Private Agent - normalian blog to pick up "access token" for setup Private Agent.

PS C:\agent> .\config.cmd

>> Connect:

Enter server URL > https://"your vsts account name".visualstudio.com
Enter authentication type (press enter for PAT) >
Enter personal access token > ****************************************************
Connecting to server ...

>> Register Agent:

Enter agent pool (press enter for default) > "Your Agent Pool Name"
Enter agent name (press enter for VSTSPAVM01) >
Scanning for tool capabilities.
Connecting to the server.
Successfully added the agent
Testing agent connection.
Enter work folder (press enter for _work) >
2018-03-18 05:09:24Z: Settings Saved.
Enter run agent as service? (Y/N) (press enter for N) > Y
Enter User account to use for the service (press enter for NT AUTHORITY\NETWORK SERVICE) > NT AUTHORITY\SYSTEM
Granting file permissions to 'NT AUTHORITY\SYSTEM'.
Service vstsagent.daisami-online.VSTSPAVM01 successfully installed
Service vstsagent.daisami-online.VSTSPAVM01 successfully set recovery option
Service vstsagent.daisami-online.VSTSPAVM01 successfully configured
Service vstsagent.daisami-online.VSTSPAVM01 started successfully
PS C:\agent>

Now, you can choose your Private Agent in your VSTS Build/Release processes.

What will be error messages if you setup Private Agent account as "NT AUTHORITY\NETWORK SERVICE"

Your VM can't access" //./pipe/docker_engine: " and the build tasks will be failed.

DockerGetServiceReferences:
docker-compose -f "C:\agent\_work\1\s\Trunk\SFwithASPNetApp\docker-compose.yml" -f "C:\agent\_work\1\s\Trunk\SFwithASPNetApp\docker-compose.override.yml" -p dockercompose13733567670188849996 --no-ansi config
C:\Program Files (x86)\Microsoft Visual Studio\2017\Community\MSBuild\Sdks\Microsoft.Docker.Sdk\build\Microsoft.VisualStudio.Docker.Compose.targets(195,5): Error MSB4018: The "GetServiceReferences" task failed unexpectedly.
C:\Program Files (x86)\Microsoft Visual Studio\2017\Community\MSBuild\Sdks\Microsoft.Docker.Sdk\build\Microsoft.VisualStudio.Docker.Compose.targets(195,5): error MSB4018: The "GetServiceReferences" task failed unexpectedly. [C:\agent\_work\1\s\Trunk\SFwithASPNetApp\docker-compose.dcproj]
C:\Program Files (x86)\Microsoft Visual Studio\2017\Community\MSBuild\Sdks\Microsoft.Docker.Sdk\build\Microsoft.VisualStudio.Docker.Compose.targets(195,5): error MSB4018: Microsoft.Docker.Utilities.CommandLineClientException: error during connect: Get http://%2F%2F.%2Fpipe%2Fdocker_engine/v1.30/version: open //./pipe/docker_engine: Access is denied. In the default daemon configuration on Windows, the docker client must be run elevated to connect. This error may also indicate that the docker daemon is not running.. [C:\agent\_work\1\s\Trunk\SFwithASPNetApp\docker-compose.dcproj]
C:\Program Files (x86)\Microsoft Visual Studio\2017\Community\MSBuild\Sdks\Microsoft.Docker.Sdk\build\Microsoft.VisualStudio.Docker.Compose.targets(195,5): error MSB4018: [C:\agent\_work\1\s\Trunk\SFwithASPNetApp\docker-compose.dcproj]
C:\Program Files (x86)\Microsoft Visual Studio\2017\Community\MSBuild\Sdks\Microsoft.Docker.Sdk\build\Microsoft.VisualStudio.Docker.Compose.targets(195,5): error MSB4018: For more troubleshooting information, go to http://aka.ms/DockerToolsTroubleshooting ---> Microsoft.Docker.Utilities.CommandLineClientException: error during connect: Get http://%2F%2F.%2Fpipe%2Fdocker_engine/v1.30/version: open //./pipe/docker_engine: Access is denied. In the default daemon configuration on Windows, the docker client must be run elevated to connect. This error may also indicate that the docker daemon is not running. [C:\agent\_work\1\s\Trunk\SFwithASPNetApp\docker-compose.dcproj]

What is workaround when you got error messages "There was an error during download.Failed" while downloading container images

$
0
0

As you know, Service Fabric is one of implementations to offer Microservice Architecture provided by Microsoft. Of course, it can be deployed Docker Images both Windows and Linux base images, but you should note "Operating System" of Service Fabric cluster matches with Docker images when you want to deploy Docker images. There might be some reasons of error messages "There was an error during download.Failed" like below when you got the messages while deploying your images.
f:id:waritohutsu:20180317111137p:plain

It's caused by some reasons and it should be one of below.

  1. URL of your Docker image is invalid
  2. The authentication info of your Docker repository account is invalid
  3. There is virtualization mechanism mismatch between base OS of Docker images and operating system version of your Service Fabric cluster

No.1 and No.2 are trivial and not so difficult to fix it, but it's not easy to clarify when you got the message caused by No.3. In this article, I will dig into cause of No.3.

Docker container base images need to match the version of the host its running on. Unfortunately Windows made a breaking change where container images are not compatible across hosts like below article.
docs.microsoft.com
You need to specify your Service Fabric cluster "Operating System" based on your Docker image base OS like below image.
f:id:waritohutsu:20180317110812p:plain

  • You must specify "WindowsServer 2016-Datacenter-with-Containers" as Service Fabric cluster Operation System if your base OS is "Windows Server 2016"
  • You must specify "WindowsServerSemiAnnual Datacenter-Core-1709-with-Containers" as Service Fabric cluster Operation System if your base OS is "Windows Server version 1709"

Example to match OS Versions

It's important to match your Service Fabric cluster "Operating System" and base OS version specified in Dockerfile "FROM" keyword. And I put ServiceManifest and ApplicationManifest.xml just in case.

Example - part of Dockerfile

# This base OS for "WindowsServer 2016-Datacenter-with-Containers"
#FROM microsoft/aspnetcore-build:2.0.5-2.1.4-nanoserver-sac2016 AS base
# This base OS for "WindowsServerSemiAnnual Datacenter-Core-1709-with-Containers"
FROM microsoft/aspnetcore:2.0-nanoserver-1709 AS base
WORKDIR /app
EXPOSE 80

# This base OS for "WindowsServer 2016-Datacenter-with-Containers"
#FROM microsoft/aspnetcore-build:2.0.5-2.1.4-nanoserver-sac2016 AS build
# This base OS for "WindowsServerSemiAnnual Datacenter-Core-1709-with-Containers"
FROM microsoft/aspnetcore-build:2.0-nanoserver-1709 AS build
WORKDIR /src
COPY *.sln ./
COPY NetCoreWebApp/NetCoreWebApp.csproj NetCoreWebApp/
RUN dotnet restore
COPY . .
WORKDIR /src/NetCoreWebApp
RUN dotnet build -c Release -o /app

FROM build AS publish
RUN dotnet publish -c Release -o /app

FROM base AS final
WORKDIR /app
COPY --from=publish /app .
ENTRYPOINT ["dotnet", "NetCoreWebApp.dll"]


Example - part of ApplicationManifest.xml

<ServiceManifestImport><ServiceManifestRef ServiceManifestName="GuestContainer1Pkg"ServiceManifestVersion="1.0.0" /><ConfigOverrides /><Policies><ContainerHostPolicies CodePackageRef="Code"><RepositoryCredentials AccountName="Username of your Container registry"Password="password of your Container registry"PasswordEncrypted="false"/><PortBinding ContainerPort="80"EndpointRef="GuestContainer1TypeEndpoint"/></ContainerHostPolicies></Policies></ServiceManifestImport>

Example - part of ServiceManifest.xml

<EntryPoint><!-- Follow this link for more information about deploying Windows containers to Service Fabric: https://aka.ms/sfguestcontainers --><ContainerHost><ImageName>"Username of your Container registry".azurecr.io/sample/helloworldapp:latest</ImageName></ContainerHost></EntryPoint>

What is workaround when you got error message "failure in a Windows system call: No hypervisor is present on this system." on Service Fabric Explorer

$
0
0

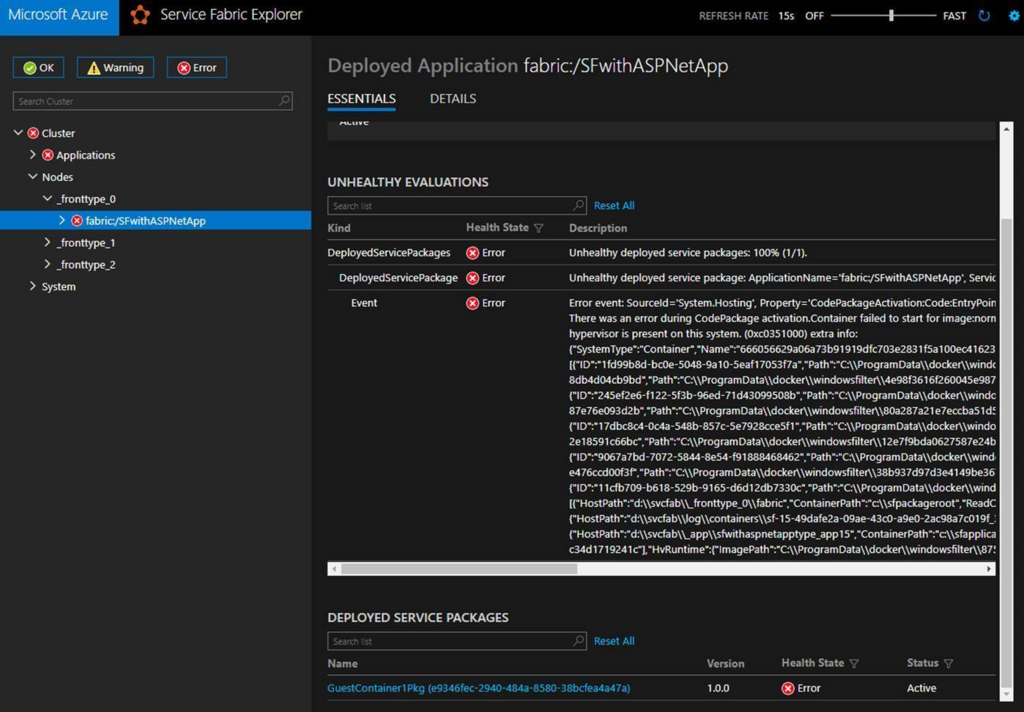
As you know, we can deploy Docker Container images into Service Fabric clusters, but you need to note when you specify "Instance Size" of Service Fabric when you use Windows Container images. You will get below error messages if you don't specify "Ev3" or "Dv3" for Azure SKUs even though you use "hyperv isolation mode".

There was an error during CodePackage activation.Container failed to start for image:"your container image".azurecr.io/"your image name":"your tag name". container 4ef6c4ec64f3006db9f5cbe9541dcb77994ccd1ac8d018180b5d08ba0cf95803 encountered an error during CreateContainer: failure in a Windows system call: No hypervisor is present on this system. (0xc0351000) extra info: {"SystemType":"Container","Name":"4ef6c4ec64f3006db9f5cbe9541dcb77994ccd1ac8d018180b5d08ba0cf95803","Owner":"docker","IsDummy":false,"IgnoreFlushesDuringBoot":true,"LayerFolderPath":"C:\\ProgramData\\docker\\windowsfilter\\4ef6c4ec64f3006db9f5cbe9541dcb77994ccd1ac8d018180b5d08ba0cf95803","Layers":[{"ID":"1fd99b8d-bc0e-5048-9a10-5eaf17053f7a","Path":"C:\\ProgramData\\docker\\windowsfilter\\b8452e48f79716c4f811a2c80d3f32d4a37c9fb98fb179c6cffce7f0beed1e66"},{"ID":"758bc832-f0e5-55a8-a2ca-8db4d04cb9bd","Path":"C:\\ProgramData\\docker\\windowsfilter\\4e98f3616f260045e987e017b3894dcfa250c7f595997110c9900b02488e05f3"},{"ID":"91a87634-6f3e-59a9-9578-33049cc2ebaa","Path":"C:\\ProgramData\\docker\\windowsfilter\\f18e514d9d6c1d8d892856392b96f939d9f992cc7395d0b2d6f05e22216ac737"},{"ID":"245ef2e6-f122-5f3b-96ed-71d43099508b","Path":"C:\\ProgramData\\docker\\windowsfilter\\715c1bdc318c7b012e2f70d3798f4e1e79a96d2fa165bac377f7540030f1a1a6"},{"ID":"22fbc57d-ea4d-552b-9b3a-87e76e093d2b","Path":"C:\\ProgramData\\docker\\windowsfilter\\80a287a21e7eccba51d5110e25517639351e87f52067a7df382edcdaf312138b"},{"ID":"a451ab3e-a3fd-5db9-8c91-7d69034cd20a","Path":"C:\\ProgramData\\docker\\windowsfilter\\94c121ca13cfde5bf579f36687d5405d0487ad972dd18ff8f598870aa3a72b73"},{"ID":"17dbc8c4-0c4a-548b-857c-5e7928cce5f1","Path":"C:\\ProgramData\\docker\\windowsfilter\\9e9fa399255bb3ba2717dcdd6ca06d493fa189c6d6a0276d0713f2a524dd3d2a"},{"ID":"20a857ef-13bb-55cf-8a67-2e18591c66bc","Path":"C:\\ProgramData\\docker\\windowsfilter\\12e7f9bda0627587e24bb4d5a3fb91c3ed9b6b6943ac1d35244afac547796dd1"},{"ID":"6d4958bb-c89f-5390-9420-5ddaff8ef0ca","Path":"C:\\ProgramData\\docker\\windowsfilter\\a4f9f68812499ffdaed2e84a6b84d8d878286f4d726b91bb7970b618f1d8dd65"},{"ID":"9067a7bd-7072-5844-8e54-f91888468462","Path":"C:\\ProgramData\\docker\\windowsfilter\\7efa7258bfec74a13dc8bbd93d4d0bc108ac6443ae0691198ff6a9a692c703f7"},{"ID":"edf15855-a46a-593c-a2c2-e476ccd00f3f","Path":"C:\\ProgramData\\docker\\windowsfilter\\38b937d97d3e4149be3671ae411441b9e839e2e0e40c5f626479357a0de8da00"},{"ID":"b4b0754d-1b7f-5413-ad1c-63616d0c72ff","Path":"C:\\ProgramData\\docker\\windowsfilter\\8753c8e07b95e6d80767dd39ace29e6e1108992ec72e46140ba990287272f418"},{"ID":"11cfb709-b618-529b-9165-d6d12db7330c","Path":"C:\\ProgramData\\docker\\windowsfilter\\d4a3ef41985c9ed1d7308f1f8603e8527154104bd7b308fed9f731f863d29314"}],"HostName":"4ef6c4ec64f3","MappedDirectories":[{"HostPath":"d:\\svcfab\\log\\containers\\sf-15-aa4017f4-24d0-437a-b7b5-a48db8717a13_3b9b217e-374e-48ea-8ee5-ccf597e47d34","ContainerPath":"c:\\sffabriclog","ReadOnly":false,"BandwidthMaximum":0,"IOPSMaximum":0},{"HostPath":"d:\\svcfab\\_fronttype_0\\fabric","ContainerPath":"c:\\sfpackageroot","ReadOnly":true,"BandwidthMaximum":0,"IOPSMaximum":0},{"HostPath":"c:\\program files\\microsoft service fabric\\bin\\fabric\\fabric.code","ContainerPath":"c:\\sffabricbin","ReadOnly":true,"BandwidthMaximum":0,"IOPSMaximum":0},{"HostPath":"d:\\svcfab\\_app\\sfwithaspnetapptype_app15","ContainerPath":"c:\\sfapplications\\sfwithaspnetapptype_app15","ReadOnly":false,"BandwidthMaximum":0,"IOPSMaximum":0}],"SandboxPath":"C:\\ProgramData\\docker\\windowsfilter","HvPartition":true,"EndpointList":["a118be34-14d8-48df-87be-2abaf0f40160"],"HvRuntime":{"ImagePath":"C:\\ProgramData\\docker\\windowsfilter\\8753c8e07b95e6d80767dd39ace29e6e1108992ec72e46140ba990287272f418\\UtilityVM"},"Servicing":false,"AllowUnqualifiedDNSQuery":true,"DNSSearchList":"SFwithASPNetApp"}

f:id:waritohutsu:20180328054928p:plain

Refer to Create an Azure Service Fabric container application | Microsoft Docs and watch the note. Next, confirm your ApplicationManifest.xml file in your Service Fabric project. It should be specified as "hyperv" isolation mode in attribute of "ContainerHostPolicies " tag if you have hyperv role enabled.

<ServiceManifestImport><ServiceManifestRef ServiceManifestName="GuestContainer1Pkg"ServiceManifestVersion="1.0.5" /><ConfigOverrides /><Policies><ContainerHostPolicies CodePackageRef="Code"Isolation="hyperv"><RepositoryCredentials AccountName="your account name"Password="your password"PasswordEncrypted="false"/><PortBinding ContainerPort="80"EndpointRef="GuestContainer1TypeEndpoint"/></ContainerHostPolicies></Policies></ServiceManifestImport><DefaultServices>

This error is caused by "you are running hyperV container on a machine that does not have hyperv role enabled", so you probably need to recreate your Service Fabric cluster as "Ev3" or "Dv3" instance size, because it might not be able to change SKU into different series.

How to override values of environment variables on VSTS tasks

$
0
0

As you know VSTS can use environment variables in VSTS Build and Release tasks. It's really useful to dynamically change values of build and release process like below, but you should sometimes wants to override even in running tasks.
f:id:waritohutsu:20180329072459p:plain

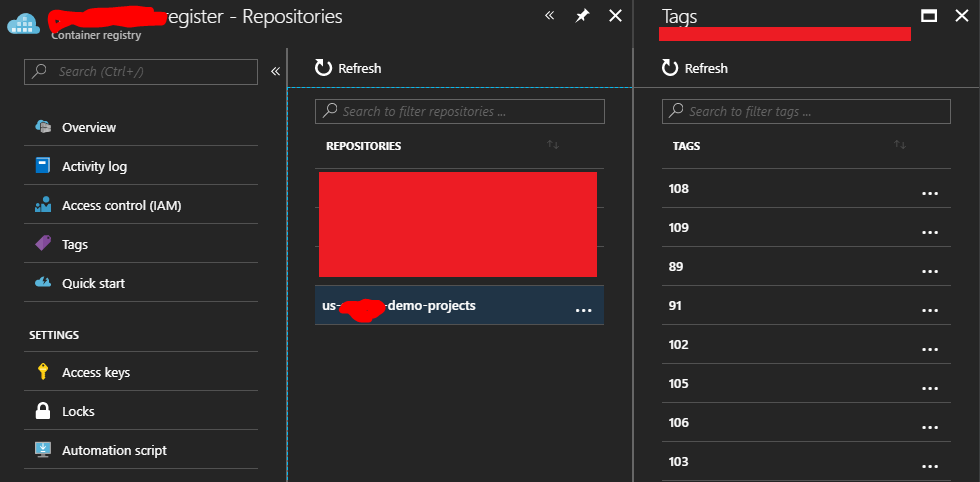
I have built Windows Docker images on with VSTS build tasks by specifying its name as $(Build.Repository.Name), the actual name is "US-XXXXXX-Demo-Projects", and I store them into Azure Container Registry. But unfortunately, Azure Container Registry stores Docker images as lowercase letters like below.
f:id:waritohutsu:20180329092859p:plain

As this result, you need to change Docker image name from $(Build.Repository.Name), change repository name itself or override environment variable. This article shows how to override the value.

How to override environment variable values on VSTS tasks

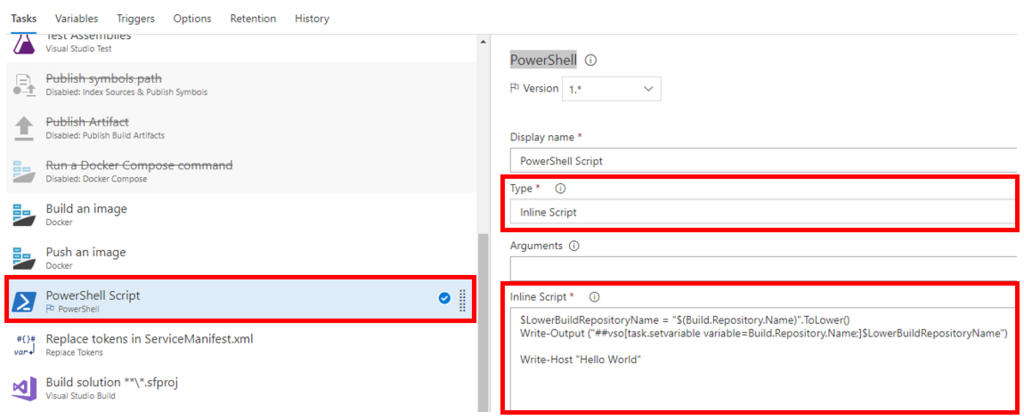
You need to add "PowerShell" tasks into your build process, specify its "Type" as "Inline Script" and edit "Inline Script" like below.
f:id:waritohutsu:20180329073438p:plain

$LowerBuildRepositoryName = "$(Build.Repository.Name)".ToLower()
Write-Output ("##vso[task.setvariable variable=Build.Repository.Name;]$LowerBuildRepositoryName")

Write-Host "Build.Repository.Name variable updates"

You can override any variables as you like to edit the inline script.

Replace configuration files with environment variables on VSTS tasks

$
0
0

I believe you definitely want to replace values of some files in your projects with environments variables when you setup Visual Studio Team Services Build/Release processes. There are some ways to replace the values, and I will introduce to use e "Replace Tokens" published in Marketplace.

How to use "Replace Tokens" on VSTS

Input "Replace Tokens" into search box when you add new tasks in your VSTS Build/Release process and click "Install" to initialize it.
f:id:waritohutsu:20180406070531p:plain

After adding "Replace Tokens" task in your process, change "Root directory" and "Target files" to specify which files you want to change. In below example, I specify *.xml files in my "SFwithASPNetApp" project.
f:id:waritohutsu:20180406070730p:plain

And finally refer below a part of Service Fabric ServiceManifest.xml. This xml file uses "Build.Repository.Name" and "Build.BuildId" environment variables to specify Docker image name.

<CodePackage Name="Code"Version="1.0.0"><EntryPoint><!-- Follow this link for more information about deploying Windows containers to Service Fabric: https://aka.ms/sfguestcontainers --><ContainerHost><ImageName>mynormalianregister.azurecr.io/#{Build.Repository.Name}#:#{Build.BuildId}#</ImageName></ContainerHost></EntryPoint>

The Docker image name will replace from "mynormalianregister.azurecr.io/#{Build.Repository.Name}#:#{Build.BuildId}#" into "mynormalianregister.azurecr.io/us-customer-demo-projects:111" in this case.

Note that you must put "}#" not "}" as suffix token.

Create Service Fabric Deployment Package with Docker images on VSTS Build Task

$
0
0

This article requires to setup below environment at first. Please refer to them before following this article.

I believe you have already created your own Docker images and pushed them into your Azure Container Registry. Now, you also need to specify the images with Service Fabric setting files to use them by your Service Fabric cluster.

How to setup Build tasks on VSTS

You need to add 5 tasks after your "Push an image" task, but you also need to add "PowerShell Script" task if you might need to use capital letters in your project names or something. Refer to How to override values of environment variables on VSTS tasks - normalian blog to override environment variables.
f:id:waritohutsu:20180410095141p:plain

Now, we will introduce how to setup the tasks.

  • Replace Tokens
  • Build solution
  • Update Service Fabric Manifests
  • Copy Files
  • Publish Build Artifacts
Replace Tokens

You need to update ServiceManifest.xml to specify your Docker image for your Service Fabric cluster.
f:id:waritohutsu:20180410082512p:plain

Parameter NameValuenote
Root directoryTrunk/SFwithASPNetApp/SFwithASPNetAppSpecify as Service Fabric directory
Target files **/*.xmlSpecify to include ServiceManifest.xml

You need to edit your ServiceManifest.xml like below

<?xml version="1.0" encoding="utf-8"?>
<ServiceManifest Name="GuestContainer1Pkg"
                 Version="1.0.0"
                 xmlns="http://schemas.microsoft.com/2011/01/fabric"
                 xmlns:xsd="http://www.w3.org/2001/XMLSchema"
                 xmlns:xsi="http://www.w3.org/2001/XMLSchema-instance">
  <ServiceTypes>
    <!-- This is the name of your ServiceType.
         The UseImplicitHost attribute indicates this is a guest service. -->
    <StatelessServiceType ServiceTypeName="GuestContainer1Type" UseImplicitHost="true" />
  </ServiceTypes>

  <!-- Code package is your service executable. -->
  <CodePackage Name="Code" Version="1.0.0">
    <EntryPoint>
      <!-- Follow this link for more information about deploying Windows containers to Service Fabric: https://aka.ms/sfguestcontainers -->
      <ContainerHost>
        <ImageName>"your acr account name".azurecr.io/#{Build.Repository.Name}#:#{Build.BuildId}#</ImageName>
      </ContainerHost>
    </EntryPoint>
    <!-- Pass environment variables to your container: -->
    <!--
    <EnvironmentVariables>
      <EnvironmentVariable Name="VariableName" Value="VariableValue"/>
    </EnvironmentVariables>
    -->
  </CodePackage>
  .....
Build solution

You need to specify *.sfproj file to build your Service Fabric application like below.
f:id:waritohutsu:20180410082650p:plain

Parameter NameValuenote
SolutionTrunk/SFwithASPNetApp/SFwithASPNetApp/SFwithASPNetApp.sfprojSpecify your Service Fabric cluster *.sfproj file
MSBuild Arguments/t:Package /p:PackageLocation=$(build.artifactstagingdirectory)\applicationpackageSpecify to create Service Fabric package
Platform$(BuildPlatform)-
Configuration$(BuildConfiguration)-
Update Service Fabric Manifests

You need to update your ServiceManifest.xml version number by environment variable.
f:id:waritohutsu:20180410094301p:plain

Parameter NameValuenote
Update TypeManifest versions-
Application Package$(build.artifactstagingdirectory)\applicationpackage-
Version Value.$(Build.BuildNumber)-
Copy Files

You also need to copy your application xml files.
f:id:waritohutsu:20180410094327p:plain

Parameter NameValuenote
Source Folder$(build.sourcesdirectory)-
Contents **\PublishProfiles\*.xml
**\ApplicationParameters\*.xml
-
Publish Build Artifacts

Finally, you can publish your build artifacts and you can use it in your Release process.

Parameter NameValuenote
Path to publish$(build.artifactstagingdirectory)-
Artifact namedrop-
Artifact publish locationVisual Studio Team Services/TFS-

How to confirm build result

You can watch your build result logs in VSTS Build page like below, and you also can find your build number like below. The number is used for Docker images tags.
f:id:waritohutsu:20180410100246p:plain

Create VSTS Release Definitions to deploy Windows Docker images into Service Fabric cluster

$
0
0

This article requires to setup below environment at first. Please refer to them before following this article.

You have to complete all setups of CI/CD cycle using Windows Docker images, Service Fabric cluster and VSTS except for VSTS Release Definitions before following this article. I believe you have already created artifacts using by your VSTS Build definition to deploy into your Service Fabric cluster. Now, you can deploy the artifact by following this article.

Create a Release Definition to use artifacts created by your Build Definition

Choose "Releases" item from the top of VSTS menus, click "+" icon from left side and choose create "Create release definition", so you can find below diagrams.
f:id:waritohutsu:20180411040657p:plain

Next, click "Add artifact", choose "Build" as "Source type" and setup your "Project" and "Source(Build definition)" which you have already created before following this article. Refer to below image if you need.
f:id:waritohutsu:20180411040922p:plain

Next, choose "Add environment" box and choose "Azure Service Fabric Deployment". Note that you need to complete
How to setup Service Fabric connections on VSTS - normalian blog to setup this. Refer to below image and table as you need.
f:id:waritohutsu:20180411041231p:plain

Parameter NameValuenote
Application Package$(system.defaultworkingdirectory)/**/drop/applicationpackage-
Cluster Connection sf-sample01-1709clusterYou must finish How to setup Service Fabric connections on VSTS - normalian blog to setup this
Publish Profile$(system.defaultworkingdirectory)/**/drop/projectartifacts/**/PublishProfiles/Cloud.xml-

Execute Release definition

After completion to create the Release Definition, click "+Rlease" link on VSTSportal.
f:id:waritohutsu:20180411041901p:plain

Next, you can execute your deployment process by clicking "Deploy" on VSTSportal like below. After execution of the process, you also be able to watch process progress by choosing "Logs" tab on VSTSportal.
f:id:waritohutsu:20180411042038p:plain

This is "Logs" tab on VSTS.
f:id:waritohutsu:20180411042151p:plain

How to setup CI/CD pipeline with Service Fabric, VSTS and Windows Container

$
0
0

We have tried lots of features to collaborate wtih Service Fabric, VSTS and Docker containers. I have realized it's needed to describe overview of the architecture, so you can learn the architecture following this article.

Overview of Service Fabric, VSTS and Windows Container architecture

At first, refer to the architecture diagram below.
f:id:waritohutsu:20180411082506p:plain

You have to create below resources to setup this architecture.

  • Service Fabric cluster
  • VSTS Proejct, Build Process and Release Process
  • Azure Container Registry
  • Virtual Machines for VSTS Private Agent

In this article, you can find references to Service Fabric cluster, VSTS and Virtula Machines. But please create Azure Container Registry for yourself and it should be quite easy.

a - Setup Private Agent for VSTS Build Definitions

Unfortunately, Windows Docker base image sizes are about 1.5G. It takes much time to download and build Docker images if you don't use Pirvate Agent. By caching the Docker images, its building time can be largely reduced.

3. and 4. Deploy deployment artifacts into Service Fabric cluster and download your Docker images from Azure Container Registry

API Management and Service Fabric Collaboration for Global Scale Applications

$
0
0

As you know, you can achieve Microservice architecture by using Service Fabric, but you might want to need request routing features for your applications for multi languages, cross devices or others. In such a case, you can use API Management for it. In this article, you can learn how to setup API Management with Service Fabric.

Edit ServiceManifest.xml of your Serviec Fabric project

At first, make a REST API application and deploy it into your Service Fabric cluster. Note to edit "ServiceManifest.xml" file in your Service Fabric project not to specify actual port like below. This setup is needed to collaborate API Management and Service Fabric.

<Resources><Endpoints><Endpoint Protocol="http"Name="ServiceEndpoint"Type="Input" /></Endpoints></Resources>

Download certificate file to access Service Fabric cluster

You probably created the certificate automatically when you made your Service Fabric cluster. Go to your Service Fabric cluster, choose "security" tab and pick up the certificate thumbprint like below.
f:id:waritohutsu:20180415080735p:plain

Next, download the certificate file as pfx into your machine. Go to KeyVault, choose "certificate" tab, select your certificate and choose "Download in PFX/PEM format" like below.
f:id:waritohutsu:20180415081024p:plain

Save thumbprint and pfx file to use ARM Template in later section.

Deploy new API Management instance by using ARM Template

Download apim.json and apim.parameters.json ARM Templates from service-fabric-api-management/apim.json at master · Azure-Samples/service-fabric-api-management · GitHub. And add '"validateCertificateChain": false into apim.json' if you will use self-signed certificate file like below .

"apiVersion": "2017-03-01",
            "type": "Microsoft.ApiManagement/service/backends",
            "name": "[concat(parameters('apimInstanceName'), '/', parameters('service_fabric_backend_name'))]",
            "dependsOn": ["[resourceId('Microsoft.ApiManagement/service', parameters('apimInstanceName'))]",
                "[resourceId('Microsoft.ApiManagement/service/certificates', parameters('apimInstanceName'), parameters('serviceFabricCertificateName'))]"
            ],
            "properties": {"description": "My Service Fabric backend",
                "url": "fabric:/fake/service",
                "protocol": "http",
                "resourceId": "[parameters('clusterHttpManagementEndpoint')]",
                "tls":{"validateCertificateChain": false},
                "properties": {"serviceFabricCluster": {"managementEndpoints": ["[parameters('clusterHttpManagementEndpoint')]"
                        ],
                        "clientCertificateThumbprint": "[parameters('serviceFabricCertificateThumbprint')]",
                        "serverCertificateThumbprints": ["[parameters('serviceFabricCertificateThumbprint')]"
                        ],
                        "maxPartitionResolutionRetries": 5}}}
        },

Update apim.parameters.json like below.

{"$schema": "http://schema.management.azure.com/schemas/2015-01-01/deploymentParameters.json#",
    "contentVersion": "1.0.0.0",
    "parameters": {"apimInstanceName": {"value": "sfapim01"
        },
        "subnetName": {"value": "API-Subnet"
        },
        "apimPublisherEmail": {"value": "mymail@address.com"
        },
        "apimSku": {"value": "Developer"
        },
        "serviceFabricCertificateName": {"value": "Daichi Isami"
        },
        "serviceFabricCertificate": {"value": "base64 encoded string of your pfx file. don't insert breaklines"
        },
        "certificatePassword": {"value": ""
        },
        "serviceFabricCertificateThumbprint": {"value": "your Cluster certificates thumbprint"
        },
        "url_path": {"value": "/api/values"
        },
        "clusterHttpManagementEndpoint": {"value": "https://'your cluster name'.westus.cloudapp.azure.com:19080"
        },
        "inbound_policy":{"value": "<policies>\r\n<inbound>\r\n<base />\r\n<set-backend-service backend-id=\"servicefabric\" sf-service-instance-name=\"fabric:/SFApiApp/Web1\" sf-resolve-condition=\"@((int)context.Response.StatusCode != 200)\" />\r\n</inbound>\r\n<backend>\r\n<base />\r\n</backend>\r\n<outbound>\r\n<base />\r\n</outbound>\r\n<on-error>\r\n<base />\r\n</on-error>\r\n</policies>"
        },
        "policies_policy_name": {"value": "policy"
        },
        "apis_service_fabric_app_name": {"value": "service-fabric-app"
        },
        "apim_service_fabric_product_name": {"value": "service-fabric-api-product"
        },
        "service_fabric_backend_name": {"value": "servicefabric"
        },
        "apis_service_fabric_app_name_operation": {"value": "service-fabric-app-operation"
        },
        "vnetName": {"value": "VNet-sf-sample01-1709cluster"
        },
        "vnetVersion": {"value": "2017-03-01"
        },
        "networkSecurityGroupName": {"value": "apim-vnet-security-03"
        },
        "networkSecurityGroupVersion": {"value": "2017-03-01"
        }}

You can put blank for certificatePasswordvalue if you created your certificate file automatically. Refer to commands for base64encode for your certificate below if you need.

$bytes = [System.IO.File]::ReadAllBytes("C:\temp\yourpfxfile.pfx")
$b64 = [System.Convert]::ToBase64String($bytes);
$b64 

It should takes 30 or 40 minutes to complete this deployment.

Access your Service Fabric application via API Management

Go to "Developer Portal" of your API Management, choose "Service Fabric App" among APIs and click "Try it" button. Now, you can send requests to your API application via API Management like below.
f:id:waritohutsu:20180415082448p:plain

Troubleshoot - "Service Fabric exception when trying to resolve partition: A Security error has occurred, failed to verify remote certificate"

You might get error messages below if you use self-signed certificate file.

service-fabric-backend (1371 ms)
{
    "message": "Service Fabric exception when trying to resolve partition: A Security error has occurred, failed to verify remote certificate.",
    "serviceName": {},
    "resourceId": "https://sf-sample01-1709cluster.westus.cloudapp.azure.com:19080",
    "managementEndpoint": [
        "https://sf-sample01-1709cluster.westus.cloudapp.azure.com:19080"
    ]
}

You should forget to update apim.json. Refer to " Deploy new API Management instance by using ARM Template" section in this article.

How to solve RDP access error "CredSSP Encryption Oracle Remediation"

$
0
0

With the release of the March 2018 Security bulletin, it causes some changes. When you try to connect to updated VMs, you probably get error like below.
f:id:waritohutsu:20180514044358p:plain

[Window Title]
Remote Desktop Connection

[Content]
An authentication error has occurred. The function requested is not supported

Remote computer: 13.93.225.149
This could be due to CredSSP encryption oracle remediation.
For more information, see https://go.microsoft.com/fwlink/?linkid=866660

[OK]

Refer to Unable to RDP to Virtual Machine: CredSSP Encryption Oracle Remediation – Azure Virtual Machines to know detail. In this article, I will describe how to solve this issue simply.

Execute gpedit.msc and go to Computer Configuration / Administrative Templates / System / Credentials Delegation like below.
f:id:waritohutsu:20180514044816p:plain

Change EncryptionOracle Remediation policy to Enabled, and Protection Level to Vulnerable like below.
f:id:waritohutsu:20180514044941p:plain

How to execute PowerShell scripts inside Azure VMs from external

$
0
0

There are some ways to execute PowerShell scripts inside Azure VMs such like PowerShell remoting. Recently, it comes up cool feature to execute scripts inside Azure VMs easily. This article introduces how to manage that.

Execute PowerShell scripts inside Azure VMs from Azure Portal

Go to Azure Portal and choose an Azure VM among your VMs, so you can find "Run command" menu from left menus. Next, choose "RunPowerShellScript" menu, so you can execute PowerShell scripts like below.
f:id:waritohutsu:20180627100025p:plain
I have already located a text file into "F;\temp\hello.txt" path on Azure VM before executing above scripts to take this screenshot. This means you can manage files inside Azure VMs.
Here is diagram for this scenario. We send HTTP requests as REST API call to VM Agent and the agent execute your PowerShell scripts inside the VM.
f:id:waritohutsu:20180628041811p:plain

Execute PowerShell scripts inside Azure VMs from client machines

You can execute the scripts with PowerShell command named Invoke-AzureRmVMRunCommand. Here is diagram for this scenario. f:id:waritohutsu:20180628042618p:plain
Follow commands snippet below in your local machine PowerShell ISE to execute your scripts inside VM.

$rgname = 'your vm resource group'
$vmname = 'your vm name'
$localmachineScript = 'PowerShell script file on your local machine like script-test.ps1'
Invoke-AzureRmVMRunCommand -ResourceGroupName $rgname -Name $vmname -CommandId 'RunPowerShellScript' -ScriptPath $localmachineScript -Parameter @{"arg1" = "var1";"arg2" = "var2"} -Debug 

Confirm your Azure PowerShell module version and authentication if the script doesn't work well.

Execute PowerShell scripts inside Azure VMs from Azure Automation

At first, update Azure Automation modules for your Azure Automation account. Go to your Azure Automation account and choose "Modules" menu from left menu and click "Update Azure Modules" to be latest versions like below.
f:id:waritohutsu:20180627102437p:plain

Next, It's needed to locate your script into downloadable place such like Azure Storage, because we can't locate any files into Azure Automation runtime environment. In this case, I have located a script file into "https://change-your-storage-account-name.blob.core.windows.net/scripts/script-test.ps1" and the content is same with above. Here is diagram for this scenario.
f:id:waritohutsu:20180628043548p:plain

Finally, create a Runbook for the script like below and execute it. This need to authenticate to Azure AD.

$connection = Get-AutomationConnection -Name "AzureRunAsConnection"
Write-Output $connection
Add-AzureRMAccount -ServicePrincipal -Tenant $connection.TenantID -ApplicationId $connection.ApplicationID -CertificateThumbprint $connection.CertificateThumbprint

$rgname = 'your vm resource group'
$vmname = 'your vm name'
$localmachineScript = 'PowerShell script file on your local machine like script-test.ps1'
wget "https://automationbackupstorage.blob.core.windows.net/scripts/$localmachineScript" -outfile $localmachineScript 
Invoke-AzureRmVMRunCommand -ResourceGroupName $rgname -Name $vmname -CommandId 'RunPowerShellScript' -ScriptPath $localmachineScript -Parameter @{"arg1" = "var1";"arg2" = "var2"} -Debug 

How to handle exceptions for the scripts inside Azure VMs

It's needed to handle errors when you will integrate this scripts execution into your workflow. I have updated 'script-test.ps1' script like below,

cd F:\temp
type hello.txt
throw "Error trying to do a task @@@@@@@@@@@@@@@@@@@@@@@@@@@@@@@@@@@@@@"

Here is a result of the script execution.

PS D:\temp> $rgname = 'your vm resource group'
$vmname = 'your vm name'
$localmachineScript = 'script-test.ps1'
$result = Invoke-AzureRmVMRunCommand -ResourceGroupName $rgname -Name $vmname -CommandId 'RunPowerShellScript' -ScriptPath $localmachineScript -Parameter @{"arg1" = "var1";"arg2" = "var2"} -Debug 
DEBUG: 6:28:11 PM - InvokeAzureRmVMRunCommand begin processing with ParameterSet 'DefaultParameter'.

...

DEBUG: ============================ HTTP REQUEST ============================

HTTP Method:
POST

Absolute Uri:
...

Headers:
x-ms-client-request-id        : f0edfe29-5abf-4d7f-9d83-8c98b3e59891
accept-language               : en-US

Body:
{
  "commandId": "RunPowerShellScript",
  "script": [
    "cd F:\\temp",
    "type hello.txt",
    "throw \"Error trying to do a task @@@@@@@@@@@@@@@@@@@@@@@@@@@@@@@@@@@@@@\""
  ],
  "parameters": [
    {
      "name": "arg1",
      "value": "var1"
    },
    {
      "name": "arg2",
      "value": "var2"
    }
  ]
}


DEBUG: ============================ HTTP RESPONSE ============================

Status Code:
OK

...

Body:
{
  "startTime": "2018-06-26T18:28:14.5508701-07:00",
  "endTime": "2018-06-26T18:28:36.3646186-07:00",
  "status": "Failed",
  "error": {
    "code": "VMExtensionProvisioningError",
    "message": "VM has reported a failure when processing extension 'RunCommandWindows'. Error message: \"Finished executing command\"."
  },
  "name": "bc901040-54ad-4ff1-a8ee-c9794b7a34cb"
}


DEBUG: AzureQoSEvent: CommandName - Invoke-AzureRmVMRunCommand; IsSuccess - True; Duration - 00:00:33.0677753; Exception - ;
DEBUG: Finish sending metric.
DEBUG: 6:28:45 PM - InvokeAzureRmVMRunCommand end processing.
Invoke-AzureRmVMRunCommand : Long running operation failed with status 'Failed'. Additional Info:'VM has reported a failure when processing extension 'RunCommandWindows'. Error message: 
"Finished executing command".'
ErrorCode: VMExtensionProvisioningError
ErrorMessage: VM has reported a failure when processing extension 'RunCommandWindows'. Error message: "Finished executing command".
StartTime: 6/26/2018 6:28:14 PM
EndTime: 6/26/2018 6:28:36 PM
OperationID: bc901040-54ad-4ff1-a8ee-c9794b7a34cb
Status: Failed
At line:1 char:1
+ Invoke-AzureRmVMRunCommand -ResourceGroupName $rgname -Name $vmname - ...
+ ~~~~~~~~~~~~~~~~~~~~~~~~~~~~~~~~~~~~~~~~~~~~~~~~~~~~~~~~~~~~~~~~~~~~~
    + CategoryInfo          : CloseError: (:) [Invoke-AzureRmVMRunCommand], ComputeCloudException
    + FullyQualifiedErrorId : Microsoft.Azure.Commands.Compute.Automation.InvokeAzureRmVMRunCommand
 
DEBUG: AzureQoSEvent: CommandName - Invoke-AzureRmVMRunCommand; IsSuccess - False; Duration - 00:00:33.0677753; Exception - Microsoft.Azure.Commands.Compute.Common.ComputeCloudException: Long
 running operation failed with status 'Failed'. Additional Info:'VM has reported a failure when processing extension 'RunCommandWindows'. Error message: "Finished executing command".'
ErrorCode: VMExtensionProvisioningError
ErrorMessage: VM has reported a failure when processing extension 'RunCommandWindows'. Error message: "Finished executing command".
StartTime: 6/26/2018 6:28:14 PM
EndTime: 6/26/2018 6:28:36 PM
OperationID: bc901040-54ad-4ff1-a8ee-c9794b7a34cb
Status: Failed ---> Microsoft.Rest.Azure.CloudException: Long running operation failed with status 'Failed'. Additional Info:'VM has reported a failure when processing extension 'RunCommandWi
ndows'. Error message: "Finished executing command".'
   at Microsoft.Rest.ClientRuntime.Azure.LRO.AzureLRO`2.CheckForErrors()
   at Microsoft.Rest.ClientRuntime.Azure.LRO.AzureLRO`2.<StartPollingAsync>d__17.MoveNext()
...
--- End of stack trace from previous location where exception was thrown ---
   at System.Runtime.ExceptionServices.ExceptionDispatchInfo.Throw()
   at System.Runtime.CompilerServices.TaskAwaiter.HandleNonSuccessAndDebuggerNotification(Task task)
   at Microsoft.Azure.Management.Compute.VirtualMachinesOperationsExtensions.RunCommand(IVirtualMachinesOperations operations, String resourceGroupName, String vmName, RunCommandInput paramet
ers)
   at Microsoft.Azure.Commands.Compute.Automation.InvokeAzureRmVMRunCommand.<ExecuteCmdlet>b__0_0()
   at Microsoft.Azure.Commands.Compute.ComputeClientBaseCmdlet.ExecuteClientAction(Action action)
   --- End of inner exception stack trace ---
   at Microsoft.Azure.Commands.Compute.ComputeClientBaseCmdlet.ExecuteClientAction(Action action)
   at Microsoft.WindowsAzure.Commands.Utilities.Common.AzurePSCmdlet.ProcessRecord();
DEBUG: Finish sending metric.
DEBUG: 6:28:47 PM - InvokeAzureRmVMRunCommand end processing.

PS D:\temp> $result

It seems to be difficult to handle the errors, because there are no contents including message of "Error trying to do a task @@@@@@@@@@@@@@@@@@@@@@@@@@@@@@@@@@@@@@". In this case, -ErrorVariable option should be useful. Update the script again and execute it like below.

PS D:\temp> $rgname = 'your vm resource group'
$vmname = 'your vm name'
$localmachineScript = 'script-test.ps1'
Invoke-AzureRmVMRunCommand -ResourceGroupName $rgname -Name $vmname -CommandId 'RunPowerShellScript' -ScriptPath $localmachineScript -Parameter @{"arg1" = "var1";"arg2" = "var2"} -ErrorVariable result
echo "============================="
$result.Count
echo "============================="
$result
echo "============================="
$result[1]

Invoke-AzureRmVMRunCommand : Long running operation failed with status 'Failed'. Additional Info:'VM has reported a failure when processing extension 'RunCommandWindows'. Error message: 
"Finished executing command".'
ErrorCode: VMExtensionProvisioningError
ErrorMessage: VM has reported a failure when processing extension 'RunCommandWindows'. Error message: "Finished executing command".
StartTime: 6/26/2018 6:35:02 PM
EndTime: 6/26/2018 6:35:17 PM
OperationID: 2ea46d42-2523-4f23-9135-9a595f62f656
Status: Failed
At line:1 char:1
+ Invoke-AzureRmVMRunCommand -ResourceGroupName $rgname -Name $vmname - ...
+ ~~~~~~~~~~~~~~~~~~~~~~~~~~~~~~~~~~~~~~~~~~~~~~~~~~~~~~~~~~~~~~~~~~~~~
    + CategoryInfo          : CloseError: (:) [Invoke-AzureRmVMRunCommand], ComputeCloudException
    + FullyQualifiedErrorId : Microsoft.Azure.Commands.Compute.Automation.InvokeAzureRmVMRunCommand
 
=============================
1
=============================
Invoke-AzureRmVMRunCommand : Long running operation failed with status 'Failed'. Additional Info:'VM has reported a failure when processing extension 'RunCommandWindows'. Error message: 
"Finished executing command".'
ErrorCode: VMExtensionProvisioningError
ErrorMessage: VM has reported a failure when processing extension 'RunCommandWindows'. Error message: "Finished executing command".
StartTime: 6/26/2018 6:35:02 PM
EndTime: 6/26/2018 6:35:17 PM
OperationID: 2ea46d42-2523-4f23-9135-9a595f62f656
Status: Failed
At line:1 char:1
+ Invoke-AzureRmVMRunCommand -ResourceGroupName $rgname -Name $vmname - ...
+ ~~~~~~~~~~~~~~~~~~~~~~~~~~~~~~~~~~~~~~~~~~~~~~~~~~~~~~~~~~~~~~~~~~~~~
    + CategoryInfo          : CloseError: (:) [Invoke-AzureRmVMRunCommand], ComputeCloudException
    + FullyQualifiedErrorId : Microsoft.Azure.Commands.Compute.Automation.InvokeAzureRmVMRunCommand
 
=============================

PS D:\temp> $result

Unfortunately, we can't take error messages from inside PowerShell scripts but we can find there are errors or not. We should use both Azure Automation logs and logs inside Azure VMs.

How to setup VSTS Private Agent to build Windows Server ver 1709 base Docker images

$
0
0

Do you know Windows had breaking changes for their virtualization technologies and I referred about that in Windows Container Version Compatibility | Microsoft Docs. This change will cause an error when you will build Windows Server ver 1709 base Docker images on VSTS build tasks.
Unfortunately, VSTS probably doesn't offer Hosted which are available to build Windows Server ver 1709 base Docker images. As far as I have checked, there are some "Hosted Agent" in Microsoft-hosted agents for VSTS | Microsoft Docs like below.

It was failed when I built my Windows Server ver 1709 base Docker images on VSTS build tasks, so you also need to setup your Private Agent for building Windows Server ver 1709 base Docker images. You can setup the VM following this article!

Step by Step to step Windows Server version 1709 based VM as Private Agent

You need to create new Virtual Machine on Azure Portal. Choose "Windows Server, version 1709 with Containers" for base VM, because it contains "docker.exe" command. But keep in mind the image doesn't contain "docker-compose".
f:id:waritohutsu:20180323034702p:plain
You don't need to add special settings when you create VMs, but don't setup Network Security Group as completely closed to enable accessible VSTS service.

Access the VM using Remote Desktop and install Visual Studio 2017 into the VM, because the VM doesn't contain MSBuild and other commands for VSTS Build/Release processes. Follow below commands.


C:\Users\azureuser>powershell
Windows PowerShell
Copyright (C) Microsoft Corporation. All rights reserved.

PS C:\Users\azureuser> curl https://aka.ms/vs/15/release/vs_community.exe -O vs_community.exe
PS C:\Users\azureuser> dir


    Directory: C:\Users\azureuser


Mode                LastWriteTime         Length Name
----                -------------         ------ ----
d-r---        3/22/2018   4:19 PM                3D Objects
d-r---        3/22/2018   4:19 PM                Contacts
d-r---        3/22/2018   4:19 PM                Desktop
d-r---        3/22/2018   4:19 PM                Documents
d-r---        3/22/2018   4:19 PM                Downloads
d-r---        3/22/2018   4:19 PM                Favorites
d-r---        3/22/2018   4:19 PM                Links
d-r---        3/22/2018   4:19 PM                Music
d-r---        3/22/2018   4:19 PM                Pictures
d-r---        3/22/2018   4:19 PM                Saved Games
d-r---        3/22/2018   4:19 PM                Searches
d-r---        3/22/2018   4:19 PM                Videos
-a----        3/22/2018   4:24 PM        1180608 vs_community.exe

PS C:\Users\azureuser> .\vs_community.exe

f:id:waritohutsu:20180323040104p:plain

I chose below settings in my case, but change the settings for your environment if you need.
f:id:waritohutsu:20180323040219p:plain
f:id:waritohutsu:20180323040228p:plain

After Visual Studio installation has completed, add MSBuild execution folder path into PATH environment variable like below.

PS C:\Users\azureuser> setx /M PATH "%PATH%;C:\Program Files (x86)\Microsoft Visual Studio\2017\Community\MSBuild\15.0\B
in"

SUCCESS: Specified value was saved.
PS C:\Users\azureuser> 

Next, you also need to add "docker-compose" to build with it, because this base VM contains only just "docker" command. Follow below commands to install it.

PS C:\> [Net.ServicePointManager]::SecurityProtocol = [Net.SecurityProtocolType]::Tls12
PS C:\> Invoke-WebRequest "https://github.com/docker/compose/releases/download/1.20.0/docker-compose-Windows-x86_64.exe" -UseBasicParsing -OutFile $Env:ProgramFiles\docker\docker-compose.exe
PS C:\>

Finally, you need to setup VSTS Private Agent. Refer to How to setup your CentOS VMs as VSTS Private Agent - normalian blog to pick up "access token" for setup Private Agent. Note you need to setup user account of this Private Agent as "NT AUTHORITY\SYSTEM".

PS C:\agent> .\config.cmd

>> Connect:

Enter server URL > https://"your vsts account name".visualstudio.com
Enter authentication type (press enter for PAT) >
Enter personal access token > ****************************************************
Connecting to server ...

>> Register Agent:

Enter agent pool (press enter for default) > "Your Agent Pool Name"
Enter agent name (press enter for VSTSPAVM01) >
Scanning for tool capabilities.
Connecting to the server.
Successfully added the agent
Testing agent connection.
Enter work folder (press enter for _work) >
2018-03-18 05:09:24Z: Settings Saved.
Enter run agent as service? (Y/N) (press enter for N) > Y
Enter User account to use for the service (press enter for NT AUTHORITY\NETWORK SERVICE) > NT AUTHORITY\SYSTEM
Granting file permissions to 'NT AUTHORITY\SYSTEM'.
Service vstsagent.daisami-online.VSTSPAVM01 successfully installed
Service vstsagent.daisami-online.VSTSPAVM01 successfully set recovery option
Service vstsagent.daisami-online.VSTSPAVM01 successfully configured
Service vstsagent.daisami-online.VSTSPAVM01 started successfully
PS C:\agent>

Now, you can choose your Private Agent in your VSTS Build/Release processes.

Note: What will be error messages if you haven't complete docker-compose

You will get "##[error]Unhandled: Failed which: Not found docker: null" message from your VSTS build task.

2018-03-17T21:07:37.4182183Z ##[section]Starting: Build an image
2018-03-17T21:07:37.4186946Z ==============================================================================
2018-03-17T21:07:37.4187316Z Task         : Docker
2018-03-17T21:07:37.4187693Z Description  : Build, tag, push, or run Docker images, or run a Docker command. Task can be used with Docker or Azure Container registry.
2018-03-17T21:07:37.4188244Z Version      : 0.3.10
2018-03-17T21:07:37.4188534Z Author       : Microsoft Corporation
2018-03-17T21:07:37.4188879Z Help         : [More Information](https://go.microsoft.com/fwlink/?linkid=848006)
2018-03-17T21:07:37.4189247Z ==============================================================================
2018-03-17T21:07:37.6890544Z ##[error]Unhandled: Failed which: Not found docker: null
2018-03-17T21:07:37.6953107Z ##[section]Finishing: Build an image

Note: What will be error messages if you build Windows Server ver 1709 images with "Hosted VS2017" agent

You will get "The following Docker images are incompatible with the host operating system: [microsoft/aspnet:4.7.1-windowsservercore-1709]. Update the Dockerfile to specify a different base image." message from your VSTS build task.

2018-03-17T21:02:41.2336315Z 
2018-03-17T21:02:41.2336964Z Build FAILED.
2018-03-17T21:02:41.4137038Z 
2018-03-17T21:02:41.4138305Z "D:\a\1\s\Trunk\SFwithASPNetApp\SFwithASPNetApp.sln" (default target) (1) ->
2018-03-17T21:02:41.4139002Z "D:\a\1\s\Trunk\SFwithASPNetApp\docker-compose.dcproj" (default target) (3) ->
2018-03-17T21:02:41.4139575Z (DockerComposeBuild target) -> 
<b>2018-03-17T21:02:41.4141190Z   C:\Program Files (x86)\Microsoft Visual Studio\2017\Enterprise\MSBuild\Sdks\Microsoft.Docker.Sdk\build\Microsoft.Docker.targets(111,5): error : The following Docker images are incompatible with the host operating system: [microsoft/aspnet:4.7.1-windowsservercore-1709]. Update the Dockerfile to specify a different base image. See http://aka.ms/DockerToolsTroubleshooting for more details. [D:\a\1\s\Trunk\SFwithASPNetApp\docker-compose.dcproj]</b>
2018-03-17T21:02:41.4142524Z 
2018-03-17T21:02:41.4142996Z     0 Warning(s)
2018-03-17T21:02:41.4143435Z     1 Error(s)
2018-03-17T21:02:41.4143702Z 
2018-03-17T21:02:41.4144142Z Time Elapsed 00:14:00.47
2018-03-17T21:02:43.2578358Z ##[error]Process 'msbuild.exe' exited with code '1'.
2018-03-17T21:02:44.0944814Z ##[section]Finishing: Build solution
2018-03-17T21:02:44.1143215Z ##[section]Starting: Post Job Cleanup
2018-03-17T21:02:44.1300074Z Cleaning any cached credential from repository: US-Crackle-Demo-Projects (Git)
2018-03-17T21:02:44.1413004Z ##[command]git remote set-url origin https://daisami-online.visualstudio.com/_git/US-Crackle-Demo-Projects
2018-03-17T21:02:44.3340613Z ##[command]git remote set-url --push origin https://daisami-online.visualstudio.com/_git/US-Crackle-Demo-Projects
2018-03-17T21:02:44.3757483Z ##[section]Finishing: Post Job Cleanup
2018-03-17T21:02:44.4763369Z ##[section]Finishing: Job

Note: What will be error messages if you setup Private Agent account as "NT AUTHORITY\NETWORK SERVICE"

Your VM can't access" //./pipe/docker_engine: " and the build tasks will be failed.

DockerGetServiceReferences:
docker-compose -f "C:\agent\_work\1\s\Trunk\SFwithASPNetApp\docker-compose.yml" -f "C:\agent\_work\1\s\Trunk\SFwithASPNetApp\docker-compose.override.yml" -p dockercompose13733567670188849996 --no-ansi config
C:\Program Files (x86)\Microsoft Visual Studio\2017\Community\MSBuild\Sdks\Microsoft.Docker.Sdk\build\Microsoft.VisualStudio.Docker.Compose.targets(195,5): Error MSB4018: The "GetServiceReferences" task failed unexpectedly.
C:\Program Files (x86)\Microsoft Visual Studio\2017\Community\MSBuild\Sdks\Microsoft.Docker.Sdk\build\Microsoft.VisualStudio.Docker.Compose.targets(195,5): error MSB4018: The "GetServiceReferences" task failed unexpectedly. [C:\agent\_work\1\s\Trunk\SFwithASPNetApp\docker-compose.dcproj]
C:\Program Files (x86)\Microsoft Visual Studio\2017\Community\MSBuild\Sdks\Microsoft.Docker.Sdk\build\Microsoft.VisualStudio.Docker.Compose.targets(195,5): error MSB4018: Microsoft.Docker.Utilities.CommandLineClientException: error during connect: Get http://%2F%2F.%2Fpipe%2Fdocker_engine/v1.30/version: open //./pipe/docker_engine: Access is denied. In the default daemon configuration on Windows, the docker client must be run elevated to connect. This error may also indicate that the docker daemon is not running.. [C:\agent\_work\1\s\Trunk\SFwithASPNetApp\docker-compose.dcproj]
C:\Program Files (x86)\Microsoft Visual Studio\2017\Community\MSBuild\Sdks\Microsoft.Docker.Sdk\build\Microsoft.VisualStudio.Docker.Compose.targets(195,5): error MSB4018: [C:\agent\_work\1\s\Trunk\SFwithASPNetApp\docker-compose.dcproj]
C:\Program Files (x86)\Microsoft Visual Studio\2017\Community\MSBuild\Sdks\Microsoft.Docker.Sdk\build\Microsoft.VisualStudio.Docker.Compose.targets(195,5): error MSB4018: For more troubleshooting information, go to http://aka.ms/DockerToolsTroubleshooting ---> Microsoft.Docker.Utilities.CommandLineClientException: error during connect: Get http://%2F%2F.%2Fpipe%2Fdocker_engine/v1.30/version: open //./pipe/docker_engine: Access is denied. In the default daemon configuration on Windows, the docker client must be run elevated to connect. This error may also indicate that the docker daemon is not running. [C:\agent\_work\1\s\Trunk\SFwithASPNetApp\docker-compose.dcproj]

Embed Jenkins portal into Visual Studio Team Services dashboard

$
0
0

As you know, lots of developers are using Jenkins for their CI/CD pipeline mainly for Java and other OSS developments. But some of such developers also use Visual Studio Team Services called VSTS for .NET development. Of course, we can develop both .NET, Java and other OSS even in VSTS, but many development fields have existing Jenkins pipelines as their assets.
It's difficult to migrate their Jenkins pipeline into VSTS In such a case, but we can easily embed your Jenkins portal into VSTSdashboard. We can collaborate both VSTS and Jenkins using by such a feature. In this article, you can learn how to setup that!

Jenkins Setup - if you need

This step isn't needed if you have already setup Jenkins in your environment. Refer to contents below if you want to setup it on Microsoft Azure.

Install XFrame Filter Plugin into Jenkin and enable to use iFrame

Install a plugin called "XFrame Filter Plugin" into your Jenkins, because it needs to enable iFrame to embed your Jenkins portal into VSTSdashboard.
Go to your Jenkins portal and choose "Manage Jekins" - "Manage Plugins" like below.
f:id:waritohutsu:20180713224159p:plain
Next, click "Available" and input "XFrame" to find "XFrame Filter Plugin". You can install the plugin easily just enable checkbox and click "Downlaod now and install after restart".

After completion of the install, you need to configure the plugin. Go to your Jenkins portal again and choose "Manage Jekins" - "Configure System" like below.
f:id:waritohutsu:20180713224703p:plain

Find the plugin among them, enable the feature and input your VSTS account URL into "X-Frame-Options Options" box like below.
f:id:waritohutsu:20180713224949p:plain

Embed Jenkins portal using by “Embedded Webpage” into VSTSDashboard

Next, you need to go to your VSTSdashboard and add "Embedd Webpage" like below,
f:id:waritohutsu:20180713230126p:plain
Configure "Embedd Webpage" to input your Jenkins URL like below.
f:id:waritohutsu:20180713230409p:plain

I believe your browser doesn't trust your Jenkins URL. so you also need to enable untrusted contents like below,
f:id:waritohutsu:20180713230626p:plain

Finally, you can watch Jenkins portal on VSTSdashboard, so you can watch both VSTS and Jenkins pipeline like below.
f:id:waritohutsu:20180713230803p:plain

Viewing all 237 articles
Browse latest View live