Quantcast
Channel: normalian blog
Viewing all 237 articles
Browse latest View live

Azure Container Service overview of Kubernetes for Java applications

$
0
0

Here is a sample architecture ACS Kubernetes. People sometimes confuse components of Container Services, because there are so many components such like Java, Docker Windows, private registry, cluster and others. This architecture helps such people to understand overview of ACS Kubernetes.
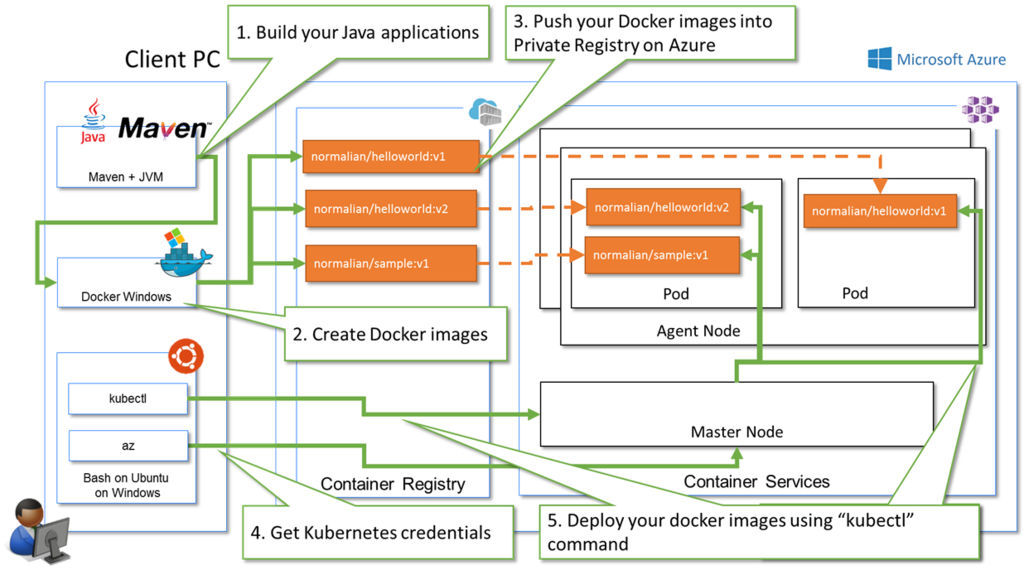
f:id:waritohutsu:20170713014405p:plain

Steps to run your Java applications using ACS Kubernetes

Follow below steps to run your Java applications.

  1. Build your Java applications
  2. Create Docker images
  3. Push your Docker images into Private Registry on Azure
  4. Get Kubernetes credentials
  5. Deploy your docker images using “kubectl” command

How to install kubectl into your client machine on "Bash on Ubuntu on Windows"

Run below commands.

normalian@DESKTOP-QJCCAGL:~$ echo "deb [arch=amd64] https://packages.microsoft.com/repos/azure-cli/ wheezy main" | sudo tee /etc/apt/sources.list.d/azure-cli.list
[sudo] password for normalian:
deb [arch=amd64] https://packages.microsoft.com/repos/azure-cli/ wheezy main
normalian@DESKTOP-QJCCAGL:~$ sudo apt-key adv --keyserver packages.microsoft.com --recv-keys 417A0893
normalian@DESKTOP-QJCCAGL:~$ sudo apt-get install apt-transport-https
normalian@DESKTOP-QJCCAGL:~$ sudo apt-get update && sudo apt-get install azure-cliExecuting: gpg --ignore-time-conflict --no-options --no-default-keyring --homedir /tmp/tmp.5tm3Sb994i --no-auto-check-trustdb --trust-model always --keyring /etc/apt/trusted.gpg --primary-keyring /etc/apt/trusted.gpg --keyserver packages.microsoft.com --recv-keys 417A0893

...


normalian@DESKTOP-QJCCAGL:~$ az

Welcome to Azure CLI!
---------------------
Use `az -h` to see available commands or go to https://aka.ms/cli.

...


normalian@DESKTOP-QJCCAGL:~$ az login
To sign in, use a web browser to open the page https://aka.ms/devicelogin and enter the code XXXXXXXXX to authenticate.

...


normalian@DESKTOP-QJCCAGL:~$ az acs kubernetes install-cli
Downloading client to /usr/local/bin/kubectl from https://storage.googleapis.com/kubernetes-release/release/v1.7.0/bin/linux/amd64/kubectl
Connection error while attempting to download client ([Errno 13] Permission denied: '/usr/local/bin/kubectl')
normalian@DESKTOP-QJCCAGL:~$ sudo az acs kubernetes install-cli
Downloading client to /usr/local/bin/kubectl from https://storage.googleapis.com/kubernetes-release/release/v1.7.0/bin/linux/amd64/kubectl
normalian@DESKTOP-QJCCAGL:~$ az acs kubernetes get-credentials --resource-group=<resource group name> --name=<cluster name>  --ssh-key-file=<ssh key file>
normalian@DESKTOP-QJCCAGL:~$ kubectl get pods
NAME                             READY     STATUS    RESTARTS   AGE

Get started with Apache Storm on HDInsight for your jar files

$
0
0

HDInsight provides you to create Apache Storm clusters easily. Please read reference articles in this post if you don't know overview of Apache Storm.

Create Storm Cluster on HDInsight

Follow https://docs.microsoft.com/en-us/azure/hdinsight/hdinsight-apache-storm-tutorial-get-started-linux article until "Create a Storm cluster" section. It takes about 15 minutes to create your Storm cluster, and pick up below info to connect your Storm cluster.

  • SSH login URL: engiyoistorm02-ssh.azurehdinsight.net
  • Dashboard URL: https://"your cluster name".azurehdinsight.net/
  • StormUI URL: https://"your cluster name".azurehdinsight.net/stormui/index.html

Deploy your jar files into your Storm cluster

Create your jar file including Topology class to deploy into your Storm Cluster. Please refer below example if you don't have such Java projects.
https://github.com/apache/storm/tree/master/examples/storm-starter

After making your jar file, try to connect to your cluster via ssh. Here is a sample connecting to your cluster using WinSCP.
f:id:waritohutsu:20170724143720p:plain
Transfer your jar file from your computer into your cluster. Now, you can run your jar file into your cluster.

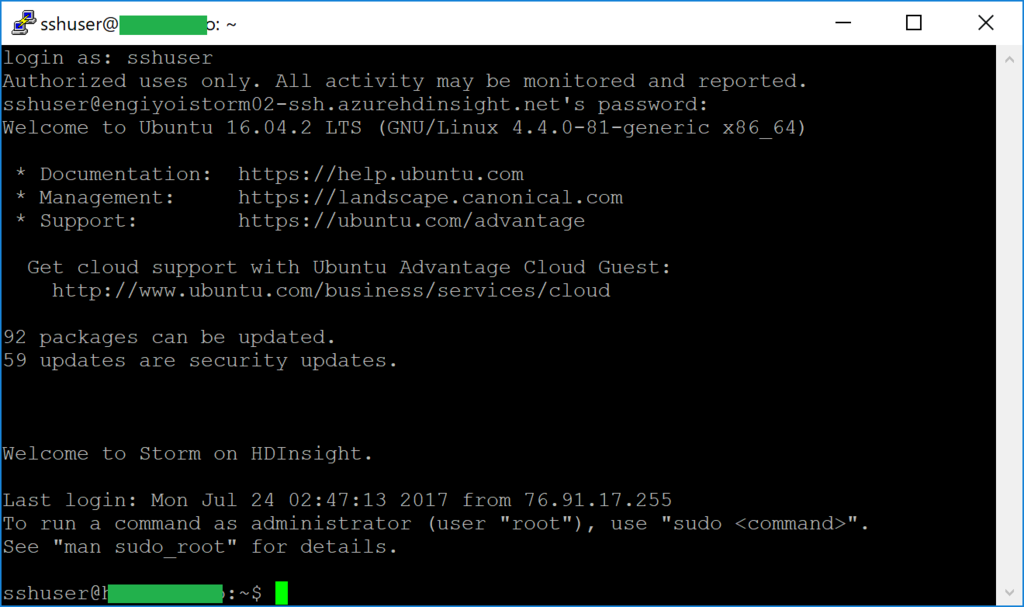
Connect to you cluster via ssh. Here is a sample connecting to your cluster using putty.
f:id:waritohutsu:20170724143739p:plain
Follow below commands to run your jar file. Specify second argument as topology class and third argument as topology name.

sshuser@xxxxxxxx:~$ storm jar /home/sshuser/hellostorm-0.0.1-SNAPSHOT.jar com.mydomain.hellostorm.HelloTopology hello-topology
sshuser@xxxxxxxx:~$ storm list
6244 [main] INFO  o.a.s.u.NimbusClient - Found leader nimbus : 10.0.0.10:6627
Topology_name        Status     Num_tasks  Num_workers  Uptime_secs
-------------------------------------------------------------------
hello-topology       ACTIVE     8          3            8758
Monitor your application

Open https://"your cluster name".azurehdinsight.net/stormui/index.html via your browser. You can find you topology in Storm UI.
f:id:waritohutsu:20170724143827p:plain

Data copy from FTP server to SQL Data Lake using Azure Data Factory

$
0
0

This topic introduces how to setup data copy from your FTP server to your SQL Data Lake using Azure Data Factory. This is really simple example, but you need some tips to setup even this simple example.

How to setup FTP server on Microsoft Azure

Create a Linux, CentOS7, virtual machine at first. After that, connect the VM with ssh, and run below commands.

[root@ftpsourcevm ~]# sudo su -
[root@ftpsourcevm ~]# yum -y update && yum -y install vsftpd

Please setup this vsftp server as passive mode with below sample. As far as I have confirmed, Azure Data Factory supports only passive mode ftp servers.

[root@ftpsourcevm ~]# vi /etc/vsftpd/vsftpd.conf

# When "listen" directive is enabled, vsftpd runs in standalone mode and
# listens on IPv4 sockets. This directive cannot be used in conjunction
# with the listen_ipv6 directive.
listen=YES
#
# This directive enables listening on IPv6 sockets. By default, listening
# on the IPv6 "any" address (::) will accept connections from both IPv6
# and IPv4 clients. It is not necessary to listen on *both* IPv4 and IPv6
# sockets. If you want that (perhaps because you want to listen on specific
# addresses) then you must run two copies of vsftpd with two configuration
# files.
# Make sure, that one of the listen options is commented !!
listen_ipv6=NO

pam_service_name=vsftpd
userlist_enable=YES
tcp_wrappers=YES

pasv_enable=YES
pasv_addr_resolve=YES
pasv_min_port=60001 ( you need add this port to this VM NSG setup
pasv_max_port=60010 ( you need add this port to this VM NSG setup
pasv_address=(update global ip address of your ftp server vm e.g. 52.1xx.47.xx)

Run below commands to reflect your config change.

[root@ftpsourcevm ~]# systemctl restart vsftpd
[root@ftpsourcevm ~]# systemctl enable vsftpd

Finally, you need to add allow port configuration between pasv_min_port and pasv_max_port into NSG. Please refer below image.
f:id:waritohutsu:20170829212808p:plain

How to setup Azure Data Lake for Azure Data Factory

Just create your Azure Data Lake instance, and add a directory for Azure Data Factory like below.
f:id:waritohutsu:20170829212827p:plain

How to setup Azure Data Factory to copy from your FTP server to your Azure Data Lake

After creating your Azure Data Factory instance, choose "Copy data (PREVIEW)" to setup this.
f:id:waritohutsu:20170829214430p:plain

Change this schedule period if it's needed.
f:id:waritohutsu:20170829212934p:plain

Choose "FTP" as "CONNECT TO A DATA SOURCE", but you can also choose other data sources such like S3 and other cloud data sources.
f:id:waritohutsu:20170829212957p:plain

Change to "Disable SSL" at "Secure Transmission" in this sample, and please setup SSL when you will deploy this pipeline in your production environments. Input a global in address of your ftp server and credential account info of your ftp server. You will get a connection error if you setup active mode FTP servers.
f:id:waritohutsu:20170829213020p:plain

Choose a folder for data source of Azure Data Factory. In this sample, we setup as binary copy mode. But you can setup other data copy types such like cvs and others.
f:id:waritohutsu:20170829213121p:plain

Choose "Azure Data Lake Store" as "CONNECT TO A DATA STORE" in this article.
f:id:waritohutsu:20170829213141p:plain

Choose your Azure Data Lake Store instance for storing data like below.
f:id:waritohutsu:20170829213202p:plain

Choose a folder for data storing destination.
f:id:waritohutsu:20170829213224p:plain

Confirm your setup info, and submit to deploy this pipeline.
f:id:waritohutsu:20170829213246p:plain

Confirm your setup

You can view your data copy pipeline in your Azure Data Factory like below. Azure Data Factory will copy your data on your FTP server into your Azure Data Lake following your schedule.
f:id:waritohutsu:20170829215545p:plain

How to use Hive tables in HDInsight cluster with Nikkei and DJIA

$
0
0

As you know, Nikkei Stock Average called Nikkei and Dow Jones Industrial Average called by DJIA are both famous stock market indexes. We can get daily data of them easily from below sites.

This topic introduces how to use hive tables with Nikkei and DJIA.

Create a HDInsight cluster

Go to Azure Portal and create new HDInsight cluster! In this sample, I choose HDInsight Spark Cluster, but it's not matter to choose other component which are available to use Hive. Please create or associate a Azure Storage to your cluster like below when you create it, because CSV data will be stored into the Azure Storage.
f:id:waritohutsu:20170901075326p:plain

Create Nikkei and DJIA Hive Tables

Go to cluster portal called Ambari, and its URL is https://"your cluster name".azurehdinsight.net/. Click top right side button on the portal and choose "Hive View" to use Hive query.
f:id:waritohutsu:20170901075359p:plain

And execute below Hive query in the portal.

CREATE DATABASE IF NOT EXISTS FINANCEDB;

DROP TABLE FINANCEDB.DJIATABLE;
CREATE EXTERNAL TABLE FINANCEDB.DJIATABLE
(
    `DATE` STRING,
    `DJIA` DOUBLE
) ROW FORMAT DELIMITED FIELDS TERMINATED BY ',' lines terminated by '\n' STORED AS TEXTFILE LOCATION 'wasbs:///financedata/DJIA.csv' TBLPROPERTIES("skip.header.line.count"="1");

DROP TABLE FINANCEDB.NIKKEITABLE;
CREATE EXTERNAL TABLE FINANCEDB.NIKKEITABLE
(
    `DATE` STRING,
    `NIKKEI` DOUBLE,
    `START` DOUBLE,
    `HIGHEST` DOUBLE,
    `LOWEST` DOUBLE
) ROW FORMAT SERDE 'org.apache.hadoop.hive.serde2.OpenCSVSerde'
WITH SERDEPROPERTIES (
   "separatorChar" = ",",
   "quoteChar"     = "\""
) STORED AS TEXTFILE LOCATION 'wasbs:///financedata/nikkei_stock_average_daily_jp.csv' TBLPROPERTIES("skip.header.line.count"="1");

Now, you can watch your hive table names in your Azure Storage which you have associated in your HDInsight cluster.
f:id:waritohutsu:20170901075434p:plain

Note those BLOB files are size zero. You should avoid to upload data before executing above queries, because you will get below errors when you execute the queries if you upload them before it.

 java.sql.SQLException: Error while processing statement: FAILED: Execution Error, return code 1 from org.apache.hadoop.hive.ql.exec.DDLTask. MetaException(message:wasbs://helloxxxxxxxxxxxxxx-2017-08-31t01-26-06-194z@hellosparyyyyyyyyyy.blob.core.windows.net/financedata/DJIA.csv is not a directory or unable to create one)

After executing CREATE TABLE queries, upload CSV data into the Azure Storage and override existing BLOB files like below.
f:id:waritohutsu:20170901075451p:plain

Confirm Hive Tables data

Go to "Hive View" in Ambari again, and execute below queries separately to avoid override. You can get some result data if your setup is correct.

SELECT * FROM FINANCEDB.DJIATABLE LIMIT 5;
SELECT * FROM FINANCEDB.NIKKEITABLE LIMIT 5;

You should check "TEXTFILE LOCATION" path and "default container" for HDInsight cluster in the Azure Storage if you can't get any data from the queries. Full path of a CSV file is "https://hellosparyyyyyyyyyy.blob.core.windows.net/helloxxxxxxxxxxxxxx-2017-08-31t01-26-06-194z/financedata/DJIA.csv, but some people confuse "default container" path.

Extract data as joined one using Nikkei and DJIA Hive tables

Execute below query to get data with joind one, because Nikkei CSV file expresses date as "2014/01/06" and DJIA one expresses date as "2013-12-16".

SELECT d.`DATE`, d.DJIA, n.NIKKEI
FROM FINANCEDB.DJIATABLE d JOIN FINANCEDB.NIKKEITABLE n 
ON ( regexp_replace(d.`DATE`, '-', '') = regexp_replace(n.`DATE`, '/', '') ) LIMIT 5;

You can view below query result if you have setup correctly, but please note Nikkei is expressed as "YEN" and DJIA is expressed as "Dollar". Please improve this sample to express same concurrency if it's possible!
f:id:waritohutsu:20170901075512p:plain

Create joined query result from Nikkei and DJIA using Spark APIs with HDInsight

$
0
0

In previous topic, I have introduced how to use Hive tables with HDInsight in How to use Hive tables in HDInsight cluster with Nikkei and DJIA. I will introduce how to use Spark APIs with HDInsight in this topic.

requirements

You have to complete below requirements to follow this topic.

Modify csv file titles

You have already downloaded USDJPY.csv and nikkei_stock_average_daily_jp.csv files, but titles of the csv files are written by Japanese. Modify the titles into English to use from Spark APIs easily like below.

  • USDJPY.csv file
日付,始値,高値,安値,終値
2007/04/02,117.84,118.08,117.46,117.84

DATE,OPEN,HIGH,LOW,CLOSE
2007/04/02,117.84,118.08,117.46,117.84
  • nikkei_stock_average_daily_jp.csv
データ日付,終値,始値,高値,安値
"2014/01/06","15908.88","16147.54","16164.01","15864.44"

DATE,CLOSE,OPEN,HIGH,LOW
"2014/01/06","15908.88","16147.54","16164.01","15864.44"

And save the csv files as "USDJPY_en.csv" and "nikkei_stock_average_daily_en.csv". And upload the csv files into your Azure Storage associated with your Spark cluster like below.
f:id:waritohutsu:20170903124441p:plain

Refer below URL and Path example if you can't figure out which path you should locate the csv files, because some people sometimes confuse them.

Create Spark application with Scala

At first, refer https://docs.microsoft.com/en-us/azure/hdinsight/hdinsight-apache-spark-intellij-tool-plugin. You have to follow the topic until "Run a Spark Scala application on an HDInsight Spark cluster" at section "Run a Spark Scala application on an HDInsight Spark cluster". Now, you have a skeleton of your spark application. Update your scala file like below.

import org.apache.spark.SparkConf
import org.apache.spark.SparkContext
import org.apache.spark.sql.types.TimestampType
import org.apache.spark.sql.{SaveMode, SparkSession}

object MyClusterApp {
  def main(args: Array[String]): Unit = {
    val spark = SparkSession.builder().appName("MyClusterApp").getOrCreate()

    val dataset_djia = "wasb://hellosparkxxxxxxx-2017-08-77777-33-yy-zzz@hellosparkatxxxxxxxtorage.blob.core.windows.net/financedata/DJIA.csv"val dataset_nikkei = "wasb://hellosparkxxxxxxx-2017-08-77777-33-yy-zzz@hellosparkatxxxxxxxtorage.blob.core.windows.net/financedata/nikkei_stock_average_daily_en.csv"val dataset_usdjpy = "wasb://hellosparkxxxxxxx-2017-08-77777-33-yy-zzz@hellosparkatxxxxxxxtorage.blob.core.windows.net/financedata/USDJPY_en.csv"// Load csv files and create a DataFrame in temp view, you have to change this when your data will be massiveval df_djia = spark.read.options(Map("header" -> "true", "inferSchema" -> "true", "ignoreLeadingWhiteSpace" -> "true")).csv(dataset_djia)
    df_djia.createOrReplaceTempView("djia_table")
    val df_nikkei = spark.read.options(Map("header" -> "true", "inferSchema" -> "true", "ignoreLeadingWhiteSpace" -> "true")).csv(dataset_nikkei)
    df_nikkei.createOrReplaceTempView("nikkei_table")
    val df_usdjpy = spark.read.options(Map("header" -> "true", "inferSchema" -> "true", "ignoreLeadingWhiteSpace" -> "true")).csv(dataset_usdjpy)
    df_usdjpy.createOrReplaceTempView("usdjpy_table")

    // Spark reads DJIA date as "DATE" type but it reads Nikkei and USDJPY date as "STRING", so you have to cast the data type like below.val retDf = spark.sql("SELECT djia_table.DATE, djia_table.DJIA, nikkei_table.CLOSE/usdjpy_table.CLOSE as Nikkei_Dollar FROM djia_table INNER JOIN nikkei_table ON djia_table.DATE = from_unixtime(unix_timestamp(nikkei_table.DATE , 'yyyy/MM/dd')) INNER JOIN usdjpy_table on djia_table.DATE = from_unixtime(unix_timestamp(usdjpy_table.DATE , 'yyyy/MM/dd'))")
    //val retDf = spark.sql("SELECT * FROM usdjpy_table")
    retDf.write
      .mode(SaveMode.Overwrite)
      .format("com.databricks.spark.csv")
      .option("header", "true")
      .save("wasb://hellosparkxxxxxxx-2017-08-77777-33-yy-zzz@hellosparkatxxxxxxxtorage.blob.core.windows.net/financedata/sparkresult")
  }
}

After updating your scala file, run the application following https://docs.microsoft.com/en-us/azure/hdinsight/hdinsight-apache-spark-intellij-tool-plugin. You can find result files in your Azure Storage like below if your setup is correct!
f:id:waritohutsu:20170903124521p:plain

Download the part-xxxxxxxxxxxxxxx-xxx-xxxxx.csv file and check the content, and you can get date, DJIA dollar and Nikkei dollar data like below.

DATE,DJIA,Nikkei_Dollar
2014-01-06T00:00:00.000Z,16425.10,152.64709268854347
2014-01-07T00:00:00.000Z,16530.94,151.23238022377356
2014-01-08T00:00:00.000Z,16462.74,153.77193819152996
2014-01-09T00:00:00.000Z,16444.76,151.54432674873556
2014-01-10T00:00:00.000Z,16437.05,152.83892037268274
2014-01-14T00:00:00.000Z,16373.86,148.021883098186
2014-01-15T00:00:00.000Z,16481.94,151.22182896498947
2014-01-16T00:00:00.000Z,16417.01,150.96539162112933
2014-01-17T00:00:00.000Z,16458.56,150.79988499137434
2014-01-20T00:00:00.000Z,.,150.18415746519443
2014-01-21T00:00:00.000Z,16414.44,151.47640966628308
2014-01-22T00:00:00.000Z,16373.34,151.39674641148324
2014-01-23T00:00:00.000Z,16197.35,151.97414794732765
2014-01-24T00:00:00.000Z,15879.11,150.54342723004694

ロサンゼルス生活日誌 ~その3アメリカの銀行って日本と違うの?~

$
0
0

ちょっと間が空きましたがこんにちは、今回はアメリカの銀行について紹介します。アメリカの銀行口座は日本と少々考え方が違うので、私が実際に色々と手続きした時にちょっと困ったことも含めて紹介します。私は日本人にやさしいという噂をうのみにして三菱東京UFJが買収した Union Bank で銀行口座を開設しましたが、Bank of America, Chase, Wells Fargo 等々と銀行は色々あるので用途に応じて開設先の銀行を選んでください。

Social Security Numberが必要か?

Social Security Number通称 SSN はアメリカでのマイナンバーの様なものです(検索すると山の様に情報がでてくるので、ここでの説明は割愛します)。原則これに全部(銀行口座、クレジットカード、こちらでの運転免許等々)が紐づきます。とある人に聞いたところによると犯罪歴(スピード違反ややらかし事故等々を含む)も SSN で全部紐づけられるらしいあげく、一生ものらしいので一度作ったら帰国しようが消えず、再入国しても元の SSN が使われるらしいです。
本題の「銀行口座の開設に SSN は必要か?」ですが、結論から言うと必ずしも要りません。知人は SSN 無しで口座を作ったとのことですし、私は「SSN 申請中」の報告をして口座開設を完了しました(後日 SSN 取得後にちゃんと送付しましたが)。

Checking Account と Saving Account って何? Routing Number って何?

この Checking Account と Saving Account の存在が日本の銀行口座とのもっとも大きな差異の一つだと思うのですが、アメリカで銀行口座を開設すると自動的にこの二つ( Checking, Saving )が作られます。日本の銀行に強引に例えるなら Checking Account が普通口座、Saving Account は 定期預金口座 が一番近いと思いますが結構気軽に金額の引き出しは出来たりします。私は Union Bank で口座を開設しましたが、オンラインバンキングでの表示は以下の様になります。
f:id:waritohutsu:20170904071135p:plain

現地の方に聞いたところ、クレジットカード等は checking account に紐づけ、貯めるためのお金(文字通り saving なお金)を checking account から saving account へ移動・もしくは直接 saving account へ振り込みをするそうです。saving account から checking account へのお金の移動もできますが、saving のお金を月に何度も移動すると以下の様に手数料がとられる様なので、そこには注意してください。
f:id:waritohutsu:20170904071355p:plain

また、給与振り込みを会社にお願いする場合等に銀行口座を指定する場合に Account Number と Routing Number というのが求められます。2点注意があり、それぞれ以下です。

Check って何さ?

日本の銀行システムでいう「小切手」に相当すると思うこれ、日本だと企業間しか原則使わないと思いますが、アメリカでは民間でも多用します。こっちに来た時に「check?(チェックでの支払いか?)」とだけ聞かれたりすることがあったのですが、当初は全く意味が分からなくて混乱しました(英語の問題とか関係なく、こういう社会の仕組みが違うのが一番大変)。
特に多いのが家賃の初回支払いは「only check(小切手だけ)」なんてところも多く、電気の支払いや固めなところの支払いでも利用することが多いです(電気の支払いはネットでも大丈夫でしたが)。日本から来た方は書き方が分からないと思いますので、支払いを求める人に金額・振込先を含む Check の記載をしてもらい、問題ないかを確認してサインをすると楽だと思います。
本来、銀行からは Check Book と呼ばれるものが送付されるはずなのですが、私にはなぜか送られてこなかったせいで Check が枯渇して困っていたりします。。。

他者への送金

上記の Union Bank オンラインバンキングの画面に "Transfer"があると思いますが、こちらを利用して他者(私は他人の Union Bank にしか送金したことはありませんが、他行でもできると思います)にお金を送金できます。この際に注意が必要なのが「送金先の登録に数日、送金額の submit から数日しないと相手にお金が届かない」という点です。私は知人から車を購入し、相手に購入額を送金しようとしたのですが大分時間がかかってしまいました(相手はこの手の事情が分かる位に在住期間が長かったので問題になりませんでしたが)ので、送金の際には気を付けてください。
f:id:waritohutsu:20170904071529p:plain

Debit Card

Union Bank 限定かどうかはしりませんが、口座を開設すると Debit Card が配布されます。クレジットカード的に使えるので便利だなぁと思っていたのですが、以下の様なのでお気を付けを。

Debit Card の利用には Activation が必要なのですが、電話という中々ハードルが高い挙句に自動音声とのコンボで対応が面倒だったので店舗に直接行ったら優しく対応してくれました。ありがとう Union Bank のスタッフさん。

How to copy comma separated CSV files into Azure SQL Database with Azure Data Factory

$
0
0

This topic introduces how to copy CSV files data into SQL Database with Azure Data Factory. At first, install SSMS from Download SQL Server Management Studio (SSMS) . After setting up SSMS, follow below step to copy CSV files data into SQL Database.

  • Upload CSV files into Azure Storage
  • Create a table in your SQL Database
  • Copy CSV files into your SQL Database with Azure Data Factory

Upload "USDJPY.csv" file into your Azure Storage from http://www.m2j.co.jp/market/historical.php if you haven't follow the topic and it will probably work.

Create a table in your SQL Database

You have to setup your SQL Database instance if you don't have it. After creating that, setup firewall following Azure SQL Database server-level and database-level firewall rules to access with "sqlcmd" command from your computer.
After setting up your SQL Database, execute below command from your client computer. Note to execute below with one liner, because I just add line breaks to read easily.

normalian> sqlcmd.exe -S "server name".database.windows.net -d "database name" -U "username"@"server name" -P "password" -I -Q 
"CREATE TABLE [dbo].[USDJPY]
(
    [ID] INT NOT NULL PRIMARY KEY IDENTITY(1,1), 
    [DATE] DATETIME NOT NULL, 
    [OPEN] FLOAT NOT NULL, 
    [HIGH] FLOAT NOT NULL, 
    [LOW] FLOAT NOT NULL, 
    [CLOSE] FLOAT NOT NULL
)"

You can remove the table using below command if you mistake something for this setting.

normalian> sqlcmd.exe -S "server name".database.windows.net -d "database name" -U "username"@"server name" -P "password" -I -Q "DROP TABLE [dbo].[USDJPY]"

Copy CSV files into your SQL Database with Azure Data Factory

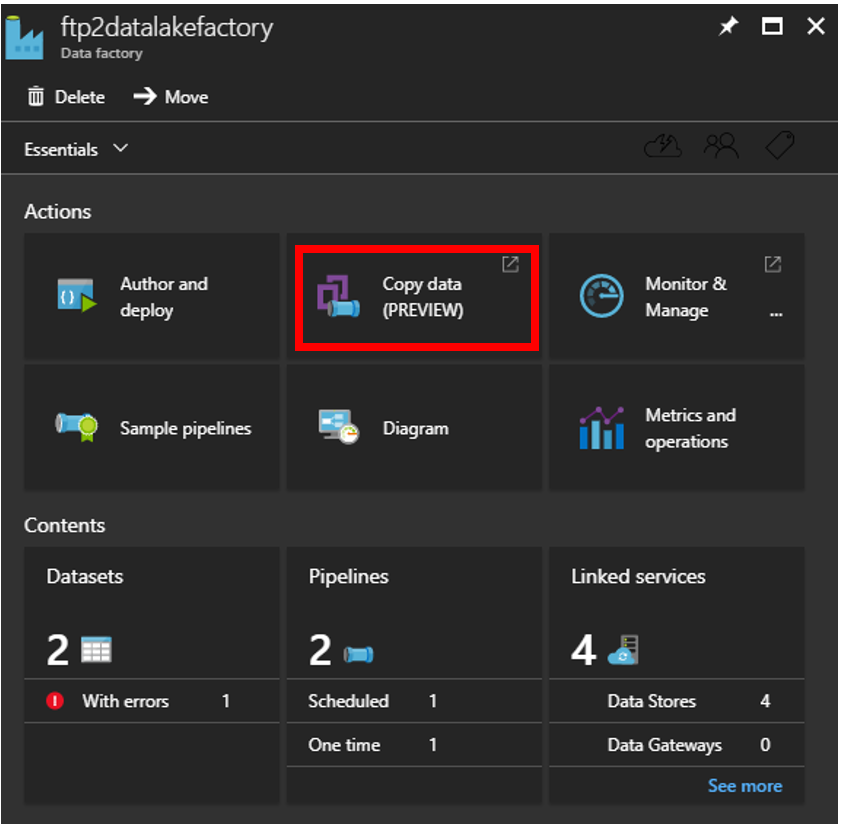
At first, create your Azure Data Factory instance. And choose "Copy data(PREVIEW)" button like below.
f:id:waritohutsu:20170904232426p:plain

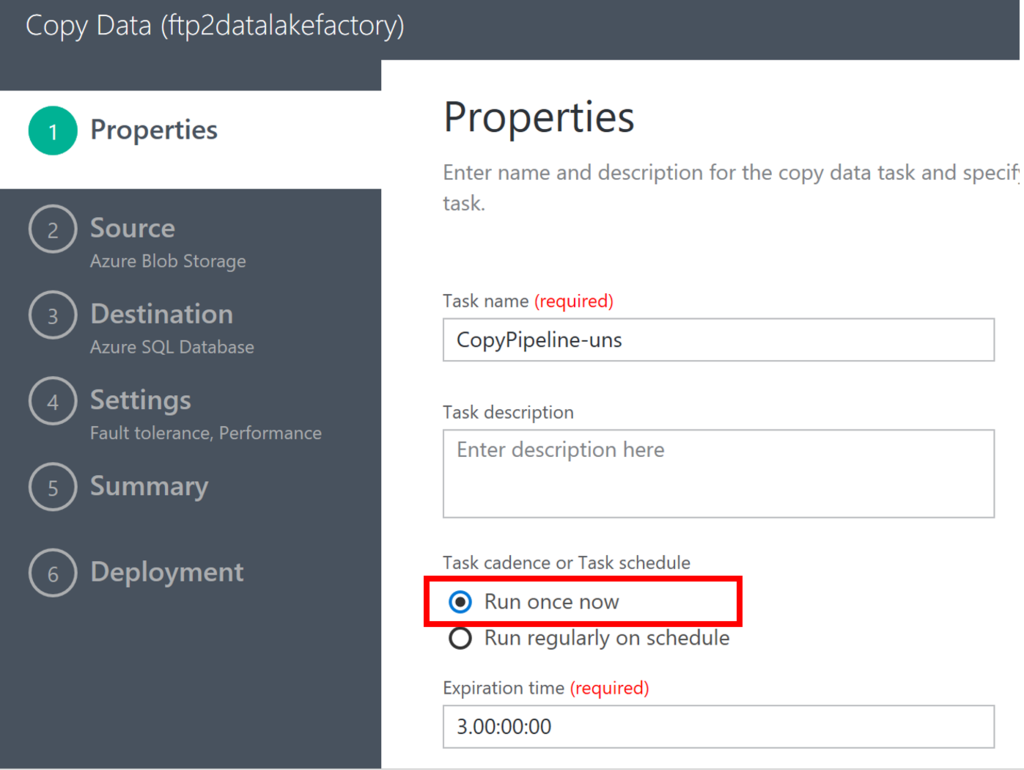
Next, choose "Run once now" to copy your CSV files.
f:id:waritohutsu:20170904232454p:plain

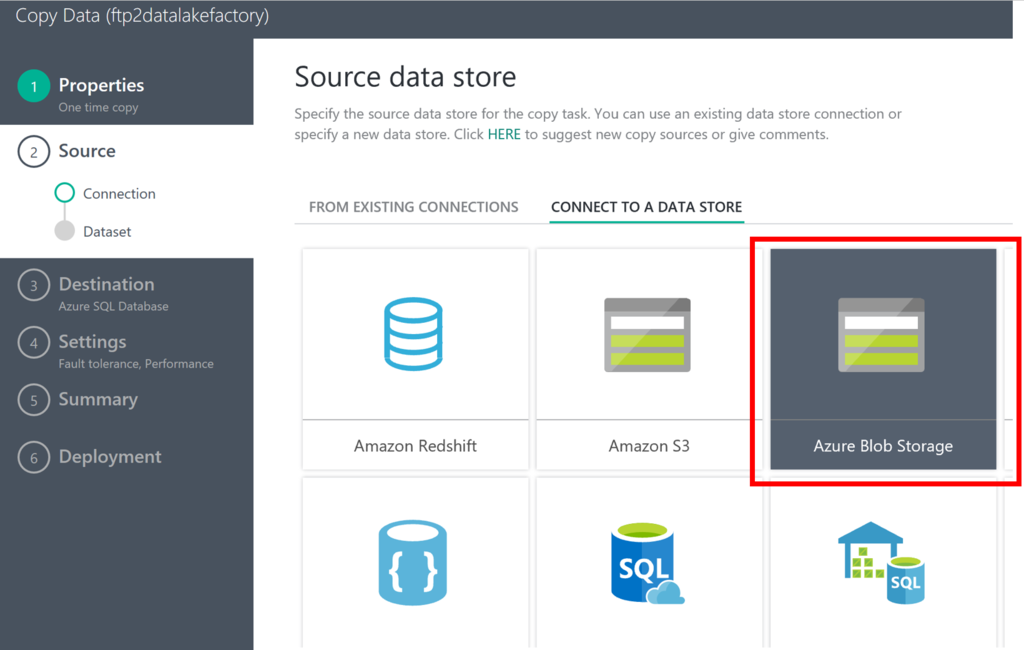
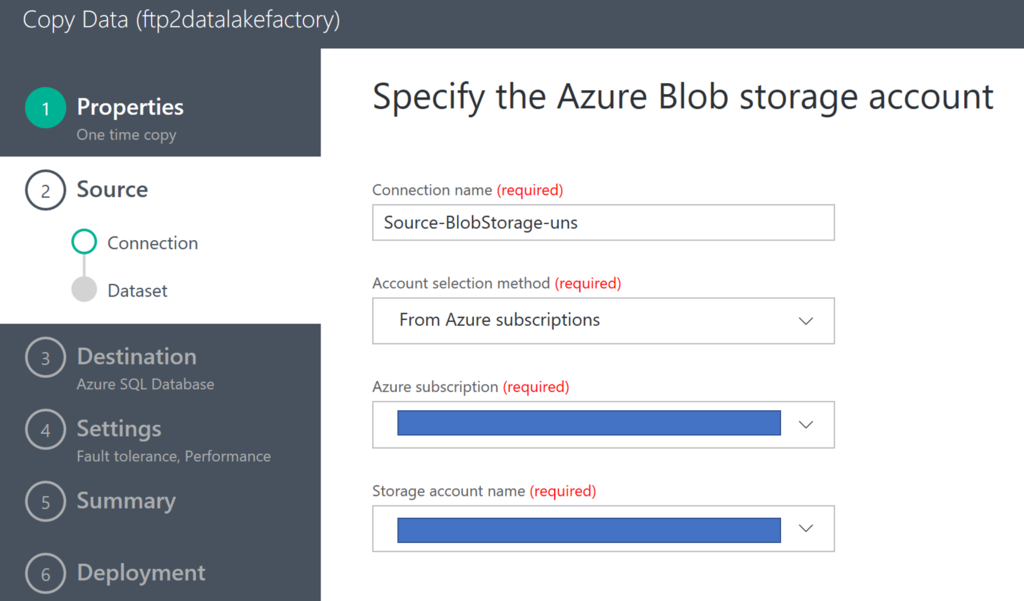
Choose "Azure Blob Storage" as your "source data store", specify your Azure Storage which you stored CSV files.
f:id:waritohutsu:20170904232523p:plain
f:id:waritohutsu:20170904232551p:plain

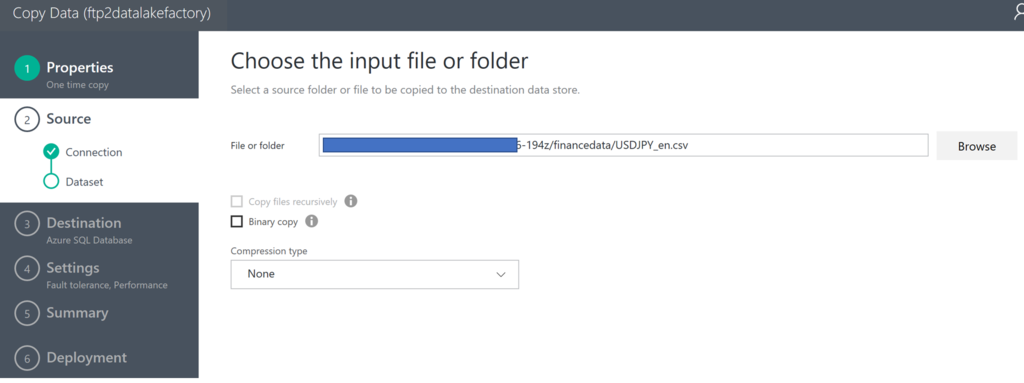
Choose your CSV files from your Azure Storage.
f:id:waritohutsu:20170904232635p:plain

Choose "Comma" as your CSV files delimiter and input "Skip line count" number if your CSV file has headers.
f:id:waritohutsu:20170904232717p:plain

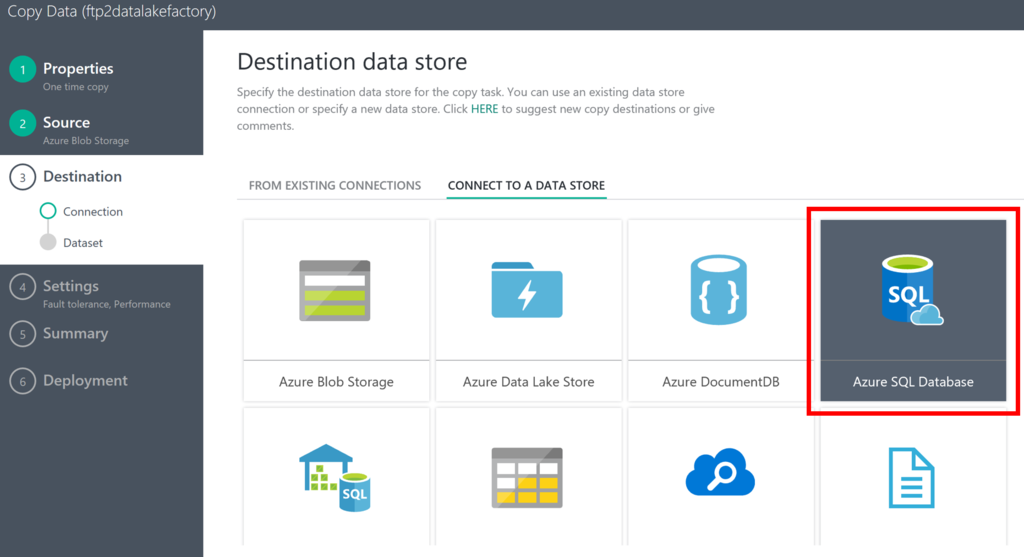
Choose "Azure SQL Database" as your "destination data store".
f:id:waritohutsu:20170904232750p:plain

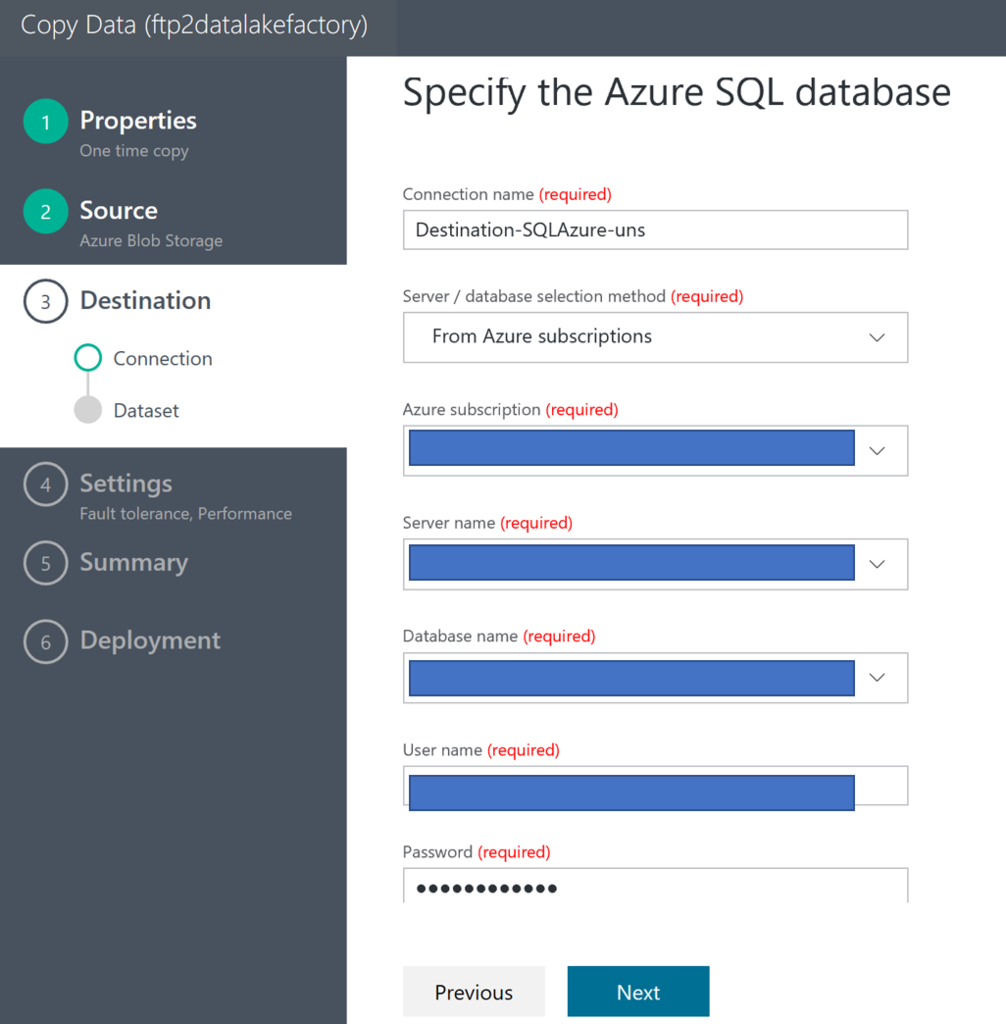
Input your "Azure SQL Database" info to specify your instance.
f:id:waritohutsu:20170904232823p:plain

Select your table from your SQL Database instance.
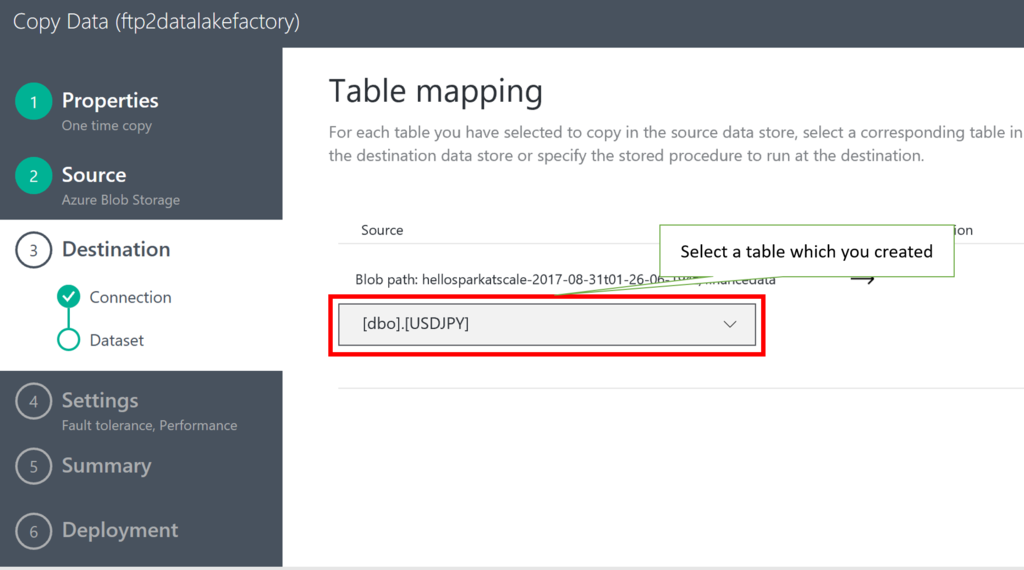
f:id:waritohutsu:20170904232852p:plain

Check your data mapping.
f:id:waritohutsu:20170904232921p:plain

Execute data copy from CSV files to SQL Database just confirming next wizards.
f:id:waritohutsu:20170904232958p:plain

After completing this pipeline, execute below command in your machine. You can get data from SQL Database.

normalian> sqlcmd.exe -S "server name".database.windows.net -d "database name" -U "username"@"server name" -P "password" -I -Q "SELECT * FROM [dbo].[USDJPY] ORDER BY 1;"

You can get some data from SQL Database if you have setup correctly.

ロサンゼルス生活日誌 ~その4 米国でのインターネット開通~

$
0
0

ご無沙汰してますがこんにちは。実は私が一番苦労した米国でのインターネット開設の流れを紹介したいと思います。日本だったりすれば KDDIか NTT 東西 辺りに頼めば大きな問題になることはないイメージですが、米国では相当の企業がどこかを知らなかったのが大きな敗因でした。この辺の苦労と米国特有の板挟みの経由を紹介したいと思います。

インターネット開設のためにたどった流れ

まずは私が今回インターネット開通までにたどった流れを紹介します。具体的には以下の様な流れになりましたが、結局 CONSOLIDATE SMART SYSTEM → Spectrum → DIRECTVAT&T→ CONSOLIDATE SMART SYSTEMというループをしてます。このたらい回しは non native speaker にはなかなか辛かったっす。。。。

  1. 居住が決まったアパートから勧められた CONSOLIDATED SMART SYSTEMに連絡したが、電話越しにクレジットカード番号の提示を求められ「契約ごとは文章が無いと信用できないからメールで文章よこせ」と突っぱねたにも拘わらず電話でしか連絡が来ないので放置する
    • DIRECTVという有名なプロバイダの Authorized Partner とチラシに書かれていたもののいまいち信用できず
    • 周辺の知人にも「いきなりクレジットカード番号を要求する様なところは辞めた方が良い」と言われて却下
  2. 近所に Spectrumのオフィスがあることが分かったので直接訪問してインターネット契約をお願いしてみるが「お前の住んでるところはサポートしてない」と言われる。「CONSOLIDATED SMART SYSTEM ってところを勧められたがクレジットカード番号を電話越しに聞かれたから信用できない」と答えたところ「DIRECTVへ直に連絡した方がよい」と言われる
  3. DIRECTVへ直接連絡したら「お前の住んでいる場所だとインターネット契約は AT&Tを使っているから直接連絡しろ」とたらい回し。DIRECTVは後述の AT&Tの様にチャットでのQ&Aサービスがあったのでその点は楽だった。どうやらそもそも DIRECTVはプロバイダ相当らしく、インターネット回線自体は提供できない模様。
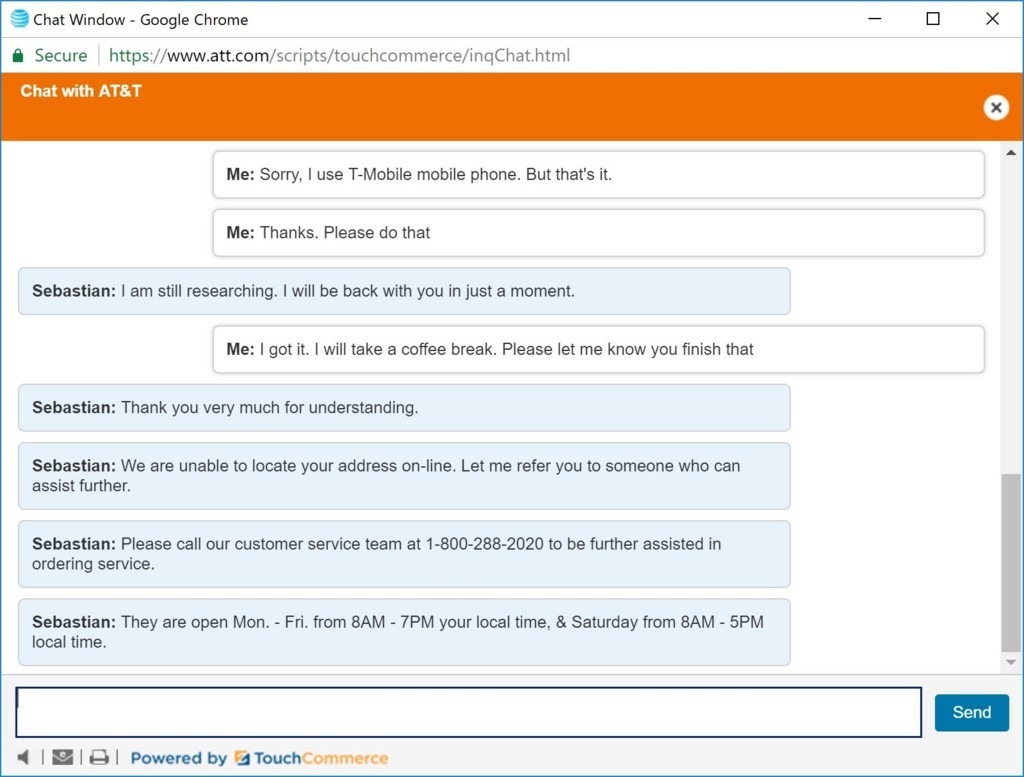
  4. AT&Tのチャットサービスに以下の様に聞いたところ「お前の住んでるところはよく分からんから直接電話窓口に連絡しろ」と言われる。これまたチャットで話せるのはまだ大分マシ f:id:waritohutsu:20171002085452j:plain
  5. AT&Tの窓口に連絡したところ「DIRECTVの契約が無いと紹介できないサービスだ」と言われ、仕方なく DIRECTVの契約を行う
  6. AT&TDIRECTV契約者専用窓口に電話したところ長々と個人情報とクレジットカード番号を聞かれる。AT&Tだからまぁ仕方あるまいとクレジットカード番号を伝えたところ、最終的に「どこでも良いから AT&Tの実店舗に行ってID(身分証明書)を見せろ」と言われる
  7. 最寄りの AT&T実店舗に行ったところ「そんなサービスを聞いたことが無い」と言われ契約が成立せず。「俺はこの電話口の相手と契約の話を進めたのにどっちかが嘘言ってんのか?」位をプッシュしても相手微動だにせず。しかも再度電話をかけたら窓口の相手が変わっており話が進まず。最終的に「契約できねぇのは分かったんだけど、DIRECTVは要らないから解約させろ」という点だけ聞き、DIRECTVの解約だけして帰宅
  8. 最終的に選択子が無かったので CONSOLIDATED SMART SYSTEM に連絡し電話口でクレジットカード番号を仕方なしに伝える。一週間程度でインターネットが開通\(^o^)/

上記を踏まえてインターネット開設時の反省

どうも住んでいる場所によって「おススメのインターネット会社」のレベルでなく「そもそも契約できるインターネット会社」が違うようです。私のヒアリング力だと解釈しきれなかったのですが、話を聞くと「お前の住んでるアパートでは一括で Home Association 契約が存在しているので個別契約はできない」という旨を言われて AT&Tからは契約を拒否されました\(^o^)/
米国では一軒家レンタルが一般的なので、一軒家レンタルをする場合は個別契約でよいと思いますが、私の様にアパートの場合は住んでる方や Leasing Office(アパートの管理事務所相当)のおススメに素直に従った方が楽だと思います。
また、クレジットカードも実際に銀行口座から引かれるまでに「これ身に覚えないから請求止めて」と連絡することが可能だったりします。その点でも契約はフットワークが軽くても良かったかもしれません。

インターネット開通前までは T-Mobile携帯のテザリングを利用してインターネットを利用していたのでえらい回線が遅かったです。しかし、仮にインターネット契約が遅れたとしても、スターバックスや Coffee Beans 等々のカフェでインターネットを気軽に使えるのが米国の良いところです(正直、米国でノマドが流行るわけが分かった気が。。。)。

最後に ~米国での契約について~

米国での契約はマジで注意しましょう。「よく分からないけどサインする」は完全に却下です。契約書にサインした時点で契約に完全に同意したとみなされます。どんなに理不尽な内容であったとしても、この時点でもう誰も助けられないし誰も助けてくれません。日本と違って「普通このくらい~」の「普通」という概念は米国には無いと思って契約を見ないと痛い目に見かねないので契約書を見るときには細心の注意を払いましょう。契約については以下のスタンスで行くと痛い目をみにくいと思います。


How to create Hive tables via Ambari on Microsoft Azure HDInsight

$
0
0

As you know, HDInsight is powerful service to analyze, manage and process BigData on Microsoft Azure. You can create Hadoop, Storm, Spark and other clusters pretty easily! In this article, I will introduce how to create Hive tables via Ambari with cvs files stored in Azure Storage.
At first, you have to create your HDInsight cluster associated an Azure Storage account. In this article, I create a Spark 2.1.x cluster as HDInsight cluster.

Store CSV files into your Azure Storage

Upload your CSV files into the Azure Storage account. In this article, I upload Nikkei Average CSV file like below.

DATE,CLOSE,START,HIGH,LOW
2012/1/5,8488.71,8515.66,8519.16,8481.83
2012/1/6,8390.35,8488.98,8488.98,8349.33
2012/1/10,8422.26,8422.99,8450.59,8405.18
2012/1/11,8447.88,8440.96,8463.72,8426.03
2012/1/12,8385.59,8423.1,8426.83,8360.33
2012/1/13,8500.02,8471.1,8509.76,8458.68
2012/1/16,8378.36,8409.79,8409.79,8352.23
2012/1/17,8466.4,8420.12,8475.66,8413.22
2012/1/18,8550.58,8458.29,8595.78,8446.09
2012/1/19,8639.68,8596.68,8668.94,8596.68
2012/1/20,8766.36,8751.18,8791.39,8725.32
2012/1/23,8765.9,8753.91,8795.27,8744.54
2012/1/24,8785.33,8815.36,8825.09,8768.51
2012/1/25,8883.69,8842.01,8911.62,8816.09
2012/1/26,8849.47,8890.49,8894.6,8834.93
2012/1/27,8841.22,8851.02,8886.02,8810.89
2012/1/30,8793.05,8803.79,8832.48,8774.23
2012/1/31,8802.51,8781.44,8836.68,8776.65

It's stored into Azure Storage account associated with HDInsight cluster, and its path is described as "https://"storage-account-name"."spark-container-name".blob.core.windows.net/financedata/nikkei_stock_average_daily_en.csv". You can specify the path in Hive query as "wasb://"spark-container-name"@"storage-account-name".blob.core.windows.net/financedata/nikkei_stock_average_daily_en.csv".

Create Hive tables from your CSV files

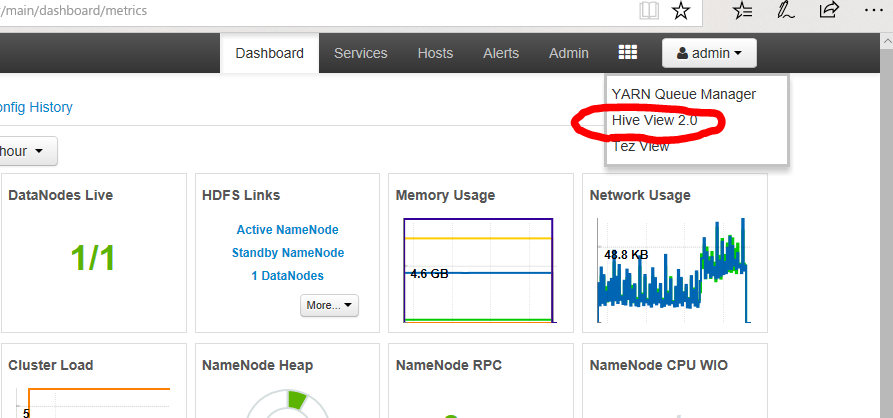
Open https://portal.azure.com/ and choose your HDInsight cluster. You can open Ambari portal to click a link of "https://'your-cluster-name'.azurehdinsight.net" in "Overview" page. Next, click "Hive View 2.0" button like below.
f:id:waritohutsu:20171002124722p:plain

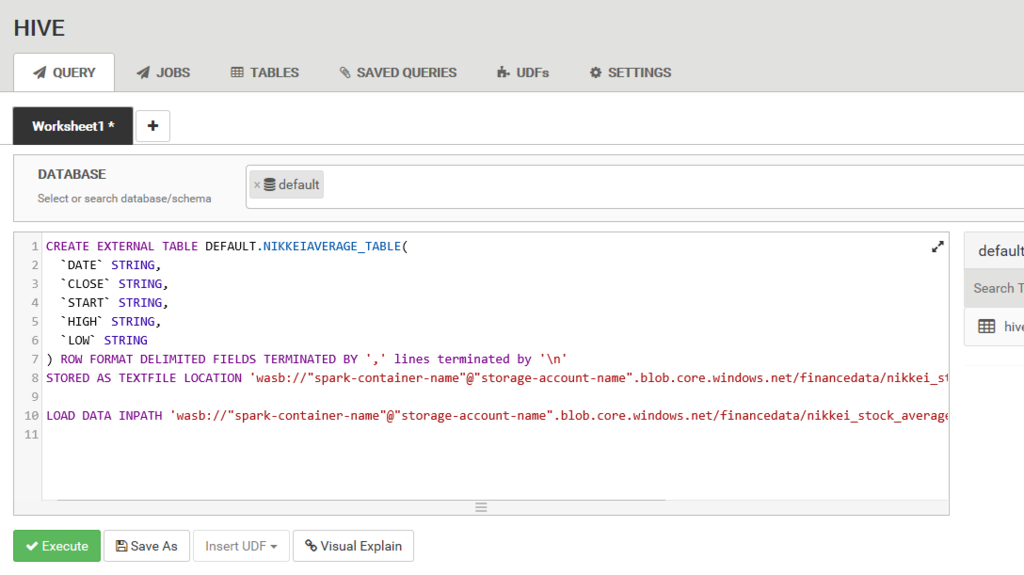
Now, you can execute Hive query using below portal site.
f:id:waritohutsu:20171002124752p:plain
Copy below query and execute it into the site.

CREATE EXTERNAL TABLE DEFAULT.NIKKEIAVERAGE_TABLE(
  `DATE` STRING,
  `CLOSE` STRING,
  `START` STRING,
  `HIGH` STRING,
  `LOW` STRING
) ROW FORMAT DELIMITED FIELDS TERMINATED BY ',' lines terminated by '\n'
STORED AS TEXTFILE LOCATION 'wasb://"spark-container-name"@"storage-account-name".blob.core.windows.net/financedata/nikkei_stock_average_daily_en.csv';

LOAD DATA INPATH 'wasb://"spark-container-name"@"storage-account-name".blob.core.windows.net/financedata/nikkei_stock_average_daily_en.csv' INTO TABLE DEFAULT.NIKKEIAVERAGE_TABLE;

Check your query result

After executing your query, run below query to check the data in Ambari.

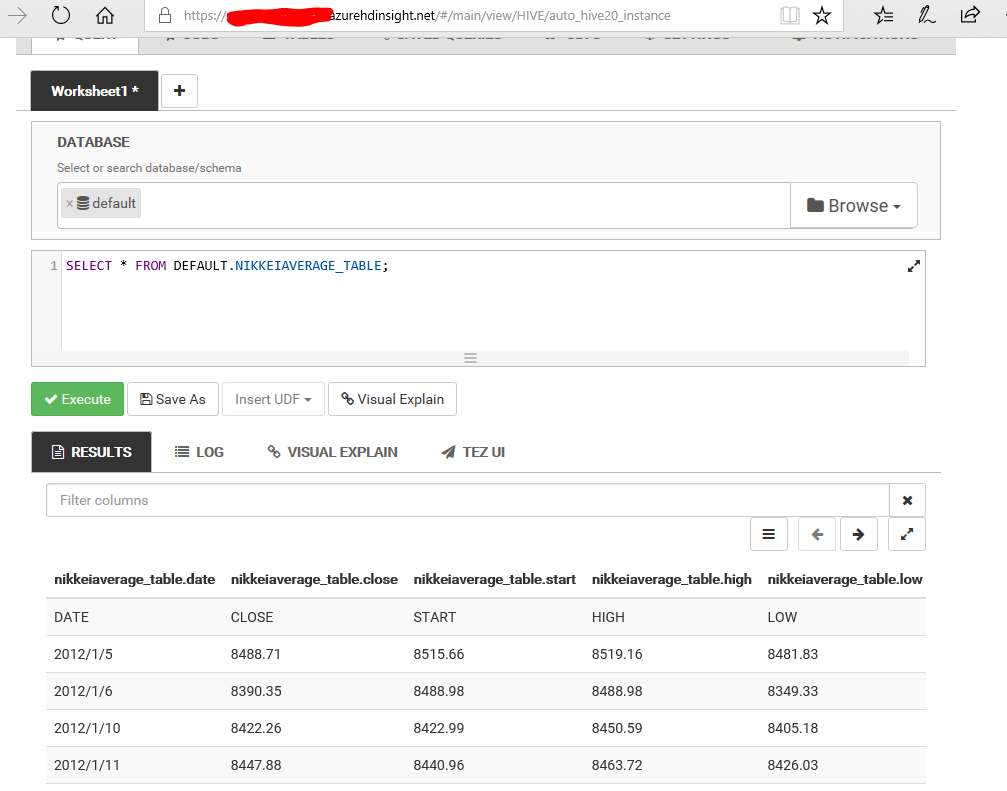
SELECT * FROM DEFAULT.NIKKEIAVERAGE_TABLE;

So, you can get below result.
f:id:waritohutsu:20171002150636p:plain

How to deploy your Azure Functions with VSTS when your project has multiple solutions

$
0
0

This article introduces how to deploy your Azure Functions with VSTS when your projects have multiple solutions like below. Please refer GitHub - AzureFunctions-CSharp-Sample if you need Azure Functions sample.

Your-Sample-Project
└─Trunk
    ├─HttpDemoFunctionApp
  └─JobDemoFunctionApp
        └─JobDemoFunctionApp

How to setup this build process

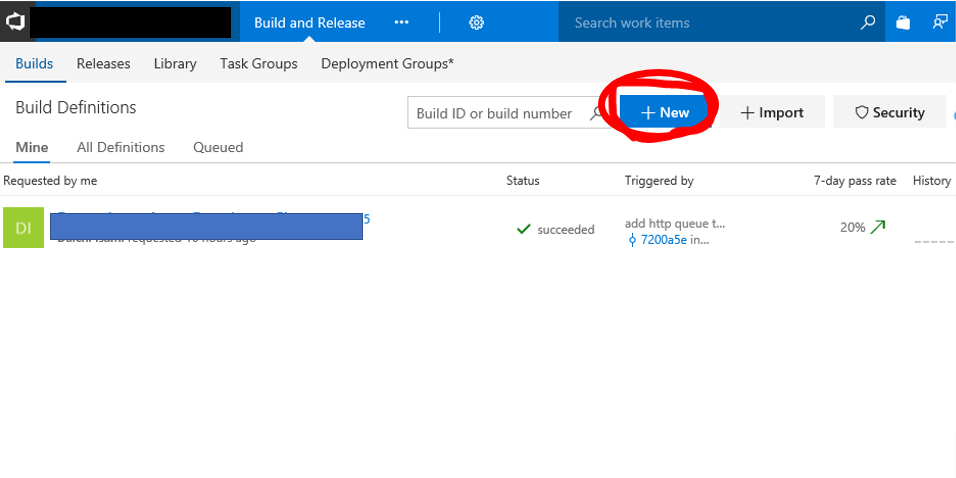
Open "Build and Release" tab in your VSTS project, and click "+New" button like below.
f:id:waritohutsu:20171031021259p:plain

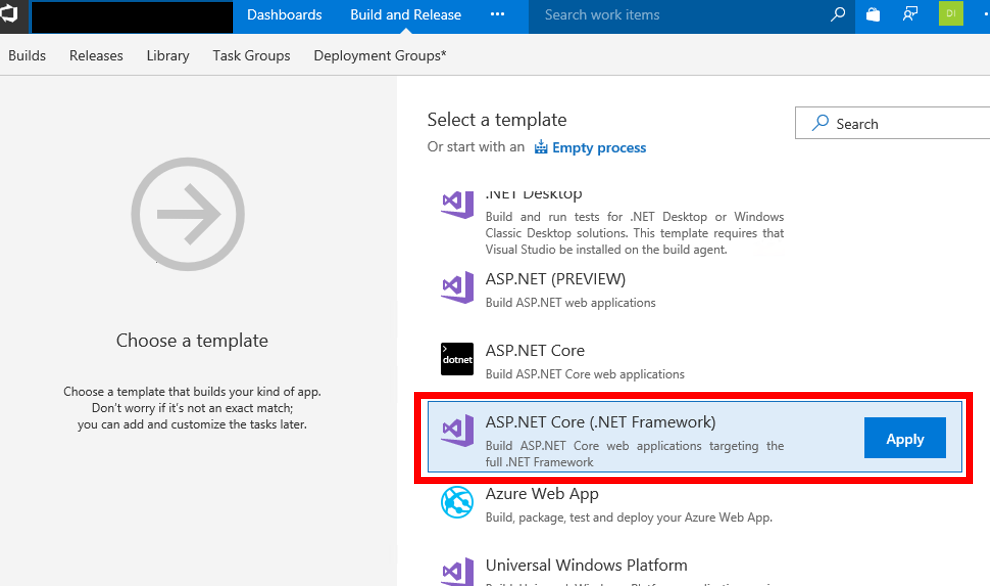
Choose "ASP.NET Core (.NET Framework)" template like below.
f:id:waritohutsu:20171031021310p:plain

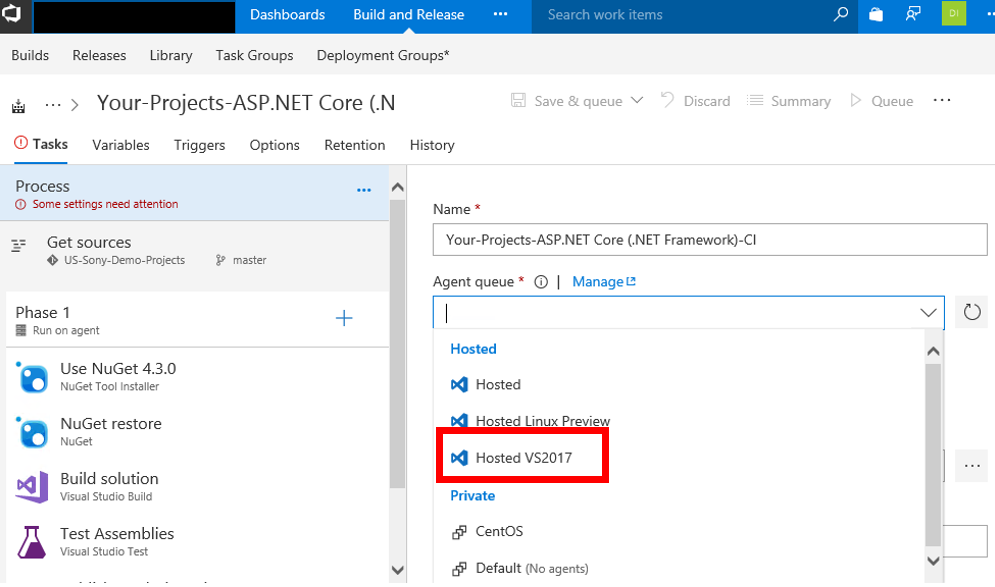
After creating a process, choose"Hosted VS2017" as "Agent queue". You will get error when you run this process if you choose other Agents.
f:id:waritohutsu:20171031021324p:plain

Choose your Azure Functions solution to deploy like below.
f:id:waritohutsu:20171031021341p:plain

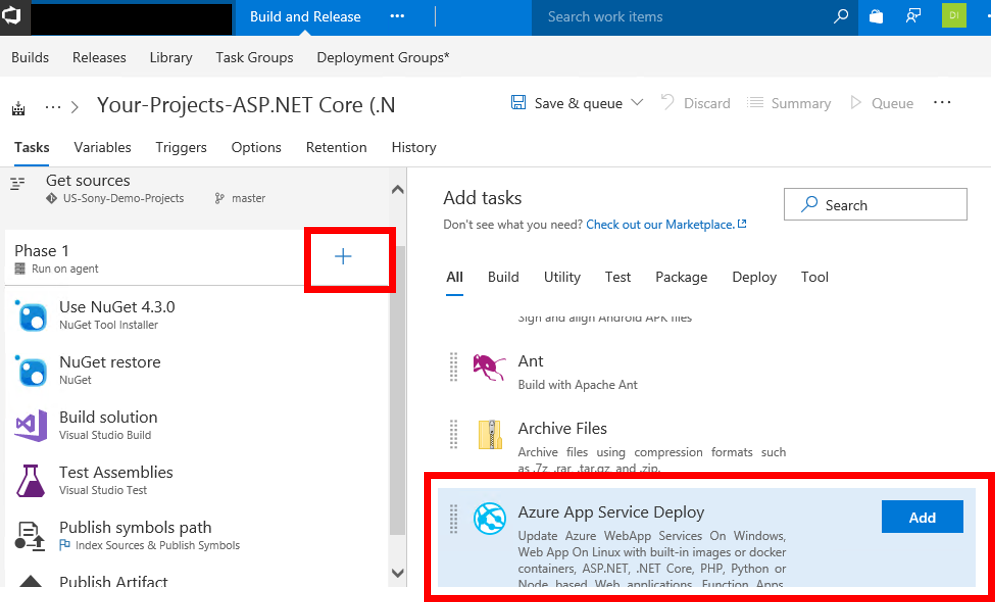
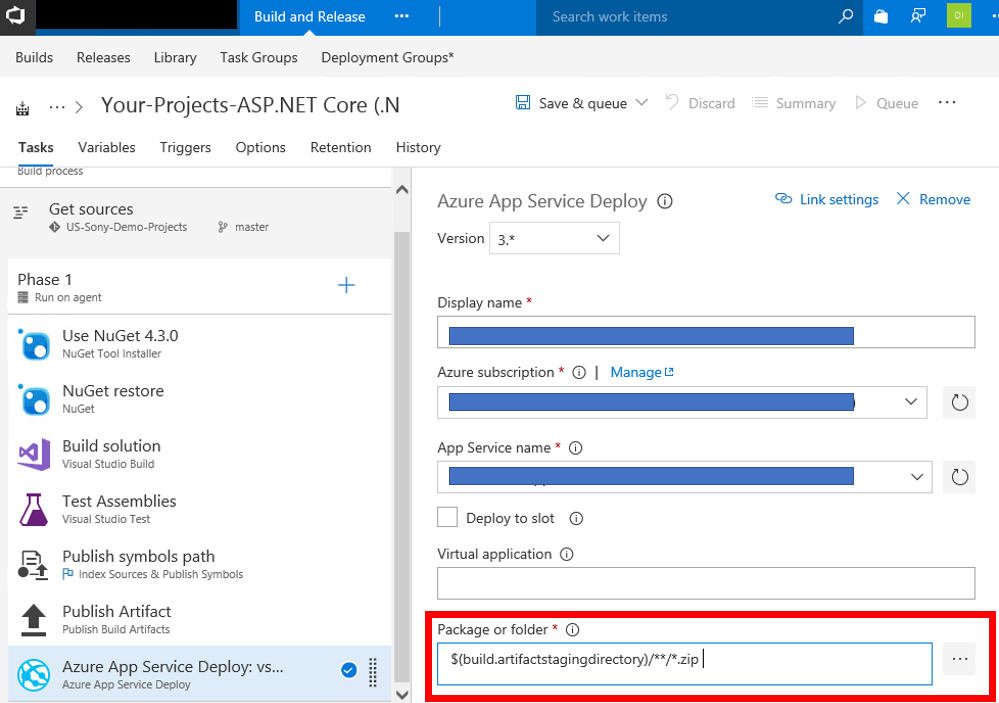
Add "Azure App Service Deploy" task like below.
f:id:waritohutsu:20171031021354p:plain

After adding the task, choose your Azure Functions and change "Package or folder" from "$(System.DefaultWorkingDirectory)/**/*.zip" to "$(build.artifactstagingdirectory)/**/*.zip".
f:id:waritohutsu:20171031021405p:plain

Tips

I got below error when I chose "Hosted" as "Agent queue", because the process failed to build my application. The cause was MSBuild didn't support Azure Functions application right now.

Got connection details for Azure App Service:'xxxxfunctionapp'

Error: No package found with specified pattern

How to create your own Azure Active Directory tenant

$
0
0

You sometimes want to create own tenant when you try to use Azure AD authentication or "School or Work Accounts" independently with your organization Azure AD tenant. Especially, you will really want to create it when you will be in charge of some PoC using Microsoft Azure. You can learn how to create your own Azure Active Directory tenant in this post.

Step by step to create new tenant in Azure portal

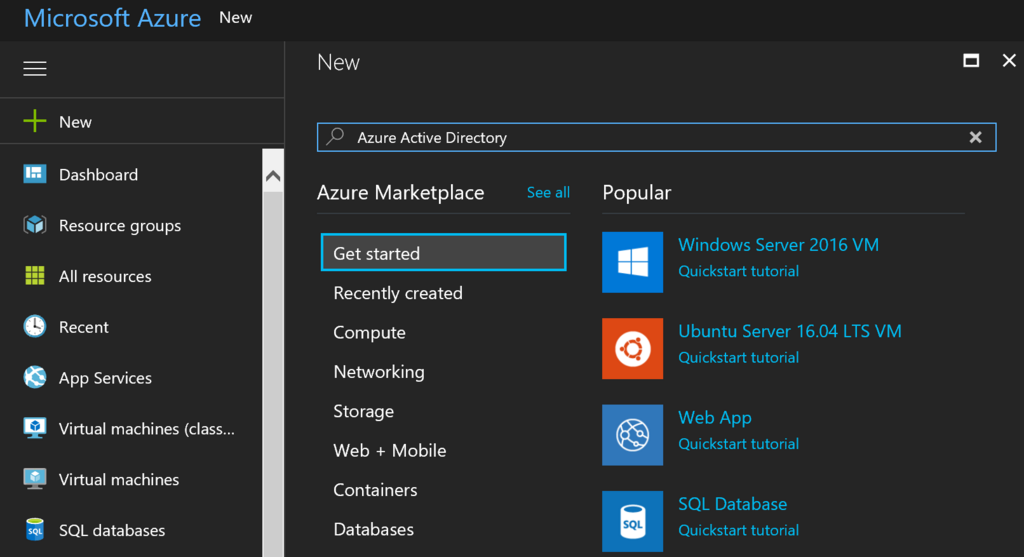
Please click "+ New" button in left side of Azure portal and input "Azure Active Directory" like below.
f:id:waritohutsu:20171229161418p:plain

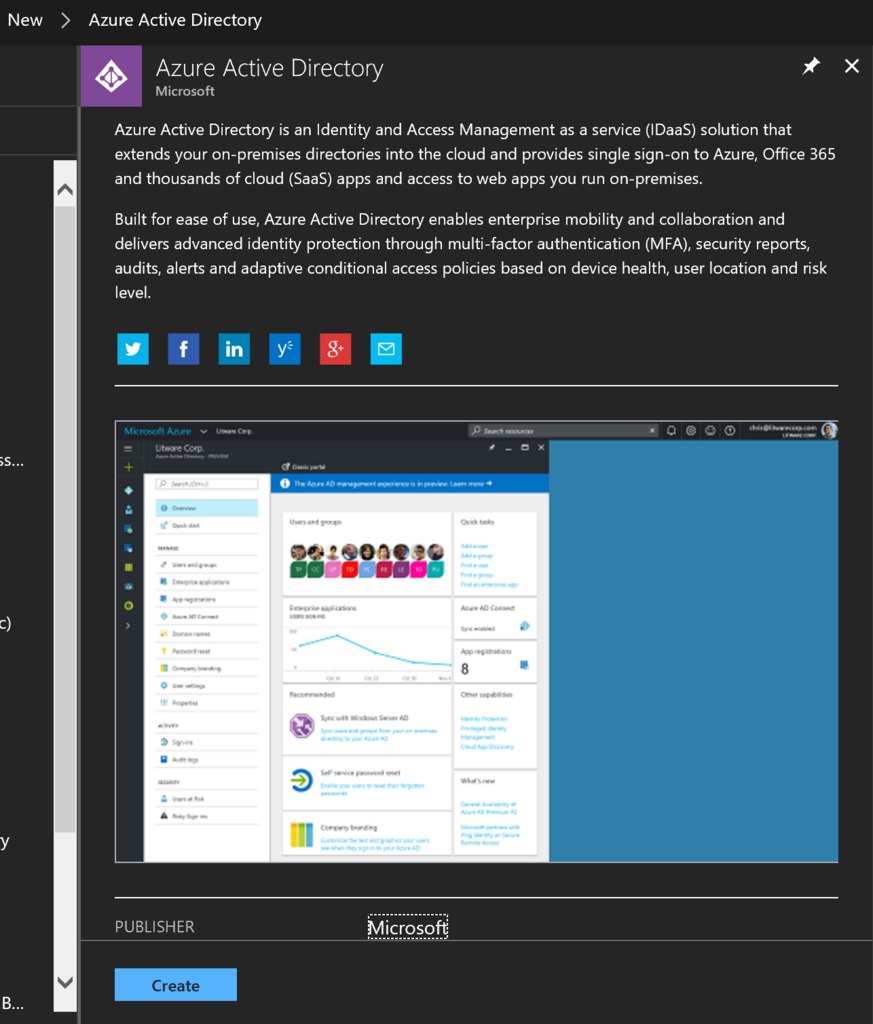
You can find "Azure Active Directory" by Microsoft like below, and please click "Create" button.
f:id:waritohutsu:20171229161529p:plain

Input your organization name and domain name, equal "tenant name", and choose your region.
f:id:waritohutsu:20171229161628p:plain

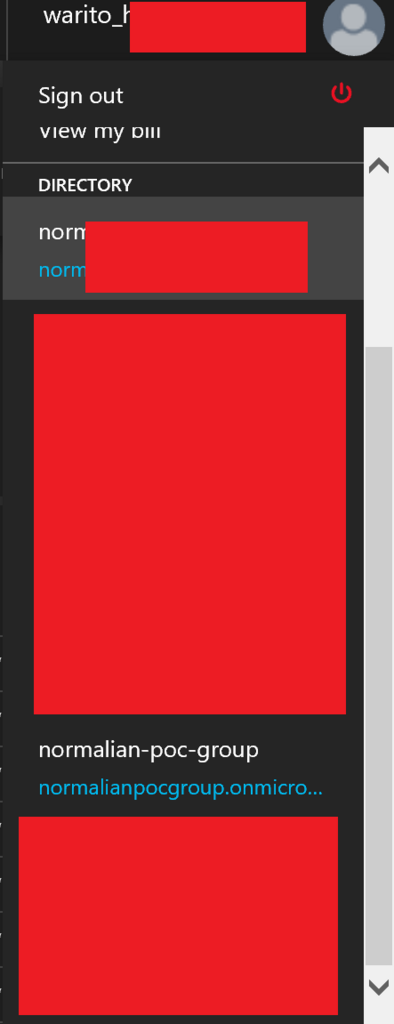
After a few minutes later, you can find your new tenant from upper-right like below.
f:id:waritohutsu:20171229161730p:plain

How to change AAD tenant associated to your subscriptions

$
0
0

You have already known how to create your own AAD tenant, but it sometimes causes some issues. As you know, all Azure subscriptions should be associated to an AAD tenant. You should change the AAD tenant of your subscriptions when you create new AAD tenant. You can learn how to change AAD tenant associated to your subscriptions in this post.

Step by step how to change AAD tenant in Azure portal

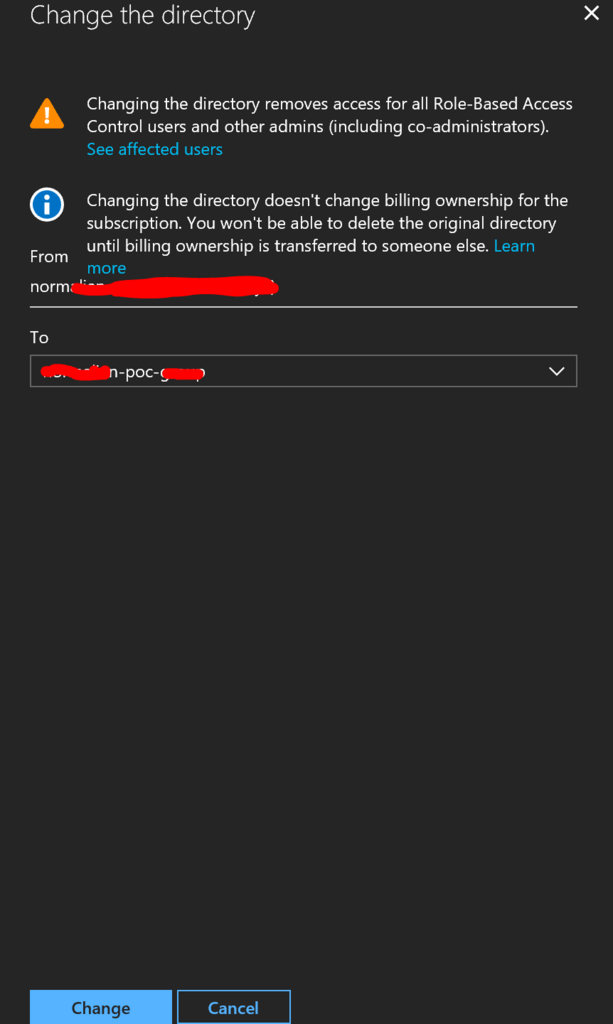
Choose your subscription need to change AAD tenant and click "Change directory" button like below.
f:id:waritohutsu:20171229163802p:plain

Choose your new AAD tenant should be associated your subscription.
f:id:waritohutsu:20171229163910p:plain

You can check its completion with portal notification like below, but it needed a few minutes to reflect into portal in my case. Please wait without hurry.
f:id:waritohutsu:20171229163958p:plain

Enable to access Azure subscriptions across Azure AD tenants

$
0
0

All Azure subscriptions are associated to an Azure AD tenant. As you know, you can use some different Azure AD tenants like below. This sometimes causes some issues, but you can learn how to use these features properly though this post.
f:id:waritohutsu:20171229161730p:plain:w200
Azure AD also manages your "School or Work Account" in your organization. You have to choose account type whether "School or Work Account" or "Microsoft Account"/"Personal Account" when you login Azure. This account types can express simply like below.

  • "Microsoft Account" and "Personal Account" are technically same, and they are managed by Microsoft services. They were called "LIVE ID" in past.
  • "School or Work Account" is managed by your own Azure AD tenant such like "xxxxx.onmicrosoft.com", and you can assign custom domain name for your tenant as "contoso.com" and others.

As far as I have tried, it's easy to access subscriptions across Azure AD tenants using "Microsoft Account". But almost all companies use "School or Work Account" for governance perspective. Because "Microsoft Account"s are managed by Microsoft, so it's difficult to enable or disable their accounts immediately.
It's needed to invite other Azure AD tenant users into your Azure AD tenant when you want to grant other Azure AD tenant users to access your subscriptions associated with your Azure AD tenant.

How to enable to access subscriptions from other Azure AD tenant users

There are two steps to grant your subscriptions to other Azure AD tenant users.

  1. Invite the users into your Azure AD tenant
  2. Assign IAM roles

Invite the users into your Azure AD tenant

Refer Inviting Microsoft Account users to your Azure AD-secured VSTS tenant | siliconvalve or follow below steps.

  1. Login to portal.azure.com
  2. Login with your Global Admin credentials of your AD tenant
  3. Go to Azure Active Directory option on the blade
  4. In the next blade you will find an option of “user setting”
  5. Under “User setting” kindly check the option “admin and users in guest inviter role can invite”
  6. The option “admin and users in guest inviter role can invite” should be yes
  7. After that, go to users and groups in the same blade and click on “all users”
  8. Under all users, you will see the option “New guest user”
  9. After clicking on that, you can invite the user of other AD tenants.
  10. Once the user will accept the invitation, you can give access to the resource under the subscription of your AD tenant.

Quick introduction for portal sites of Microsoft Azure

$
0
0

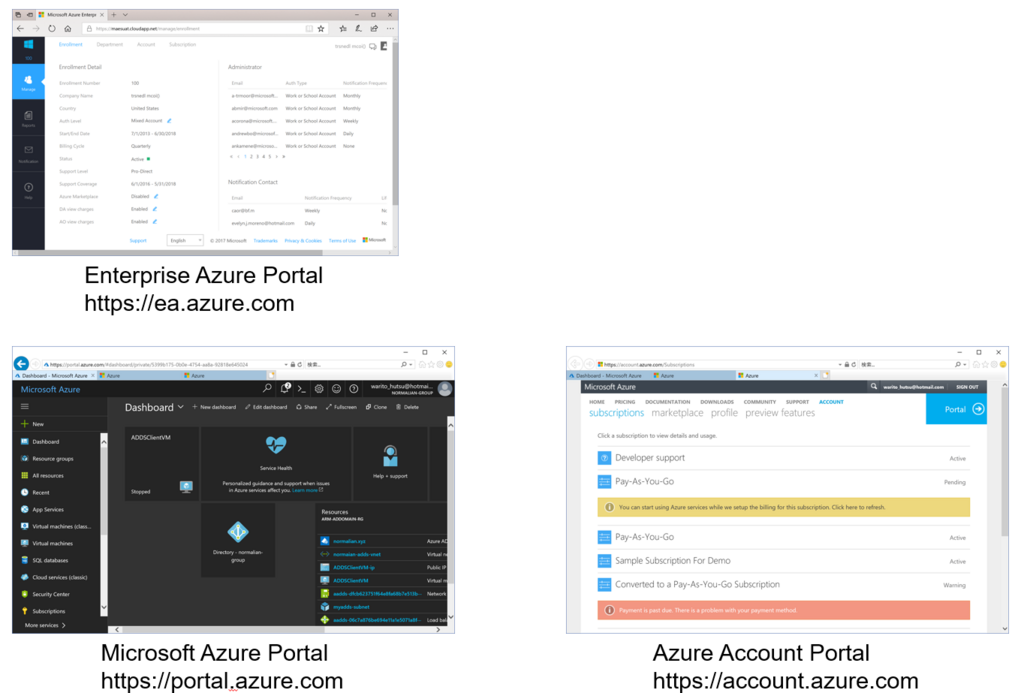
Do you know how many portal sites Microsoft Azure has? Almost all users access only "Microsoft Azure Portal". "Microsoft Azure Portal" manages all Azure resources such like VMs, App Service, SQL Database and others. In addition the portal site, Microsoft Azure also offers two other different portal sites as "Enterprise Azure Portal" and "Azure Account Portal".

  • "Enterprise Azure Portal" manages Azure subscriptions, subscription administrators and billing reports. This portal is mainly used by billing administrator in your company.
  • "Azure Account Portal" manages all Azure resources. This portal is mainly used by developers.
  • "Microsoft Azure Portal" is mainly used for create, transfer, cancel subscriptions. This portal is mainly used by developers.

f:id:waritohutsu:20171231160454p:plain

You don't need to use "Enterprise Azure Portal" if there are no EA contract with Microsoft in your company. Almost all users who use only "Pay-As-You-Go" Azure subscriptions need to use only "Azure Account Portal" and "Microsoft Azure Portal".

Step by step how to setup Service Fabric Explorer on Azure

$
0
0

This article introduce how to setup the environment on Azure. Service Fabric offers Microservices and containerized architecture on Microsoft Azure, and it's secure with multiple certificates for the clusters.

  • Create Key Vault
  • Create Service Fabric
  • Create Certificate and install into your computer
  • Register your certificate into your Service Fabric
  • Access Service Fabric Explorer

Create Key Vault

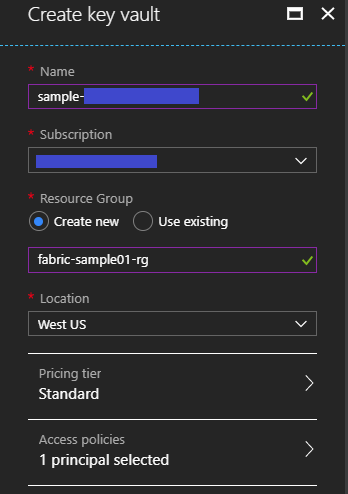
You need to setup a "Key vault" instance like below and it's OK to use existing one if you have already your "Key vault" instance, because Service Fabric depends on Key Vault
f:id:waritohutsu:20180209081056p:plain

Create Service Fabric

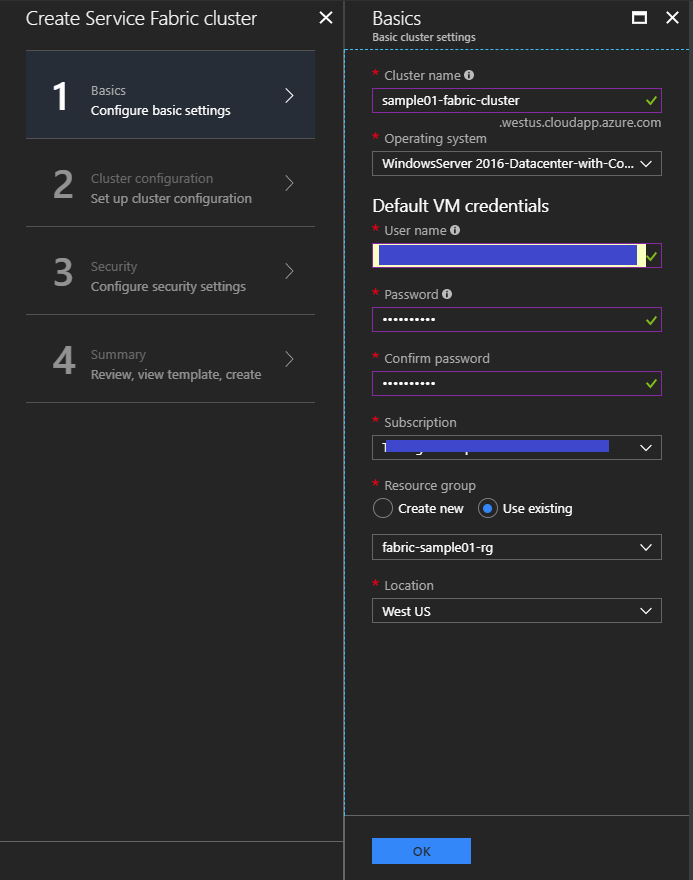
Create your Service Fabric cluster following below steps. You need to choose "Operating system" adjusting to your applications.
f:id:waritohutsu:20180209081308p:plain

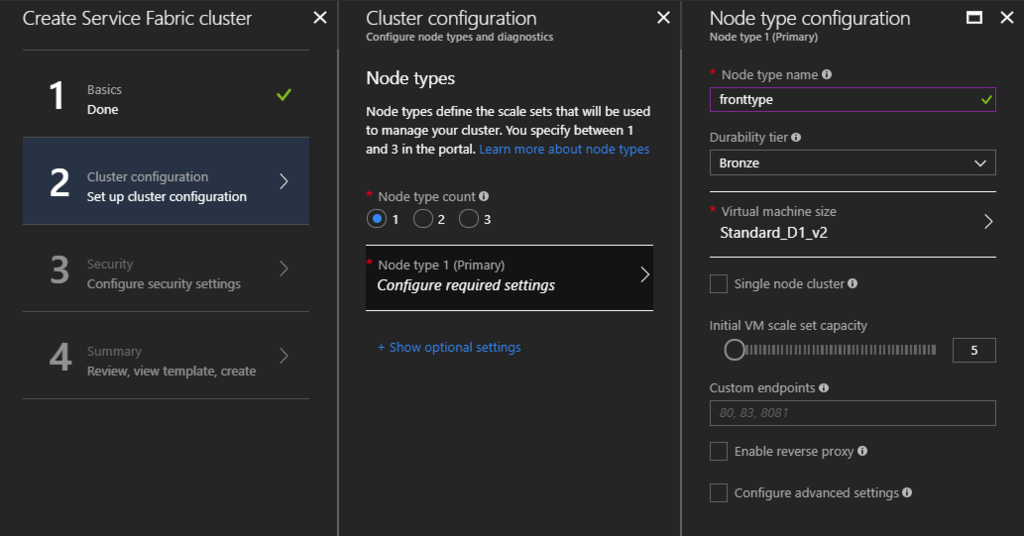
"Node types" is similar with "Cloud Service Roles". VM Scale sets will be created as a number of "Node type count", and specify your "Node type name" and instance type for your "Node Type".
f:id:waritohutsu:20180209081443p:plain

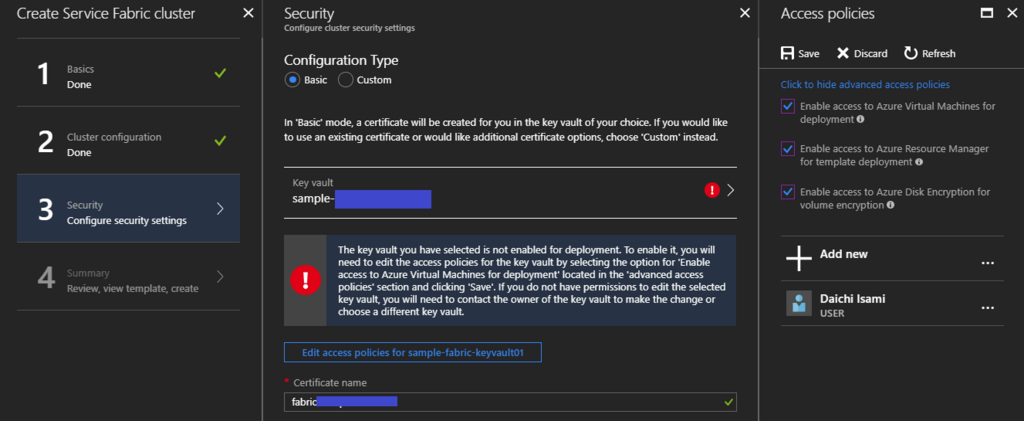
Setup up your cluster security. Please note "Click to hide advanced access policies" at first, and add "Enable access ..." as your Access policies on your Key Vault instance, because it's mandatory to setup. Input your "Certificate name" for your internal cluster communication.
f:id:waritohutsu:20180209081534p:plain

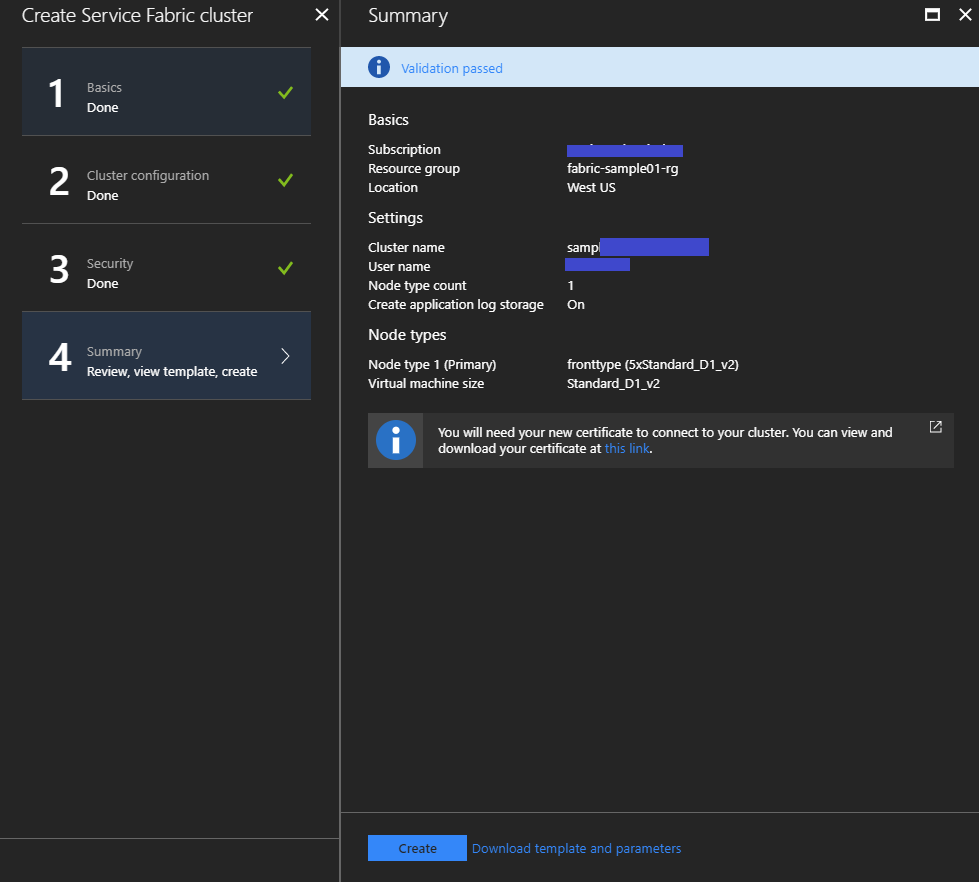
Verify your cluster info and execute to create it.
f:id:waritohutsu:20180209081803p:plain

Create Certificate and install into your computer

You need to create and register new certificate to communicate between your client machine and your cluster. At first, execute below command to create new certificate.

# I tried "C:\Program Files (x86)\Windows Kits\10\bin\10.0.16299.0\x64\makecert.exe", but its path depends on your computer platfrom
makecert -r -pe -a sha1 -n "CN=Service Fabric Sample 01" -ss my -len 2048 -sp "Microsoft Enhanced RSA and AES Cryptographic Provider" -sy 24 C:\temp\ServiceFabricSample01.cer 

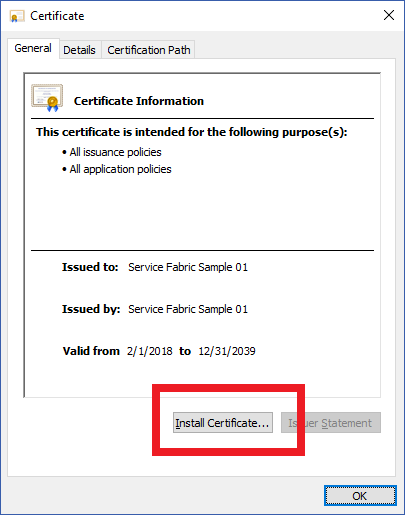
After creating your certificate, just double click it and install certificate into your compute with clicking below button.
f:id:waritohutsu:20180209082050p:plain

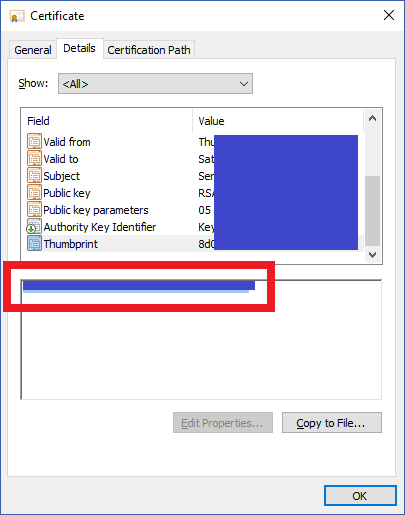
Please pick up and save your thumbprint to register your certificate into your cluster.
f:id:waritohutsu:20180209082112p:plain

Register your certificate into your Service Fabric

Before proceed this step, you need to confirm your cluster status as "Ready". It might wait more than 20 minute. You might get “failed to submit updates for certificate” error if you proceed this step before that.
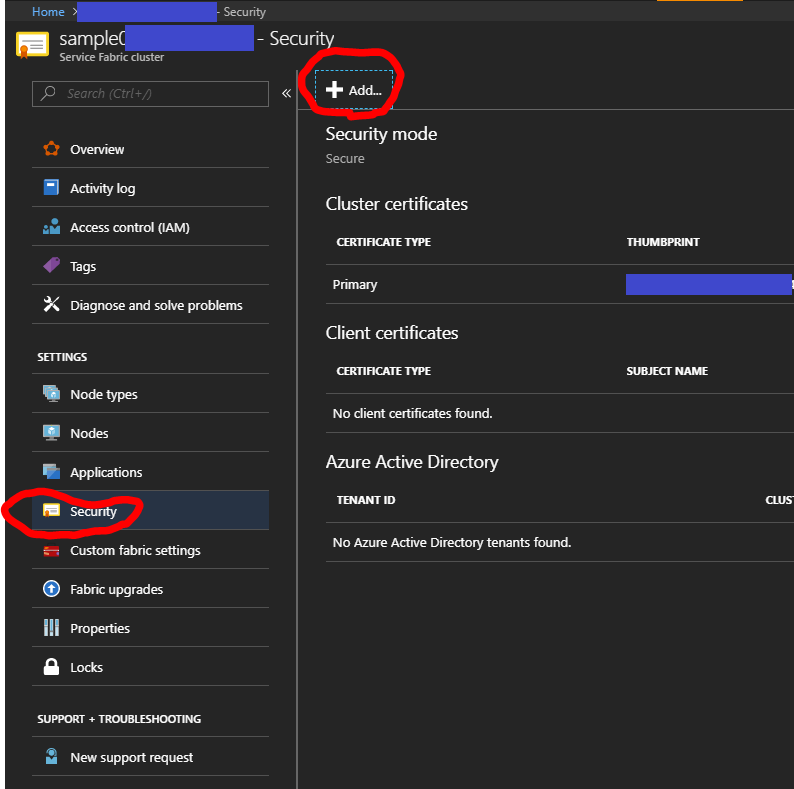
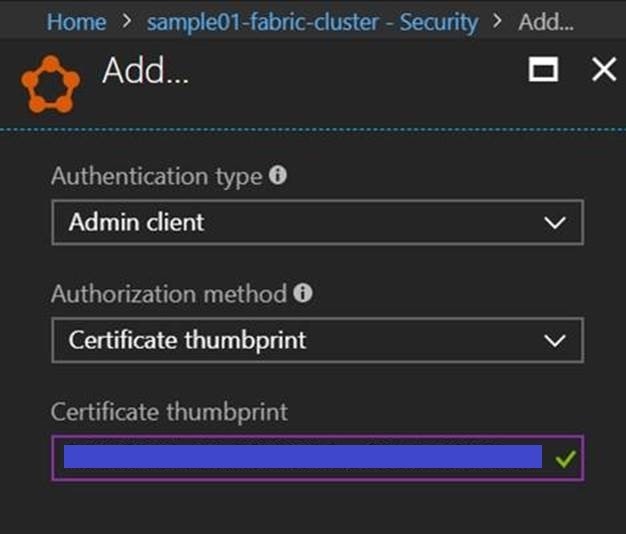
Register your certificate into your Service Fabric cluster in Azure Portal. Choose "Security" tab and "Add.." button.
f:id:waritohutsu:20180209082342p:plain

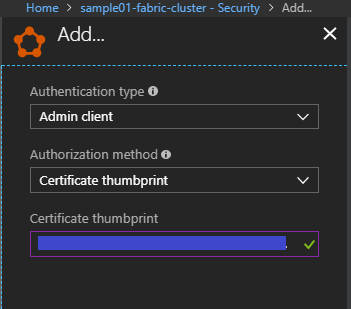
Select "Authentication type" as Admin client to deploy and upgrade your cluster. Input your saved thumbprint into "Certificate thumbprint" and save it.
f:id:waritohutsu:20180209083110p:plain

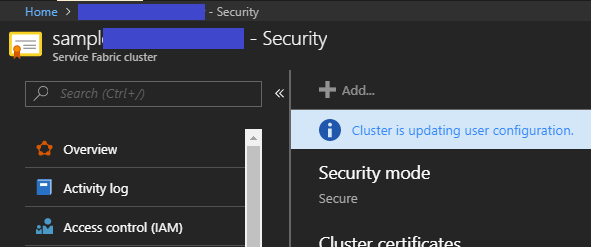
After this, it takes about 30 minutes to complete this step.
f:id:waritohutsu:20180209083121p:plain

Access Service Fabric Explorer

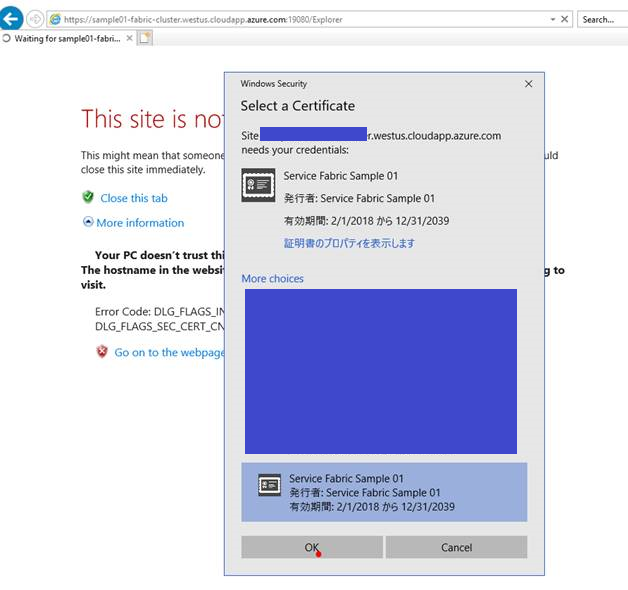
Access Service Fabric Explorer URL like https://"your cluster name"."your region".cloudapp.azure.com:19080/Explorer/index.html#/, and choose proper certificate installed into your compute.
f:id:waritohutsu:20180209083212p:plain

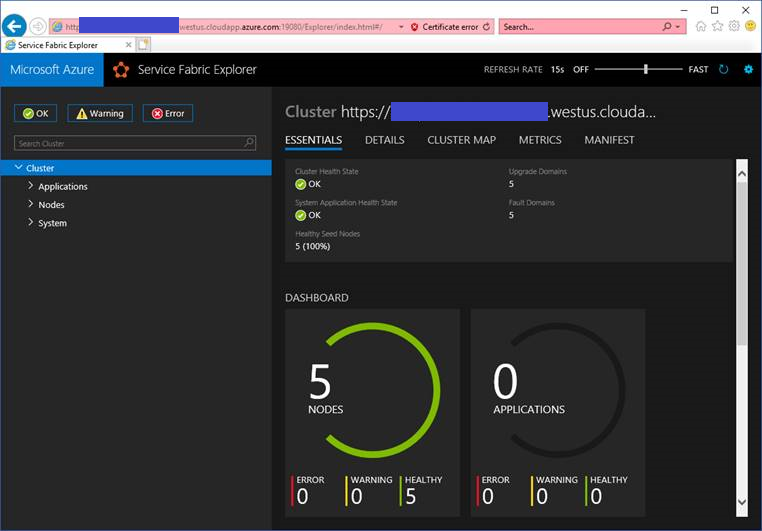
You can watch Service Fabric Explorer on your cluster
f:id:waritohutsu:20180209083302p:plain


Service Fabric deployment tips - Deployment on Azure stops when scripts log "Copying application to image store"

$
0
0

When you try to deploy ASP.NET Core Stateless applications into Service Fabric on Azure in like below environment.

The deployment might stop when scripts log "Copying application to image store" like below.

C:\Users\xxxxxxxx\source\repos\FabricApp01\Web1\bin\Debug\netcoreapp2.0\win7-x64\Web1.dllWeb1 -> C:\Users\xxxxxxxx\source\repos\FabricApp01\Web1\obj\Debug\netcoreapp2.0\win7-x64\PubTmp\Out\FabricApp01 -> C:\Users\xxxxxxxx\source\repos\FabricApp01\FabricApp02\pkg\Debug-------- Package: Project: FabricApp01
succeeded, Time elapsed: 00:00:18.7823627 --------3>Started executing script
'Deploy-FabricApplication.ps1'.3>powershell -NonInteractive -NoProfile
-WindowStyle Hidden -ExecutionPolicy Bypass -Command ".
'C:\Users\xxxxxxxx\source\repos\FabricApp01\FabricApp01\Scripts\Deploy-FabricApplication.ps1'
-ApplicationPackagePath
'C:\Users\xxxxxxxx\source\repos\FabricApp01\FabricApp01\pkg\Debug'
-PublishProfileFile
'C:\Users\xxxxxxxx\source\repos\FabricApp01\FabricApp01\PublishProfiles\Cloud.xml'
-DeployOnly:$false -ApplicationParameter:@{} -UnregisterUnusedApplicationVersionsAfterUpgrade
$false -OverrideUpgradeBehavior 'None' -OverwriteBehavior
'SameAppTypeAndVersion' -SkipPackageValidation:$false -ErrorAction Stop" 3>Copying application to image store.

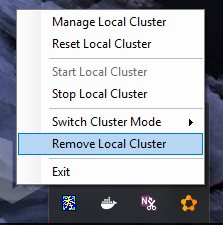
This issue is already known in Copy-ServiceFabricApplicationPackage hangs forever · Issue #813 · Azure/service-fabric-issues · GitHub. You need to remove your "Local Cluster" when you deploy your applications into your cluster on Azure.
f:id:waritohutsu:20180209092112p:plain

After removing Local Cluster, you can deploy your applications into Service Fabric on Azure.

Service Fabric deployment tips - always return “Failed to submit updates for certificate" on Azure Portal

$
0
0

As you know, Service Fabric uses some various certificates to manage their clusters.

  • Cluster certificate : Client to node security, e.g. Management Endpoints such as Service Fabric Explorer or PowerShell
  • Server certificate: Server (node) to clients, and server (node) to a server (node).
  • Client certificates : Role-Based Access Control (RBAC) – used to limit access to certain cluster operations for different groups of users, e.g. Admin vs User.

You need to register your own certificate into Azure Portal for browsing your cluster and deploy your applications using Visual Studio, and you can register your certificate with Azure Portal like below.
f:id:waritohutsu:20180210091235j:plain

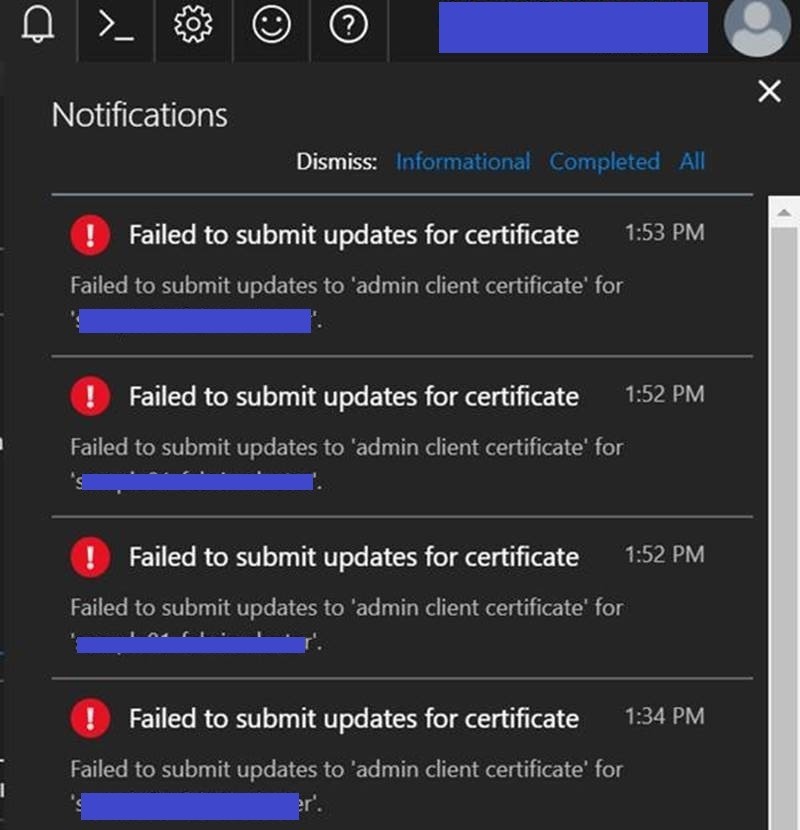
Almost all cases above step will work well, but there is possibility to get below error “Failed to submit updates for certificate" on Azure Portal.
f:id:waritohutsu:20180210091334j:plain

This issues is caused by wrong version API on Azure Portal. Please use below PowerShell command to avoid the error.

Login-AzureRmAccount
Add-AzureRmServiceFabricClientCertificate -ResourceGroupName "your resource group name" -Name "your service fabric cluster name" -Thumbprint "your thumbprint" -Admin

ロサンゼルス生活日誌 ~その5 米国の医療制度~

$
0
0

すっかりご無沙汰で恐縮ですが、先日ついに米国で歯医者に行かねばならない状態になったので色々と分かった結果を共有します。良く言われる「米国の医療費は高い」と言われるお話しですが、具体的にどのくらい高いのか?どういう手続きになるのか?ということがある程度でも伝われば幸いです。

健康保険ってあるの?

まずは日本が提供する素晴らしい社会保障制度である健康保険制度ですが、私が米国に来た際に最初に聞いたのが「健康保険制度に相当する制度は米国にあるのか?」でした。結果から言うと健康保険相当の制度は無く、その当時に質問した相手が外人同僚だったこともあり理解できる的を得た回答をもらえなかった記憶があります。

相当する制度がない代わりに米国では HSA(Heath Saving Account)と呼ばれる口座に自身の医療費を積み立てますが、給与天引き等で積み立てる場合は所得税控除等のメリットがあります。更に所属する会社によっては「月の給与から $100 HSA に入れるなら会社が $50 分補助してやる」というような仕組みがある場合もあります。こちらの口座利用専用のデビットカードが発行されるので、病院等に行った際に利用できます*1

上記の HSA に加えて民間医療保険に入るのが一般的なようです。医療保険もまた仕組みが違っており、日本では原則的に「患者が医療費の3割を負担」というルール*2となりますが、何をどれだけ負担してくれるかが各保険会社によって異なります。具体的には「レントゲン取るのは全部保証してやるけど、クラウン作ったりするのは 50% までしか出さないぜ」という様なイメージです。

更にこの医療保険における日米での大きな差として、米国で自分が購入した医療保険団体に加盟している医療団体か否かで保険の補償額が異なるところです。具体的には「購入した医療保険団体に所属している病院Aでは 100% 保険でカバーしてくれる」が「購入した医療保険団体に所属していない病院Bでは保険のカバーが 0%」ということが発生する可能性があります。このため、事前に病院と購入した医療保険への加盟確認は必須となります。

日本と米国で具体的にどう違うのか?

上記をまとめると以下の様なイメージです。日本側の医療制度は割かし何にも考えなくとも「とりあえず健康保険に入っとけばいいや」なのに対し、米国側は考慮点が色々とあることが分かります。

日本米国
積み立て or 掛け捨て健康保険で掛け捨て制度Health Saving Account への積み立て制度
対象の医療機関健康保険でどの病院でも原則3割負担医療保険団体に加盟しているか否かで値段が異なる
対象の医療処置健康保険で外科・内科・歯医者どれでも原則3割負担医療保険次第で異なる

歯医者に行った際に具体的にかかったお金は?

渡米前にすべて歯の治療を完遂していたのですが、ガムを食べている際に歯のクラウンが取れてしまったのでこちらの治療をお願いしました。この際に聞いた情報は以下になります。

  • クラウンを作りなおす場合、補償前金額は $1,000 程度が目安でそこから保険補償がどこまで効くか次第で異なる
  • 今回は取れたクラウンを持っておりすぐに歯医者に来てくれたので接着のみの処置であり $120 程度
  • 保険会社との交渉後に金額が確定するが $25 程度ではないか

クランとの接着だけの処置ですが、大体3000円弱といったところでしょうか。日本なら肌感的に1,000円ちょっとなイメージがあるのでやはり医療費は高めな印象です。今回は歯医者のお話だけですが、ご参考になれば。

*1:どうもこの辺り駐在員の方は医療費が会社もちだったりと制度が違うようです

*2:高齢者だと2割負担だったり、幼児は自治体によって無料だったり、高額医療とかは置いときます

How to setup your CentOS VMs as VSTS Private Agent

$
0
0

VSTS is really powerful tool and you can use compute resources from cloud, but you will sometimes want to use your own custom libraries or executable files in you build processes. You can use Private Agent for such cases. In this post,
I will setup private agent with CentOSVM, but please note VSTS offers some platforms agents like below and CentOS isn't supported right now.

Step by Step to setup Private Agent

Follow below three sections.

  1. Create new pool in VSTSportal
  2. Create new “Personal access tokens” in VSTSportal
  3. Setup agent in your VM

1. Create new pool in VSTSportal

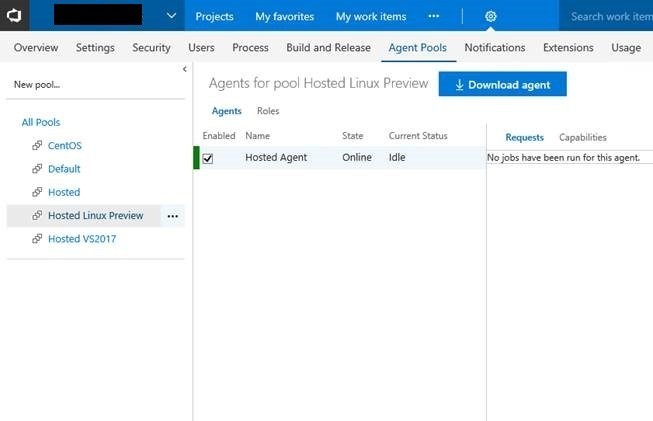
Go to “Agent Pools” tab in your VSTS and click “New pool…”.
f:id:waritohutsu:20180216004316j:plain

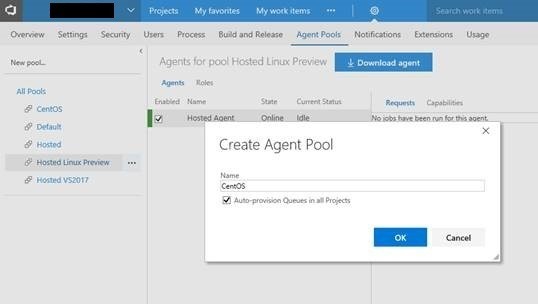
Input Agent pool name as you need. I recommend to name for each uses.
f:id:waritohutsu:20180216004328j:plain

Download agent package from your agents pool like below.
f:id:waritohutsu:20180216004337j:plain

2. Create new “Personal access tokens” in VSTSportal

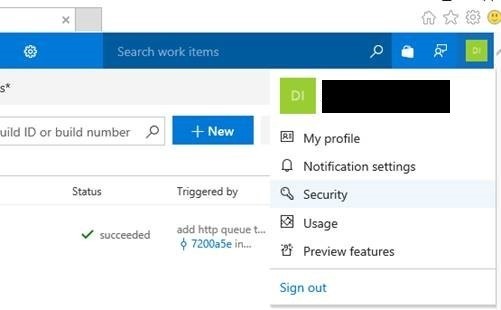
Choose “Security” from your account setting.
f:id:waritohutsu:20180216004343j:plain

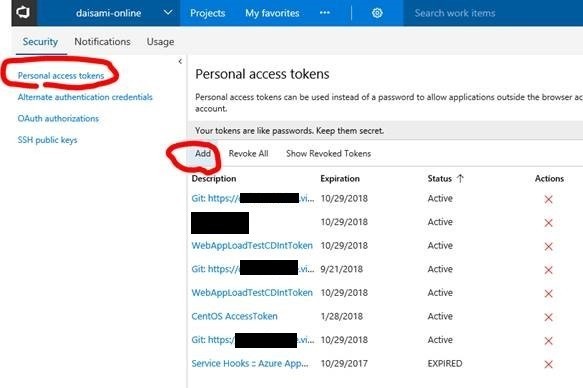
Create new “Personal access tokens”.
f:id:waritohutsu:20180216004352j:plain

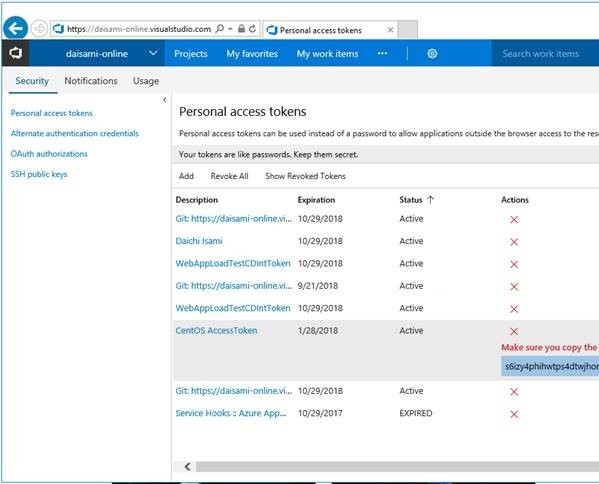
Keep access token from VSTSportal. The value never show without at the time.
f:id:waritohutsu:20180216004407j:plain

3. Setup agent in your VM

Transfer agent package into your VM and extract data. I executed below commands.

# be root
sudo su -

# I have to install below pakcages into your CentOS VM, because VSTS agent offers RedHat but not CentOS
yum install centos-release-dotnet.noarch
yum install rh-dotnetcore11-dotnetcore.x86_64

# setup agent
mkdir /opt/agent
mv vsts-agent-rhel.7.2-x64-2.123.0.tar.gz /opt/agent
tar zxvf vsts-agent-rhel.7.2-x64-2.123.0.tar.gz
chown -R azureuser /opt/agent/

cd /opt/agent/
./config.sh
./run.sh

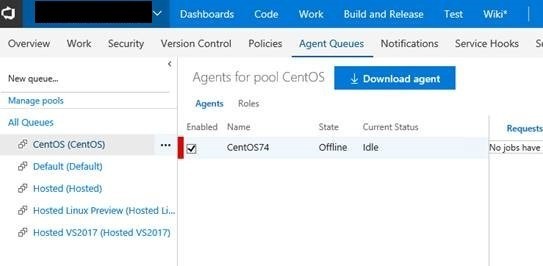
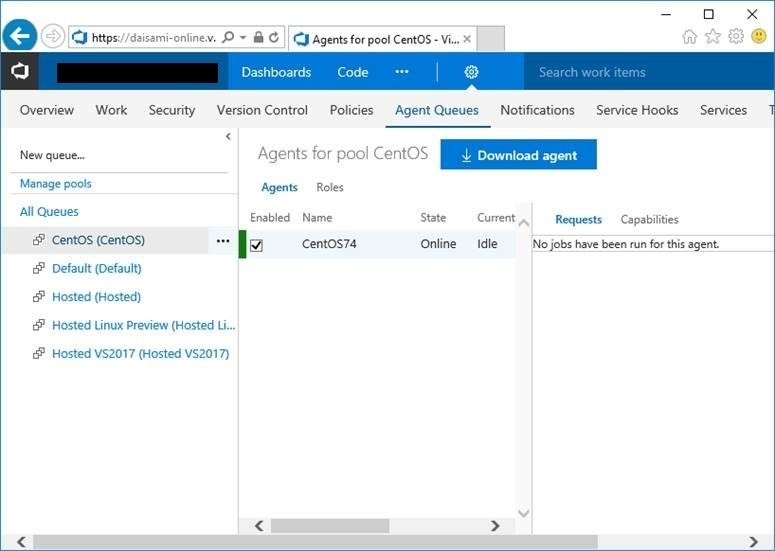
Your instance will be registered after “./config.sh” execution. You have to execute “./run.sh” to maintain “Online” status.
f:id:waritohutsu:20180216004433j:plain

How to setup Service Fabric connections on VSTS

$
0
0

Visual Studio Team Service, VSTS, is really powerful tool to achieve your CI/CD pipeline. Before setting up Service Fabric connections, you need to create a *.pfx file to register as "Client Admin" certificate into your Service Fabric cluster. Please refer
Step by step how to setup Service Fabric Explorer on Azure - normalian blog if you have registered no *.pfx files as "Admin Client" certificates yet.

Create BASE64 string from your *.pfx file

Create BASE64 string for registering on VSTSportal to setup Service Fabric cluster connections.

PS C:\Users\normalian> [System.Convert]::ToBase64String([System.IO.File]::ReadAllBytes("D:\temp\yourpfxfile.pfx"))
MIIJ+gIBAzCCCbYGCSqGSIb3DQEHAaCCCacEggmjMIIJnzCCBgAGCSqGSIb3DQEHAaCCBfEEggXtMIIF6TCCBeUGCyqGSIb3DQEMCgECoIIE9jCCBPIwHAYKKoZIh
"omission"
OBBRKwq7BWPo3ZdSGscBgAYKIhP8yGwICB9A=

Pick up and save the BASE64 string.

Setup on VSTSportal

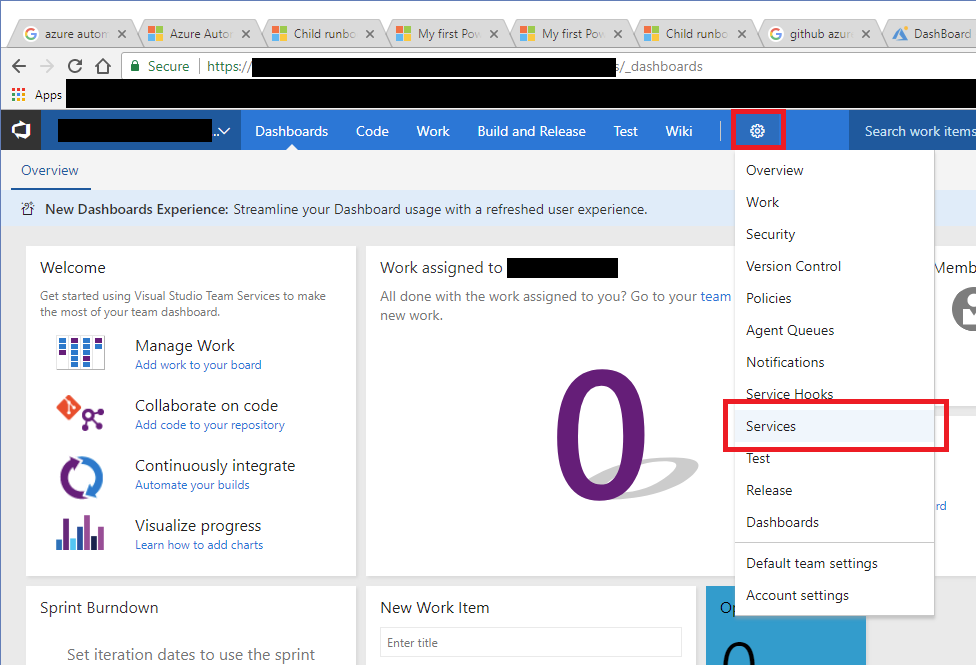
Go to your VSTS project page and choose right side icon and "Services" item like below.
f:id:waritohutsu:20180216091954p:plain

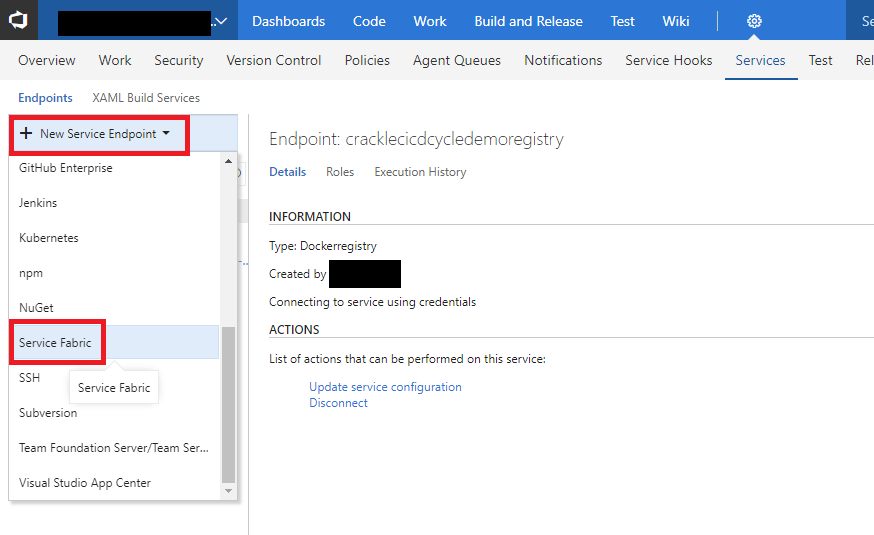
Click "New Service Endpoint" and choose "Service Fabric" like below.
f:id:waritohutsu:20180216092050p:plain

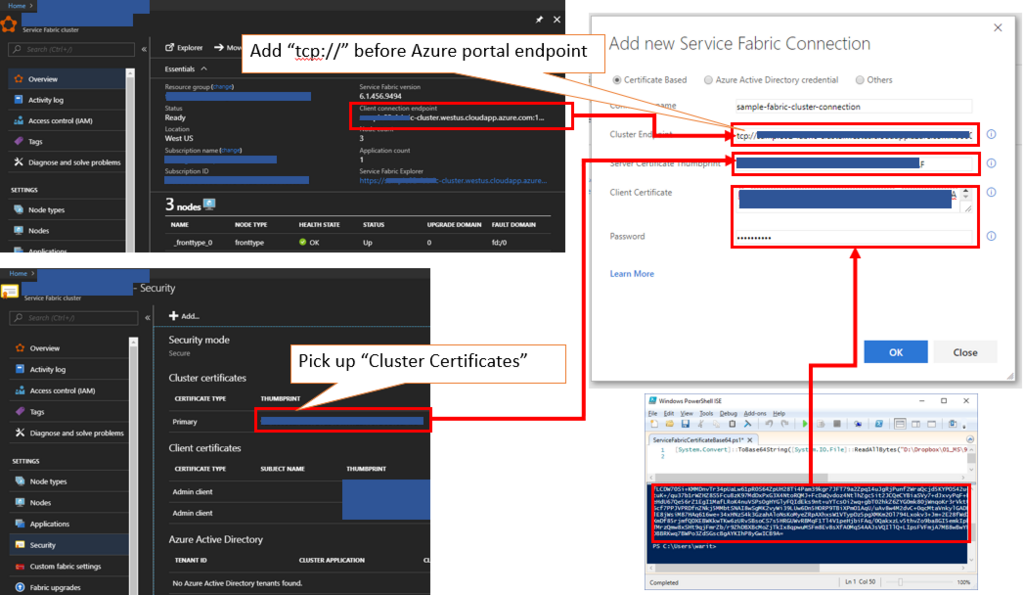
Input your info into "Add new Service Fabric Connection" wizard like below. Input *.pfx file password into "Password" section.
f:id:waritohutsu:20180216093140p:plain

Now, you can use your Service Fabric cluster in your VSTS project.

Viewing all 237 articles
Browse latest View live